


- The new VoSeq is here
- New features
- Quick install of VoSeq using Docker (Recommended)
- Installation instructions
- Test database for development
- Start a test server
- Migrate VoSeq database
- Set-up a publicly available web server
- Administrate the server
- Deployment of VoSeq
- Upgrade VoSeq's software
- Database backups
We have rebuilt VoSeq from scratch. We decided to migrate from PHP to Python by using the framework Django. We also moved from MySQL to PostgreSQL.
You can still download the old VoSeq v1.7.4 from here. But be aware that we will not be doing maintenance of that code.
More details about the migration can be found in our discussion list.
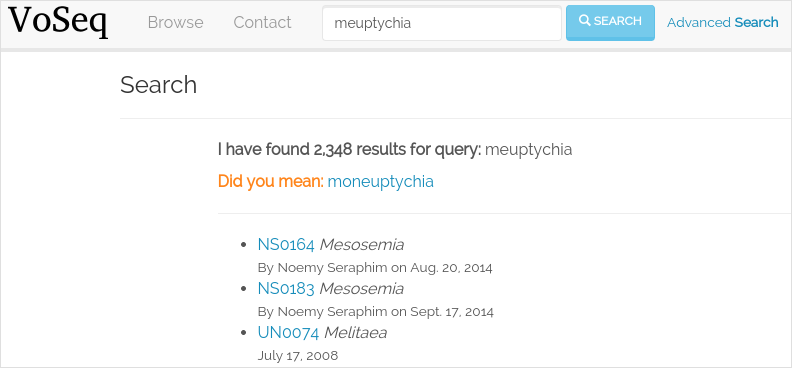
Query suggestions for simple taxon searches:
Docker allows setting up virtual machines that automatically installs all dependencies and sets up configuration from a recipe contained in the Docker file.
You need Docker installed in your computer or server.
Assuming that you have installed [GIT](https://git-scm.com/downloads), you need to get a copy of VoSeq into your hard-disk. From a console or terminal type the following command:
git clone https://github.com/VoSeq/VoSeq.gitJust go to the VoSeq's directory:
cd VoSeqAnd execute the following command:
./run/scripts/docker_upgradeOnce the process has finished, you will have a new Ubuntu virtual machine with VoSeq installed. To enter this virtual machine:
./run/scripts/docker_compose exec app bashTo exit the virtual machine:
exitImport a test database into your Voseq installation: (1) enter the virtual machine, (2) execute the command to import the database:
./run/scripts/docker_compose exec app bash
python manage.py import_test_db
Set up an administrator account by using the command make admin (see Administrate the server).
In your host system, open your brower and load this URL: localhost:8081 to see your fresh installation of VoSeq.
These instructions assume that your libraries are up to date and that you have Python, pip and virtual environments installed. Python3 is recommended.
Step 1: get VoSeq. Clone or download VoSeq to your preferred directory. We recommend cloning VoSeq as it will be easier to do software upgrades with on single command:
- To clone VoSeq:
git clone https://github.com/VoSeq/VoSeq.git- To upgrade VoSeq to newer versions:
cd /path/to/VoSeq
git pull origin master
Step 2: create a virtual environment and install dependencies. To ensure that all the dependencies will work without conflict, it is best to install them within a virtual environment.
mkvirtualenv -p /usr/bin/python3 voseq_environment
cd /path/to/VoSeq
workon voseq_environment
pip install -r requirements/testing.txt
Exit the virtual environment for now to continue from the shell:
deactivateStep 3: download and install elasticsearch. Elasticsearch is needed to enable the advanced search tool and auto suggestions. By default, the elasticsearch is enabled. You can disable it in the config.json file by using the key:value "ELASTICSEARCH": "false". In such case, only the general search will work.
Use elasticsearch versions 1.7.3 or below. The newer versions 2.0+ currently do not work with VoSeq. For elasticsearch, java needs to be installed. Mac users can download and install elasticsearch from here: http://www.elasticsearch.org/overview/elkdownloads/. In Linux, you can do:
wget https://download.elastic.co/elasticsearch/elasticsearch/elasticsearch-1.5.2.deb
sudo dpkg -i elasticsearch-1.5.2.deb
The bin directory of elasticsearch should be added automatically to your PATH. If not, add the following line to your .profile (Linux) or .bash_profile (macOSX) file:
export PATH="$PATH:/path/to/elasticsearch/bin/"Step 4: download, install and configure PostgreSQL. For macOSX users we recommend to do it by downloading the Postgres.app from http://postgresapp.com. Linux users can use apt-get:
sudo apt-get install postgresql postgresql-contrib postgresql-server-dev-9.3Create new role by typing:
createuser --interactiveEnter the psql shell, create a password for this user and create a database for VoSeq:
psql
postgres=# ALTER ROLE postgres WITH PASSWORD 'hu8jmn3';
postgres=# create database voseq;
In macOSX if you are using the Postgres.app, it my be enough to run:
psql
user.name=# CREATE DATABASE voseq;
To exit the psql shell:
\qNext, create a config.json file to keep the database variables:
cd /path/to/Voseq
touch config.json
and write in the following content:
{
"SECRET_KEY": "create_a_secret_key",
"DB_USER": "postgres",
"DB_PASS": "hu8jmn3",
"DB_NAME": "voseq",
"DB_PORT": "5432",
"DB_HOST": "localhost",
"GOOGLE_MAPS_API_KEY": "get_a_google_map_api_key",
"PHOTOS_REPOSITORY": "local",
"ELASTICSEARCH": "false"
}
If you want to host your photos in Flickr you need to change the last parameter of your config.json file to "PHOTOS_REPOSITORY": "flickr".
If you followed the above instructions to the letter, the DB_USER will be "postgres" and the DB_PASS will be "hu8jmn3". It is of recommended to come up with your own password. Instructions to obtain a personal google map browser API key can be found here. You need to create a Google Maps JavaScript API for yourself.
After following these four steps everything should be installed and ready to run. You can now choose to either continue with adding real data migrated from VoSeq 1.x and setting up a publicly available web server, or to first add some test data and test the set-up with a lightweight local server included in the VoSeq package.
You can use test data to populate your PostgreSQL database, useful for development.
First, enter the virtual environment:
workon voseq_environmentThen, create tables for the database:
cd /path/to/Voseq/
make migrations
And import test data for your database:
make test_importIn Linux start elasticsearch as a service, then enter the virtual environment and then start the server:
sudo service elasticsearch start
workon voseq_environment
cd /path/to/Voseq
make serve
In macOSX if you do not have the service command, run elasticsearch in the background and then start the server (*):
elasticsearch -d
cd /path/to/Voseq
make serve
* Note that if you did not check to Start Postgres automatically after login, you first have to go to Applications and start it manually from there by clicking on the Postgres.app. Do this before running the server.
You now have a local webserver running. You can access it by opening this URL in your web browser: http://127.0.0.1:8000/ and try all the buttons to see if they all work! Also notice the debug bar on the right of the screen where you can check if all the configurations are correct.
If you have an existing Voseq 1.x database and want to migrate, you need to dump your MySQL database into a XML file:
cd /path/to/Voseq/
mysqldump --xml voseq_database > dump.xml
Then use our script to migrate all your VoSeq data into a PostGreSQL database.
make migrations
python voseq/manage.py migrate_db --dumpfile=dump.xml --settings=voseq.settings.local
If you have used a prefix for your tables in the old VoSeq, you can optionally input this as an argument for the import script:
python voseq/manage.py migrate_db --dumpfile=dump.xml --prefix=voseq_ --settings=voseq.settings.localIt might issue a warning message:
WARNING:: Could not parse dateCreation properly.
WARNING:: Using empty as date for `time_edited` for code Your_Vocher_Code
It means that the creation time for your voucher was probably empty or similar to 0000-00-00. In that case the date of creation for your voucher will be empty. This will not cause any trouble when running VoSeq. You can safely ignore this message.
Create an index for all the data in your database:
make indexIf you kept your voucher images in your local computer or server then your need to copy them to the correct location in the VoSeq folders:
cp old_voseq/pictures/* VoSeq/voseq/public_interface/static/.Now copy the thumbnails of those images:
cp old_voseq/pictures/thumbnails/* VoSeq/voseq/public_interface/static/.If you have your photos in Flickr, then don't worry you don't need to copy any image file.
To make VoSeq available to multiple users, you will have to set-up a publicly available web server. There are several options to do this, for example using nginx and gunicorn (best performance) or Apache and WSGI (more suitable for hosting multiple websites).
Instructions for how to do this will follow later, but the DigitalOcean tutorials may be of use for now:
Optionally if you want to add items/vouchers to your database interactively, you need to create an administration account. Run the following command and provide the requested information:
make adminCreate a database index for the simple and advanced search functions. This will speed up the data retrieval. You need to run it once as soon as you deploy VoSeq to the server:
make indexYou can setup cronjobs to execute some commands once a day or every 2 hours depending on your needs.
If you remove or add data to VoSeq quite rarely (once a day) you might want to sync the database index with your real data. In this way, new vouchers or sequences will be found by VoSeq's search tools.
To update your database index every 24 hours (at 3:00 am) set the following cronjob:
crontab -eAdd the following line, save and exit:
0 3 * * * /path/to/python /path/to/voseq/manage.py update_index --age=24 --remove --settings=voseq.settings.productionIf you add and delete data several times a day then you might want to update your database index more often. Let us try every three hours:
0 */3 * * * /path/to/python /path/to/voseq/manage.py update_index --age=3 --remove --settings=voseq.settings.productionIf you installed VoSeq using Vagrant, then your cronjob command with the correct paths should be this:
0 */3 * * * /home/vagrant/.virtualenvs/voseq/bin/python /vagrant/voseq/manage.py update_index --settings=voseq.settings.productionUpdate some voucher and gene statistics for your installation of VoSeq:
make statsVoSeq comes with a very simple server software (from Django) that you can use for development and testing purposes. This is the server that starts up when you use the command make serve.
However, the Django developers warn that you will need to do some extra configuration if you want VoSeq to start serving data to the users of your lab from your institution server or commercial servers:
- To serve statics files such as stylesheet and javascript files, you need to choose a folder in your sever to be the root folder for such files. Open the file
VoSeq_repo/voseq/voseq/settings/production.pyand change this line so that it points to your server's folder:
STATIC_ROOT = "/var/www/VoSeq/static/"- Do something similar for being able to serve voucher images from your local server:
MEDIA_ROOT = "/var/www/VoSeq/media/"You might want to leave it with the default values. It should work (# TODO test).
- If you have installed VoSeq in a commercial server and already bought an Internet domain, you need to add it to the
production.pyfile. Change the following line:
ALLOWED_HOSTS = [
    '192.168.0.106',  # Your Domain or IP address
]
If you don't have a domain like (myawesomedomain.com) then just replace the IP address for the one of your server.
Before starting up VoSeq, you will need to gather all the static files in the folders you just specified so they will be available for your users. Use the following command:
python voseq/manage.py collectstatic --settings=voseq.settings.productionThen start VoSeq using the production configuration file:
python voseq/manage.py runserver --settings=voseq.settings.productionIf you cloned the VoSeq software you can easily get the new changes by typing the following commands in a computer terminal or console:
cd /path/to/VoSeq
git pull origin master
Do the updates to the database structure:
workon voseq_environment
make migrations
Rebuild the index and start the test server:
make index
make serveYou might want to do periodical backups of your VoSeq database. You can follow these instrucctions for backup data from postgreSQL databases: https://wiki.postgresql.org/wiki/Automated_Backup_on_Linux
VoSeq is able to host all the specimen photos in Flickr. If you have a free account you can host up to 200 photos. The Pro account allows you hosting unlimited number of photos for a yearly fee (25 USD).
You need to get API keys from Flickr and place them in the config.json configuration file of VoSeq:
- Create and account in Flickr (if you don't own one already)
- Follow the instructions to get an API key and Secret key.
- After submitting you will get your Key and Secret. Write down those keys.
Using a text editor software, edit the file
config.jsonby copying your keys in it.- For example [these are not real keys and will not work if you use them]:
"FLICKR_API_KEY": "2d7f59f9aaa2d5c0a2782d7f5d9083a6",
"FLICKR_API_SECRET": "ef0def0f3d5f3f15f1"
- Save and exit.
Thus, every picture that you upload into your VoSeq installation will be uploaded into your Flickr account. It is necessary to get a flickr token using instructions from the flickrapi <https://stuvel.eu/flickrapi-doc/3-auth.html>.
GenBank fasta files have the optional field Lineages. You can add lineages in the form:
- LINEAGES = {
# superfamily: lineage from domain Eukaryota to suborder Ditrysia "Papilionoidea": "Eukaryota; Metazoa; Ecdysozoa; Arthropoda; Hexapoda; Insecta; Pterygota; Neoptera; Holometabola; Lepidoptera; Glossata; Ditrysia; ", "Hesperioidea": "Eukaryota; Metazoa; Ecdysozoa; Arthropoda; Hexapoda; Insecta; Pterygota; Neoptera; Holometabola; Lepidoptera; Glossata; Ditrysia; ", "Hedyloidea": "Eukaryota; Metazoa; Ecdysozoa; Arthropoda; Hexapoda; Insecta; Pterygota; Neoptera; Holometabola; Lepidoptera; Glossata; Ditrysia; ",
}
by editing the file voseq/create_dataset/utils.py.