The Raspberry PI base Home Brewing Software
Website: www.CraftBeerPI.com
- Flexible Kettle Setup - From simple 1 kettle preserving cooker to 3 kettle RIMS or HERMS setup
- Flexible Brew Step Configuraiton - Configure your own brew steps. From mashing over boiling to whirlpool
- Automatic Timer Control. The Step Control will take care of your brew steps
- Import Recipes from "Kleiner Brauhelfer" -Plan your brew at "Kleiner Brauhelfer" and import the recipes to CraftBeerPI
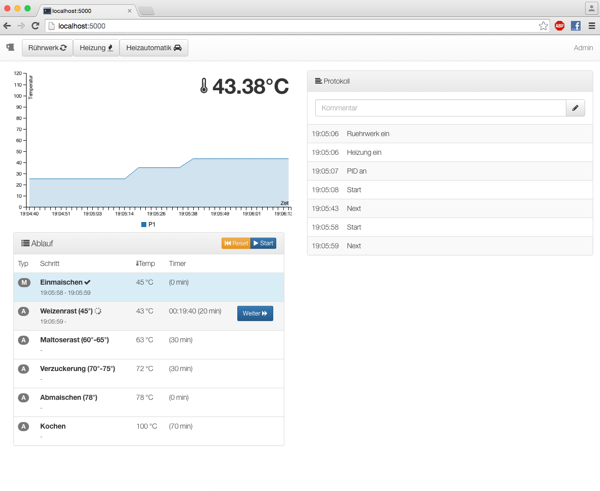
- Heater & Agitator Control - Control heater and agitator via web interface
- PID Controller - The PID Controller takes care to meeting the target temperatue of your kettle
- Temperature Chart - Temprature data is recorded and display as a line chart
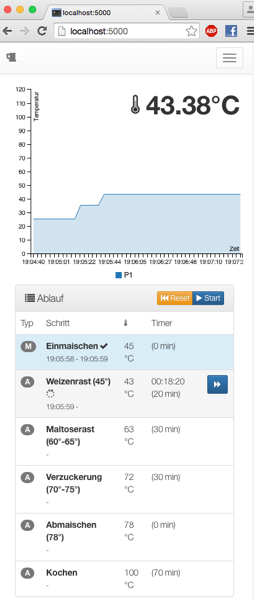
- Mobile Device UI - Control your brew form Smartphone or Tablet
Here you will find the guide to install Raspbina
https://www.raspberrypi.org/help/noobs-setup/
Please select Raspbina as operating system.
Clone CraftBeerPI from GitHub
git clone https://github.com/Manuel83/craftbeerpi.git
Run the installation script
sudo ./install.sh
As part of the installation you will ask if you like to start CraftBeerPI after boot automatically. If you have selected this at the first installation just run the installation again and select 'y' when you are ask if CraftBeerPI should start after boot.
sudo python runserver.py
The App is now avaibale under: http://<server_id>:5000 im Browser aufrufbar.
To import the database from "Kleiner Brauhelfer" select "Steps". There you will find a buttton "Import Kleiner Brauhelfer". Upload the kb_daten.sqlite of Kleiner Brauhelfer.
You will find the sqlite file on your computer at.
Windows: USER_HOME/.kleiner-brauhelfer/kb_daten.sqlite
Mac: USER_HOME/.kleiner-brauhelfer/kb_daten.sqlite
Refresh the "Import Kleiner Brauhelfer" page. Select the brew you want to load. After this you will asked for the MashTun and the Boild kettle of the brew.
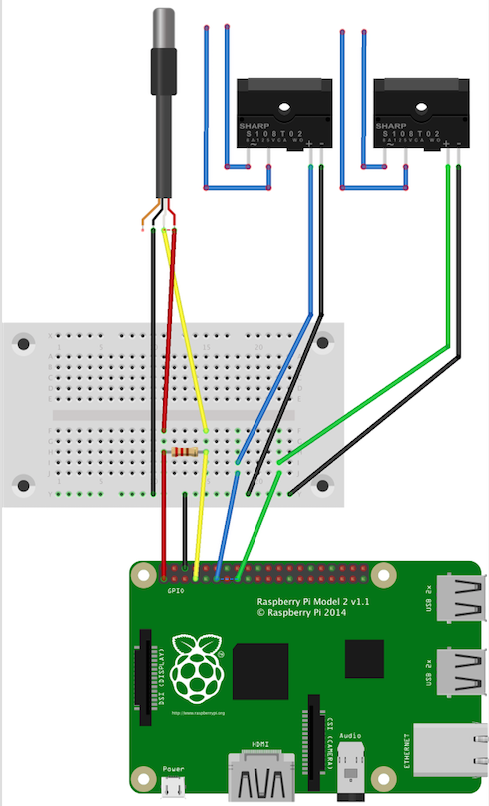
- 1 x 1-wire Temperatursensor DS1820 Waterproof! (ebay)
- Thermowell stainless steel - in gewünschter Länge (sensorshop24.de)
- 1 x 4.7k Ohm Resistor (Pollin.de, Conrad.de, Reichelt.de)
- Jumper Cable (ebay)
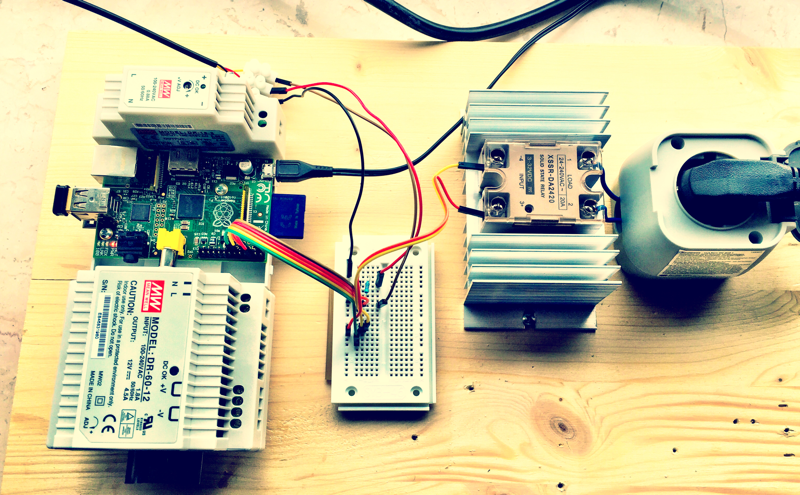
- 2 x Solid-State Relais XURUI (Pollin.de, Conrad.de, Reichelt.de)
- Heatsink KAB-60 (Pollin.de, Conrad.de, Reichelt.de)
- Breadboard SYB-46 (Pollin.de, Conrad.de, Reichelt.de)
- Raspberry Pi (Model A+, 2 Model B) + Power Cable + SDCard (Pollin.de, Conrad.de, Reichelt.de)
The Kiosk Mode requires that CraftBeerPI is start at boot. Make sure that SSH is still enabled otherwise its not possible remove this kiosk mode.
sudo raspi-config
Change your boot to desktop environment. This will start-up the GUI instead of the CLI and automatically will login to user 'pi'.
Install Chromium Browser
sudo apt-get install chromium
Change startup Config
sudo nano /etc/xdg/lxsession/LXDE-pi/autostart
Change the file that it looks like this
@lxpanel --profile LXDE
@pcmanfm --desktop --profile LXDE
@xset s off
@xset -dpms
@xset s noblank
@sed -i 's/"exited_cleanly": false/"exited_cleanly": true/' ~/.config/chromium/Default/Preferences
@chromium --noerrdialogs --kiosk http://localhost:5000 --incognito
Reboot the Raspberry PI
sudo reboot
Out of the box CraftBeerPI is supporting 1-wire thermometers. But integrating a custom thermometer protocol is quite simple.
Just overwrite 3 simple method of the w1_thermometer.py
## This method gets invoked only once during start time.
## This is the right place if the Thermometer needs to be initialize
## during server start.
@brewinit()
def initThermo():
    #Custom Code here
    # no return value

## Define which Thermometers are available
## Return the id/name of available thermometers as string array
def getW1Thermometer():
    ## Custom code here!
    return ["DummySensor1","DummySensor2"]

## This method gets invoked every 5 seconds for each thermometer
## Just read the current value and return it a float
def tempData1Wire(tempSensorId):
    ## Custom code here!
    return 100.00