![]()
If you have experience installing python modules, you should be able to get the application running by following these steps:
- Make sure JACK is installed on your system
- Make sure Python 2.7 is installed on your system
- Install PySide
- Install jackpatch
- Start the JACK server using something like QJackCtl or the command line
- Clone this repository
- In a console, navigate to the source directory using
cd <clone location>/jackpatch/src - Run the application using
./app.py
This is a simple tutorial to cover the basics of using the application. When you start up, you should see an empty document like this:

Like the instructions say, left-clicking or right-clicking anywhere on the window will show you a menu of things to add to your workspace. These are called units, and form the basic elements of a document.

Let's add a unit to get MIDI input from an instrument:

There's nothing inside the unit yet because no instruments have been plugged in (or possibly they have not been connected to JACK). At the top left of the unit you can see a grip that allows you to drag it around, and at the top right is an X button in case you want to delete it. Let's plug in a QuNEXUS and see what happens.

As you can see, I've also added a sampled instrument by clicking on the workspace, selecting Sampler Instrument..., and choosing a file. The name is kind of long, but the neat thing is that almost any text you see in the interface can be edited to say whatever you want, and your edits will be remembered. I'm going to change it to just "tuba" for brevity:

Okay, so now we have an input and a synthesizer, but nothing is happening when we play. That's because they need to be connected together. The little stubs on the sides of the units are called ports, and they work kind of like the plug jacks on a physical piece of equipment. Ports on the left side of a unit are inputs, ports on the right are outputs. Diamond-shaped ones are MIDI ports, circular ones are audio ports. If there is one "wire" at the base of the port, it's mono, and if there are two it's stereo. To connect two ports, you just drag from one to the other:

If you want to disconnect, simply grab the wire and drag on it to pull it out and then let go, just like you would with a physical patch cable. You can also click it and press delete on your keyboard, or right-click it and select Delete from the context menu.
Okay, but there's still no sound! That's because the sampler isn't automatically connected to any outputs, since you might want to route its output through some effects or something like that. To connect it directly to the output, we can click on the workspace and add an Audio Output unit, then connect the port on the right side of the sampler to that:

Notice the doubled line indicating that the sampler output is in stereo. You can connect stereo and mono ports and JACKDAW will try to do the right thing, either mixing stereo down to mono or duplicating the mono channel onto each stereo channel. At any rate, we should now be able to hear some sound when we hit the keys. If not, make sure your volume is up and you're playing in an octave that the sampler instrument actually supports.
Another important concept in JACKDAW is that it has hierarchical context menus. Notice how the tuba is inside the sampler unit, which is itself inside the workspace. If you right-click it, you'll see menu entries for each level of this hierarchy. That way you don't need to be so careful exactly where you right-click; as long as the mouse is inside an element, you should get a menu for it. For example, many elements can be given a color to make them stand out in complex documents. Here's the color menu for a unit:


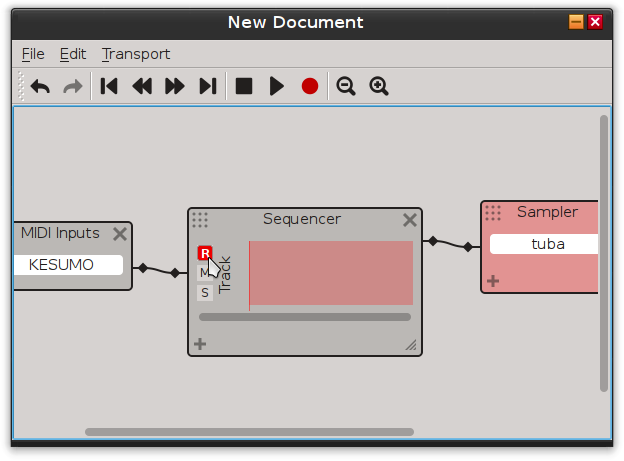
So that's a basic setup for fooling around or playing live, but you can also record what you play, edit it, and play it back. To do all that, you'll need a Sequencer unit.

As you can see, we've connected the sequencer unit in between the MIDI instrument and the sampler. The sequencer has more controls than the other units. The main empty area of the unit is a track, which has its own inputs and outputs and works a lot like a track on a 4-track tape recorder (if you're old enough to have used those). The vertical red line is called the transport and is kind of like the tape head on a 4-track, marking a specific time where recording and playback will happen. On the bottom left is a + button which allows you to add more tracks (unlike the 4-track you get as many as you want!), and the bottom right has a grip that allows you to make the sequencer wider or narrower as needed. Below the track is a scrollbar that lets you navigate through time. The three buttons to the left of each track allow you to aRm, Mute, or Solo the track. Arming the track opens it up for recording. If the track isn't armed, nothing is going to be written onto it even if an instrument is connected. Muting a track stops it from playing, and soloing it stops other tracks from playing so you can hear it alone.
At this point, you won't hear anything you play. That's because the track needs to be armed to start previewing what you're playing:
Notice how the background of the track changes to red, reminding you that it's ready for recording, and you should hear something when you play. This is a good time to practice what you're going to record. When you're ready, click the big red circle on the toolbar to actually start recording. Click it again to stop. Now you should have a box with some notes in it, which is called a block, and is the basic container for a specific musical phrase.

You can select and drag almost anything here: the block itself, the ends of the block, the notes. You can also use the arrow keys to move things around (hold shift to move in bigger jumps), and the delete or backspace keys to delete things. The musical repeat sign (two vertical lines with two dots to the left), can be used to control when the phrase repeats, as in the drum part above.
You might notice a couple things that are different from other DAWs here...