~~ Your Personal EXIF-based Photo, Video and Audio Assistant ~~
*** Get a sample chapter from my book, Photo Archiving for Nerds ***


Getting started takes just a few minutes.
Elodie relies on the great ExifTool library by Phil Harvey. You'll need to install it for your platform.
Some features for video files will only work with newer versions of ExifTool and have been tested on version 10.20 or higher. Check your version by typing exiftool -ver and see the manual installation instructions for ExifTool if needed.
# OSX (uses homebrew, http://brew.sh/)
brew install exiftool

# Debian / Ubuntu
apt-get install libimage-exiftool-perl

# Fedora / Redhat
dnf install perl-Image-ExifTool

# Windows users can install the binary
# http://www.sno.phy.queensu.ca/~phil/exiftool/install.html
You can clone Elodie from GitHub. You'll need git installed (instructions).
git clone https://github.com/jmathai/elodie.git
cd elodie
pip install -r requirements.txt
Now that you've got the minimum dependencies installed you can start using Elodie. You'll need a photo, video or audio file and a folder you'd like Elodie to organize them into.
# Run these commands from the root of the repository you just cloned.
./elodie.py import --destination="/where/i/want/my/photos/to/go" /where/my/photo/is.jpg
You'll notice that the photo was organized into an Unknown Location folder. That's because you haven't set up your MapQuest API (instructions).
You can view these instructions on the command line by typing ./elodie.py import --help, ./elodie.py update --help or ./elodie.py generate-db --help.
Usage: elodie.py import [OPTIONS] [PATHS]...

  Import files or directories by reading their EXIF and organizing them
  accordingly.

Options:
  --destination DIRECTORY  Copy imported files into this directory.
                           [required]
  --source DIRECTORY       Import files from this directory, if specified.
  --file PATH              Import this file, if specified.
  --album-from-folder      Use images' folders as their album names.
  --trash                  After copying files, move the old files to the
                           trash.
  --allow-duplicates       Import the file even if it's already been imported.
  --help                   Show this message and exit.
Usage: elodie.py update [OPTIONS] FILES...

  Update a file's EXIF. Automatically modifies the file's location and file
  name accordingly.

Options:
  --album TEXT     Update the image album.
  --location TEXT  Update the image location. Location should be the name of a
                   place, like "Las Vegas, NV".
  --time TEXT      Update the image time. Time should be in YYYY-mm-dd
                   hh:ii:ss or YYYY-mm-dd format.
  --title TEXT     Update the image title.
  --help           Show this message and exit.
Usage: elodie.py generate-db [OPTIONS]

  Regenerate the hash.json database which contains all of the sha1
  signatures of media files.

Options:
  --source DIRECTORY  Source of your photo library.  [required]
  --help              Show this message and exit.
Usage: elodie.py verify
Now you're ready to learn more about Elodie.
![]()
Read a 3 part blog post on why I was created and how I can be used with Google Photos.
I work tirelessly to make sure your photos are always sorted and organized so you can focus on more important things. By photos I mean JPEG, DNG, NEF and common video and audio files.
You don't love me yet but you will.
I only do 3 things.
- Firstly I organize your existing collection of photos.
- Second I help make it easy for all the photos you haven't taken yet to flow into the exact location they belong.
- Third but not least I promise to do all this without a yucky propietary database that some friends of mine use.
NOTE: make sure you've installed everything I need before running the commands below. Instructions at the top of this page.
I can be used as a GUI taskbar app or through the command line. My GUI app is great for updating EXIF on existing photos while my command line tools are great for setting up automated jobs.
Read the instructions on building the GUI taskbar app for more information.
Updating EXIF of photos using the GUI taskbar app.

Importing and organizing photos from the command line.

Updating EXIF of photos from the command line.
I'm most helpful when I'm fully utilized to keep your photos organized.
Here's an example of a very asynchronous setup.
- Specify a folder in your Dropbox/Google Drive to store the organized photo library.
- Set up a Hazel rule to notify me when photos arrive in
~/Downloadsso I can import them.- The rule waits 1 minute before processing the photo which gives you a chance to move it elsewhere if it's not something you want in the library.
- Use AirDrop to transfer files from any iPhone to your laptop. That goes to
~/Downloadsfor the Hazel rule to process.- AirDrop is fast, easy for anyone to use and once the transfer is finished your don't have to stick around. I'll move it to Dropbox/Google Drive and Dropbox/Google Drive will sync it to their servers.
- Periodically recategorize photos by fixing their location or date or by adding them to an album.
- Have a Synology at home set to automatically sync down from Dropbox/Google Drive.
This setup means you can quickly get photos off your or anyone's phone and know that they'll be organized and backed up in 3 locations by the time you're ready to view them.

My guess is you've got quite a few photos scattered around. The first thing I'll help you do is to get those photos organized. It doesn't matter if you have hundreds, thousands or tens of thousands of photos; the more the merrier.
Fire up your terminal and run this command which copies your photos into something a bit more structured.
./elodie.py import --destination="/where/i/want/my/photos/to/go" /where/my/photos/are
I'm pretty fast but depending on how many photos you have you might want to grab a snack. When you run this command I'll print out my work as I go along. If you're bored you can open /where/i/want/my/photos/to/go in Finder and watch as I effortlessly copy your photos there.
You'll notice that your photos are now organized by date and location. Some photos do not have proper dates or location information in them. I do my best and in the worst case scenario I'll use the earlier of the files access or modified time. Ideally your photos have dates and location in the EXIF so my work is more accurate.
Don't fret if your photos don't have much EXIF information. I'll show you how you can fix them up later on but let's walk before we run.
Back to your photos. When I'm done you should see something like this. Notice that I've renamed your files by adding the date and time they were taken. This helps keep them in chronological order when using most viewing applications. You'll thank me later.
├── 2015-06-Jun
│   ├── California
│   │   ├── 2015-06-29_16-34-14-img_3900.jpg
│   │   └── 2015-06-29_17-07-06-img_3901.jpg
│   └── Paris
│       └── 2015-06-30_02-40-43-img_3903.jpg
├── 2015-07-Jul
│   ├── Mountain View
│   │   ├── 2015-07-19_17-16-37-img_9426.jpg
│   │   └── 2015-07-24_19-06-33-img_9432.jpg
└── 2015-09-Sep
│   ├── Unknown Location
    │   ├── 2015-09-27_01-41-38-_dsc8705.dng
    │   └── 2015-09-27_01-41-38-_dsc8705.nef
Not too bad, eh? Wait a second, what's Unknown Location? If I'm not able to figure out where a photo was taken I'll place it into a folder named Unknown Location. This typically happens when photos do not have GPS information in their EXIF. You shouldn't see this for photos taken on a smartphone but it's often the case with digital cameras and SLRs. I can help you add GPS information to those photos and get them organized better. Let me show you how.
OK, so what if you don't like the folders being named 2015-07-Jul/Mountain View? No problem!
You can add a custom folder structure by editing your config.ini file. This is what I include in the sample config file.
[Directory]
date=%Y-%m-%b
location=%city
full_path=%date/%location
There needs to be 2 levels of folders and you can construct them using the date and location. Use full_path to determine how the 2 levels are nested. If for some reason your config is not correct I will use the default formatting which is found in config.ini-sample.
The default formatting from the above config looks like 2015-07-Jul/Mountain View.
You can use any of the standard Python time directives to create your ideal structure.
- To have
201601, usedate=%Y%m - For
Sunday, 01 January 2016, usedate=%A, %d %B %Y - Python also has some pre-built formats. So you can get
Sun Jan 01 12:34:56 2016, by using%c
I use the Open Street Maps Nominatim reverse geocoding API provided by MapQuest. You can use city, state and country to construct the folder name.
- To have
Sunnyvale, uselocation=%city - To have
Sunnyvale-CA, use `location=%city-%state
Sometimes a location may not have all of the values available. If your format is %city-%state and city was not returned then the folder name will be %state. Take note that I'll strip out extra characters so you don't end up with folders name -%state when city is not found.
If you notice some photos were incorrectly organized you should definitely let me know. In the example above I put two photos into an Unknown Location folder because I didn't find GPS information in their EXIF. To fix this I'll help you add GPS information into the photos' EXIF and then I'll reorganize them.
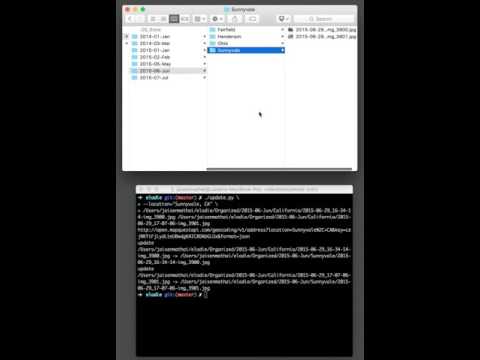
Run the command below if you want to tell me the photos were taken in Las Vegas. You don't have to type all that in though. It's easier to just type ./elodie.py update --location="Las Vegas, NV" and select and drag the files from OS X Finder into the terminal.
./elodie.py update --location="Las Vegas, NV" /where/i/want/my/photos/to/go/2015-09-Sep/Unknown\ Location/2015-09-27_01-41-38-_dsc8705.dng /where/i/want/my/photos/to/go/2015-09-Sep/Unknown\ Location/2015-09-27_01-41-38-_dsc8705.nef
You should see this after running that command.
└── 2015-09-Sep
│   ├── Las Vegas
    │   ├── 2015-09-27_01-41-38-_dsc8705.dng
    │   └── 2015-09-27_01-41-38-_dsc8705.nef
Run the command below if I got the date wrong when organizing your photos. Similarly to the above command you can drag files from Finder into your terminal.
./elodie.py update --time="2015-04-15" /where/i/want/my/photos/to/go/2015-09-Sep/Unknown\ Location/2015-09-27_01-41-38-_dsc8705.dng /where/i/want/my/photos/to/go/2015-09-Sep/Unknown\ Location/2015-09-27_01-41-38-_dsc8705.nef
That will change the date folder like so.
└── 2015-04-Apr
│   ├── Las Vegas
    │   ├── 2015-09-27_01-41-38-_dsc8705.dng
    │   └── 2015-09-27_01-41-38-_dsc8705.nef
You can, of course, ask me to change the location and time. I'll happily update the photos and move them around accordingly.
./elodie.py update --location="Las Vegas, NV" --time="2015-04-15" /where/i/want/my/photos/to/go/2015-09-Sep/Unknown\ Location/2015-09-27_01-41-38-_dsc8705.dng /where/i/want/my/photos/to/go/2015-09-Sep/Unknown\ Location/2015-09-27_01-41-38-_dsc8705.nef
Organizing your existing photos is great. But I'd be lying if I said I was the only one who could help you with that. Unlike other programs I put the same effort into keeping your library organized into the future as I have in getting it organized in the first place.
In order to sort new photos that I haven't already organized I need someone to tell me about them. There's no single way to do this. You could use inotify, cron, Automator or my favorite app - Hazel; it doesn't matter.
If you'd like to let me know of a specific photo or group of photos to add to your library you would run one of the following commands. Use fully qualified paths for everything since you won't be running this manually.
# I can import a single file into your library.
./elodie.py import --destination="/where/i/want/my/photo/to/go" /full/path/to/file.jpg

# I can also import all the photos from a directory into your library.
./elodie.py import --destination="/where/i/want/my/photo/to/go" /where/my/photos/are
Look, it's not that I think databases are evil. One of my friends is a database. It's just that I've been doing this for a long time and I've always used a database for it. In the end they're more trouble than they're worth. I should have listened to my mother when she told me to not date a database.
It's a lot more work to organize photos without a database. No wonder everyone else uses them. But your happiness is my happiness. If a little elbow grease on my part makes you happy then I'm glad to do it.
Every photo is essentially a database. So it's more accurate to say I use the thousands of tiny databases you already have and use them to organize your photos.
I'm simple. I put a photo into its proper location. I can update a photo to have the right date or location. The latter triggers the first; creating a nice tidy loop of organizational goodness.
I don't do anything else so don't bother asking.
When I organize photos I look at the embedded metadata. Here are the details of how I determine what information to use in order of precedence.
| Dimension | Fields | Notes |
|---|---|---|
| Date Taken (photo) | EXIF:DateTimeOriginal, EXIF:CreateDate, EXIF:ModifyDate, file created, file modified | |
| Date Taken (video, audio) | QuickTime:CreationDate, QuickTime:CreationDate-und-US, QuickTime:MediaCreateDate, file created, file modified | |
| Location (photo) | EXIF:GPSLatitude/EXIF:GPSLatitudeRef, EXIF:GPSLongitude/EXIF:GPSLongitudeRef | |
| Location (video, audio) | XMP:GPSLatitude, Composite:GPSLatitude, XMP:GPSLongitude, Composite:GPSLongitude | Composite tags are read-only |
| Title (photo) | XMP:Title | |
| Title (video, audio) | XMP:DisplayName | |
| Album | XMP-xmpDM:Album, XMP:Album | XMP:Album is user defined in configs/ExifTool_config for backwards compatability |
I use MapQuest to help me organize your photos by location. You'll need to sign up for a free developer account and get an API key. They give you 15,000 calls per month so I can't do any more than that unless you shell out some big bucks to them. Once I hit my limit the best I'll be able to do is Unknown Location until the following month.
Once you sign up you'll have to get an API key and copy it into a file named ~/.elodie/config.ini. I've included a config.ini-sample file which you can copy to config.ini.
mkdir ~/.elodie
cp config.ini-sample ~/.elodie/config.ini
# now you're ready to add your MapQuest key
The best ways to provide feedback is by reaching out on Twitter at @getelodie, opening a GitHub issue or emailing me at jaisen@jmathai.com.