A cloudlet is a new architectural element that arises from the convergence of mobile computing and cloud computing. It represents the middle tier of a 3-tier hierarchy: mobile device - cloudlet - cloud. A cloudlet can be viewed as a "data center in a box" whose goal is to "bring the cloud closer".
Copyright (C) 2012-2016 Carnegie Mellon University This is a developing project and some features might not be stable yet. Please visit our website at Elijah page.
All source code, documentation, and related artifacts associated with the cloudlet open source project are licensed under the Apache License, Version 2.0.
- We have tested OpenStack++ on Ubuntu 14.04 LTS 64-bit using the OpenStack Kilo release.
For FAQ and troubleshooting, please visit the Open Edge Forum.
OpenStack++ is an OpenStack extension for cloudlets. Therefore, you first need to install OpenStack and the cloudlet library before installing this extension. Since installing OpenStack is non-trivial, we recommend DevStack, which provides a set of scripts to quickly install and test OpenStack. And for the cloudlet library, we provide a fabric script to help with installation. If you already have installed the cloudlet library, please start from step 3 below. The following installation steps are for DevStack (all-in-one-single-machine) case.
-
Prepare Ubuntu 14.04 64-bit
-
Install cloudlet library
$ cd ~
$ sudo apt-get install git openssh-server fabric
$ git clone https://github.com/cmusatyalab/elijah-provisioning
$ cd elijah-provisioning
$ fab install (Requires password for your account)To check the installation, execute "cloudlet list-base". If successful, you should see an empty table with two columns: hash value and path.
For more details and troubleshooting, please read elijah-provisioning repo.
-
Install OpenStack using DevStack (Reference: DevStack guidance).
$ cd ~
$ echo "$USER ALL=(ALL) NOPASSWD: ALL" | sudo tee -a /etc/sudoers
$ git clone https://github.com/openstack-dev/devstack
$ cd devstack
$ git checkout stable/kilo
$ cp samples/local.conf local.conf- Download a sample samples/local.conf and read the comments in it regarding the sections you must modify for your system.
- Modify /devstack/stackrc to change the _BRANCH variables for all the OpenStack Server Components from -stable/kilo to -tags/kilo-eol. Alternatively, you may replace the stackrc file from DevStack with the one in samples/stackrc which already has the _BRANCH variables modified.
- Optionally, you may change the FLOATING_RANGE specified in stackrc to match the appropriate range of floating IP address range that should be given out to VM instances.
$ ./stack.sh
Please make sure that all the OpenStack functionality is working by connecting to OpenStack Web interface (http://localhost/) and logging in with the admin account.
If the vanilla OpenStack does not work, please check the troubleshooting section below. You may need to restart apache and/or the keystone component.
-
Finally, install the OpenStack++ extension
$ cd ~
$ git clone https://github.com/cmusatyalab/elijah-openstack
$ cd elijah-openstack
$ fab localhost devstack_single_machine
(Requires password for your account)This fabric script will check the cloudlet library version as well as OpenStack installation, and just place relevant files in the correct directories. It does not change any existing OpenStack code, and is designed to be a purely pluggable extension, so you can revert back to original state by reversing these installation steps. We enable cloudlet features by changing the nova configuration file at /etc/nova/nova.conf.
After successful installation, please restart OpenStack to reflect the changes.
$ cd ~/devstack
$ ./unstack
$ ./rejoin-stack.sh
(Often you may need to restart apache and/or the keystone service manually after rejoining. Please see the the troubleshooting section below for more information.)
-
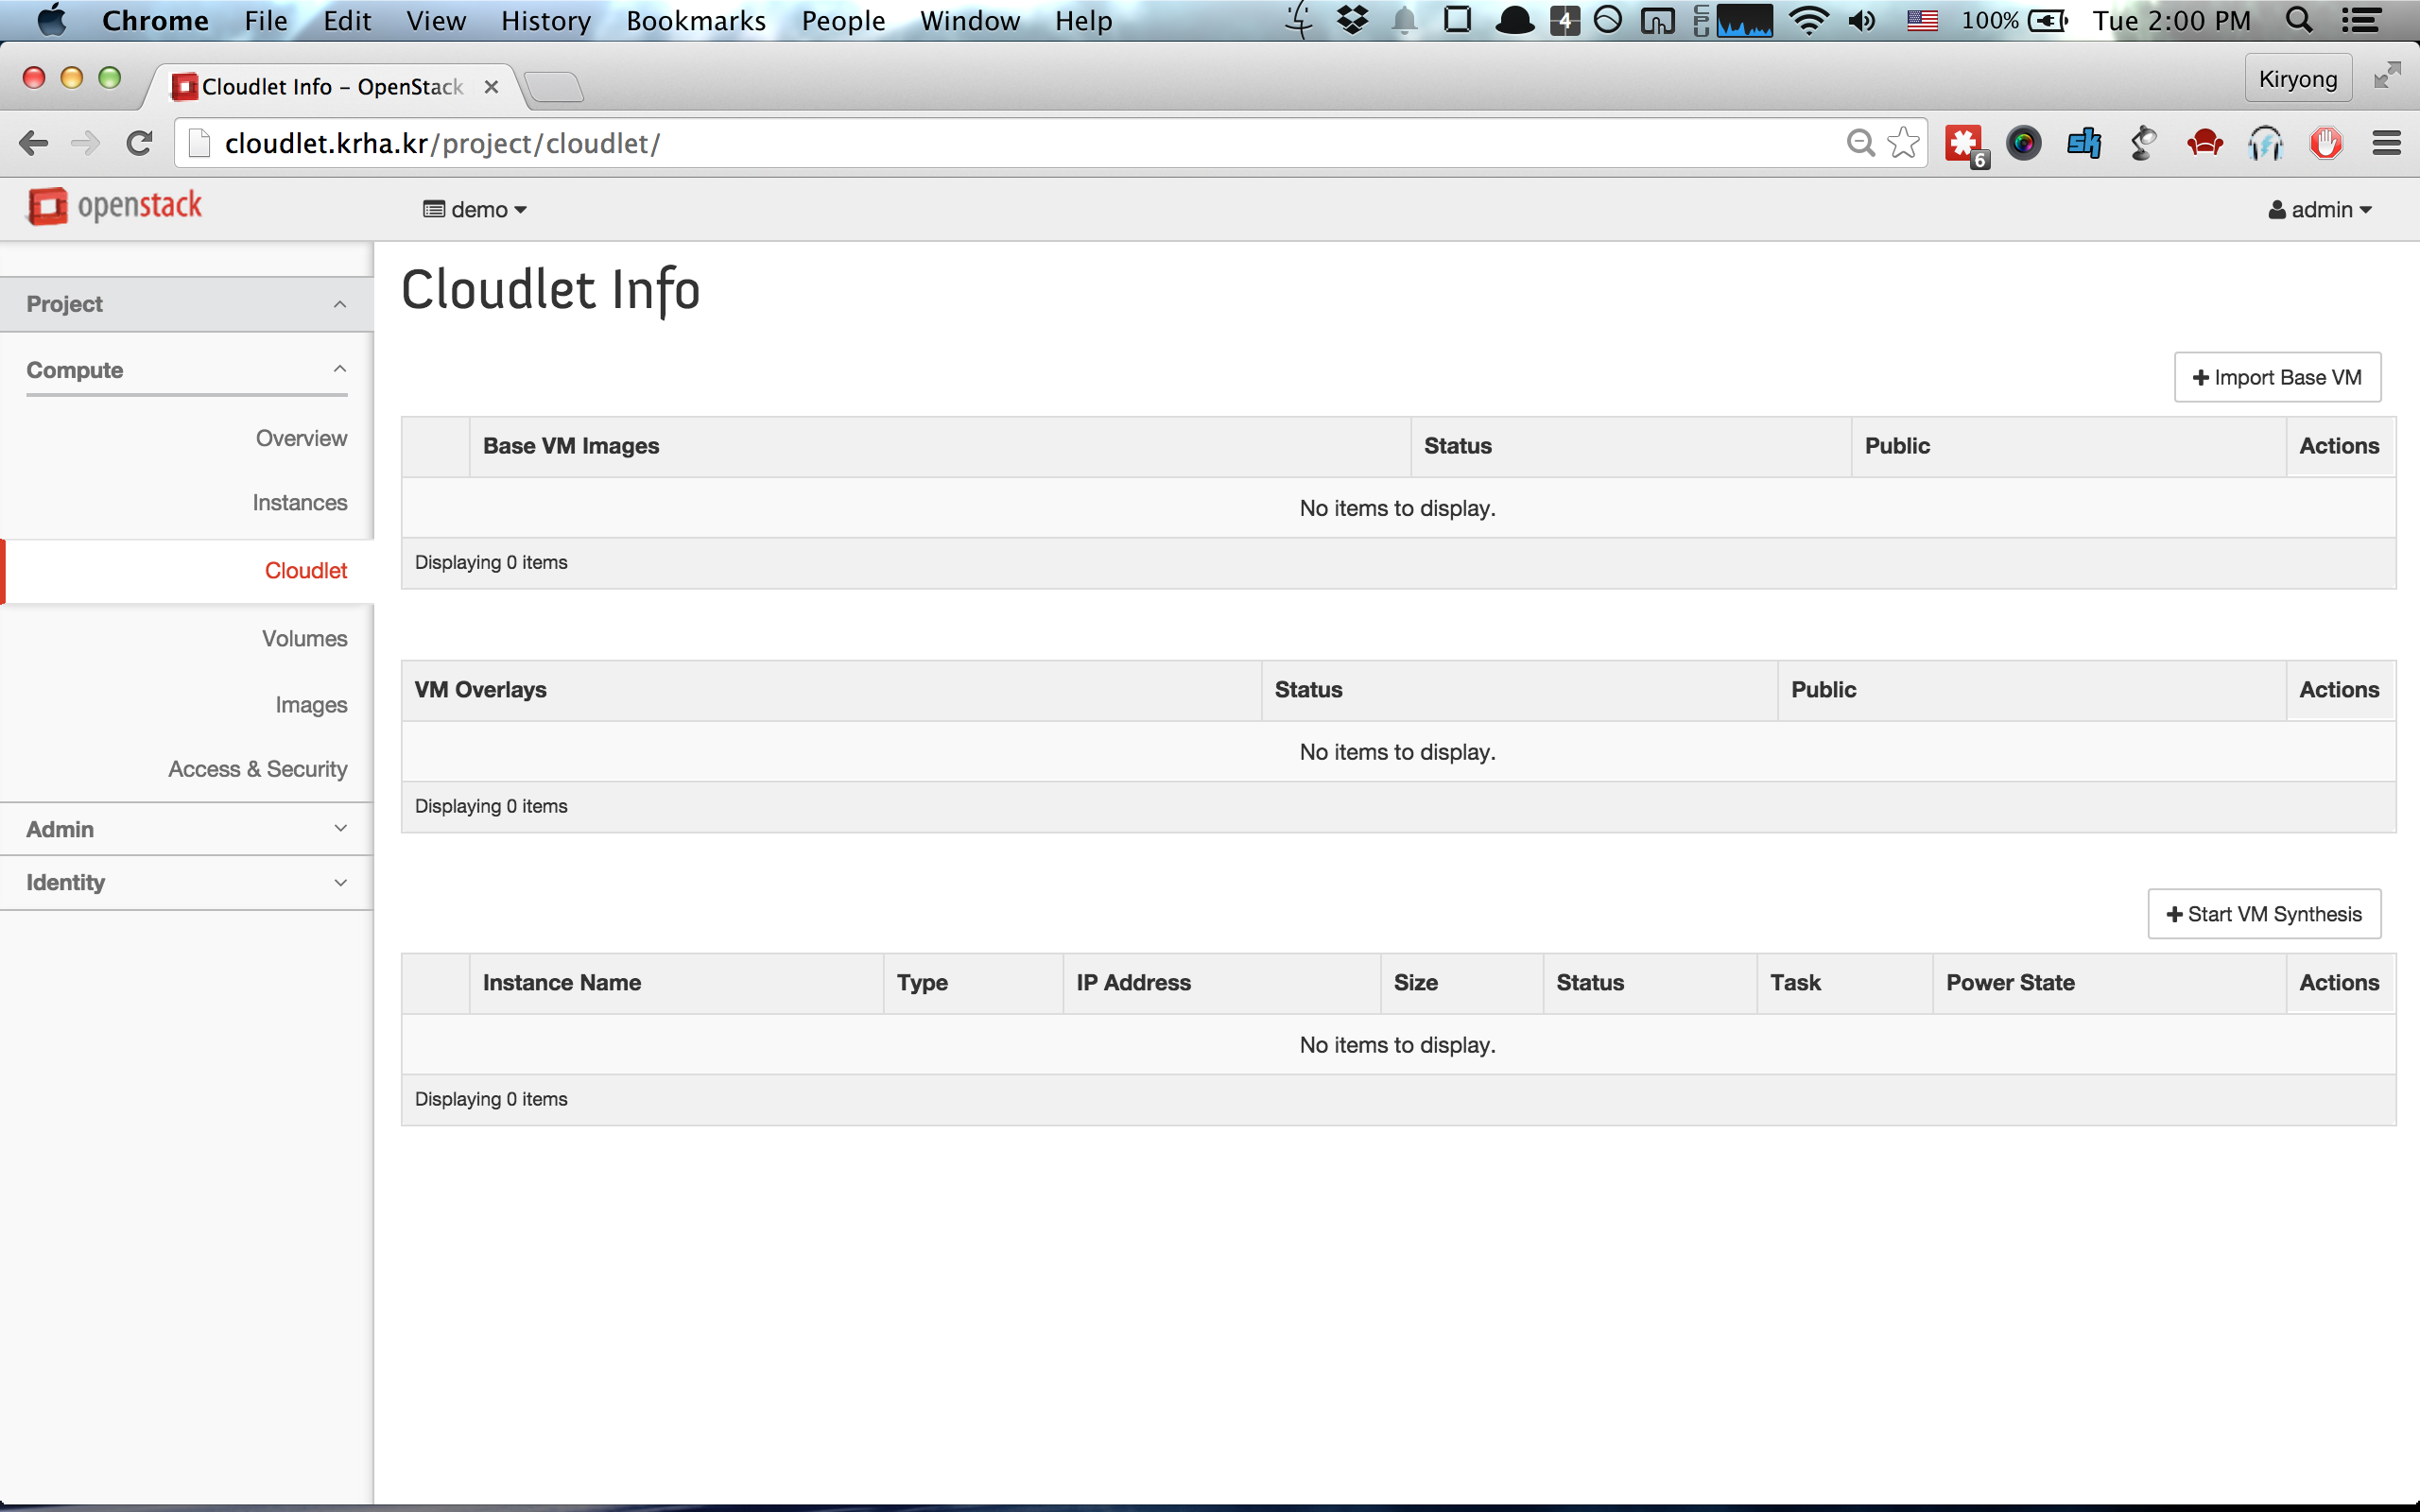
Check Installation - If the installation is successful, you will see a new panel on the project tab as seen in the figure below. You can also check for the cloudlet extension by listing the available OpenStack extensions using the standard OpenStack API.

-
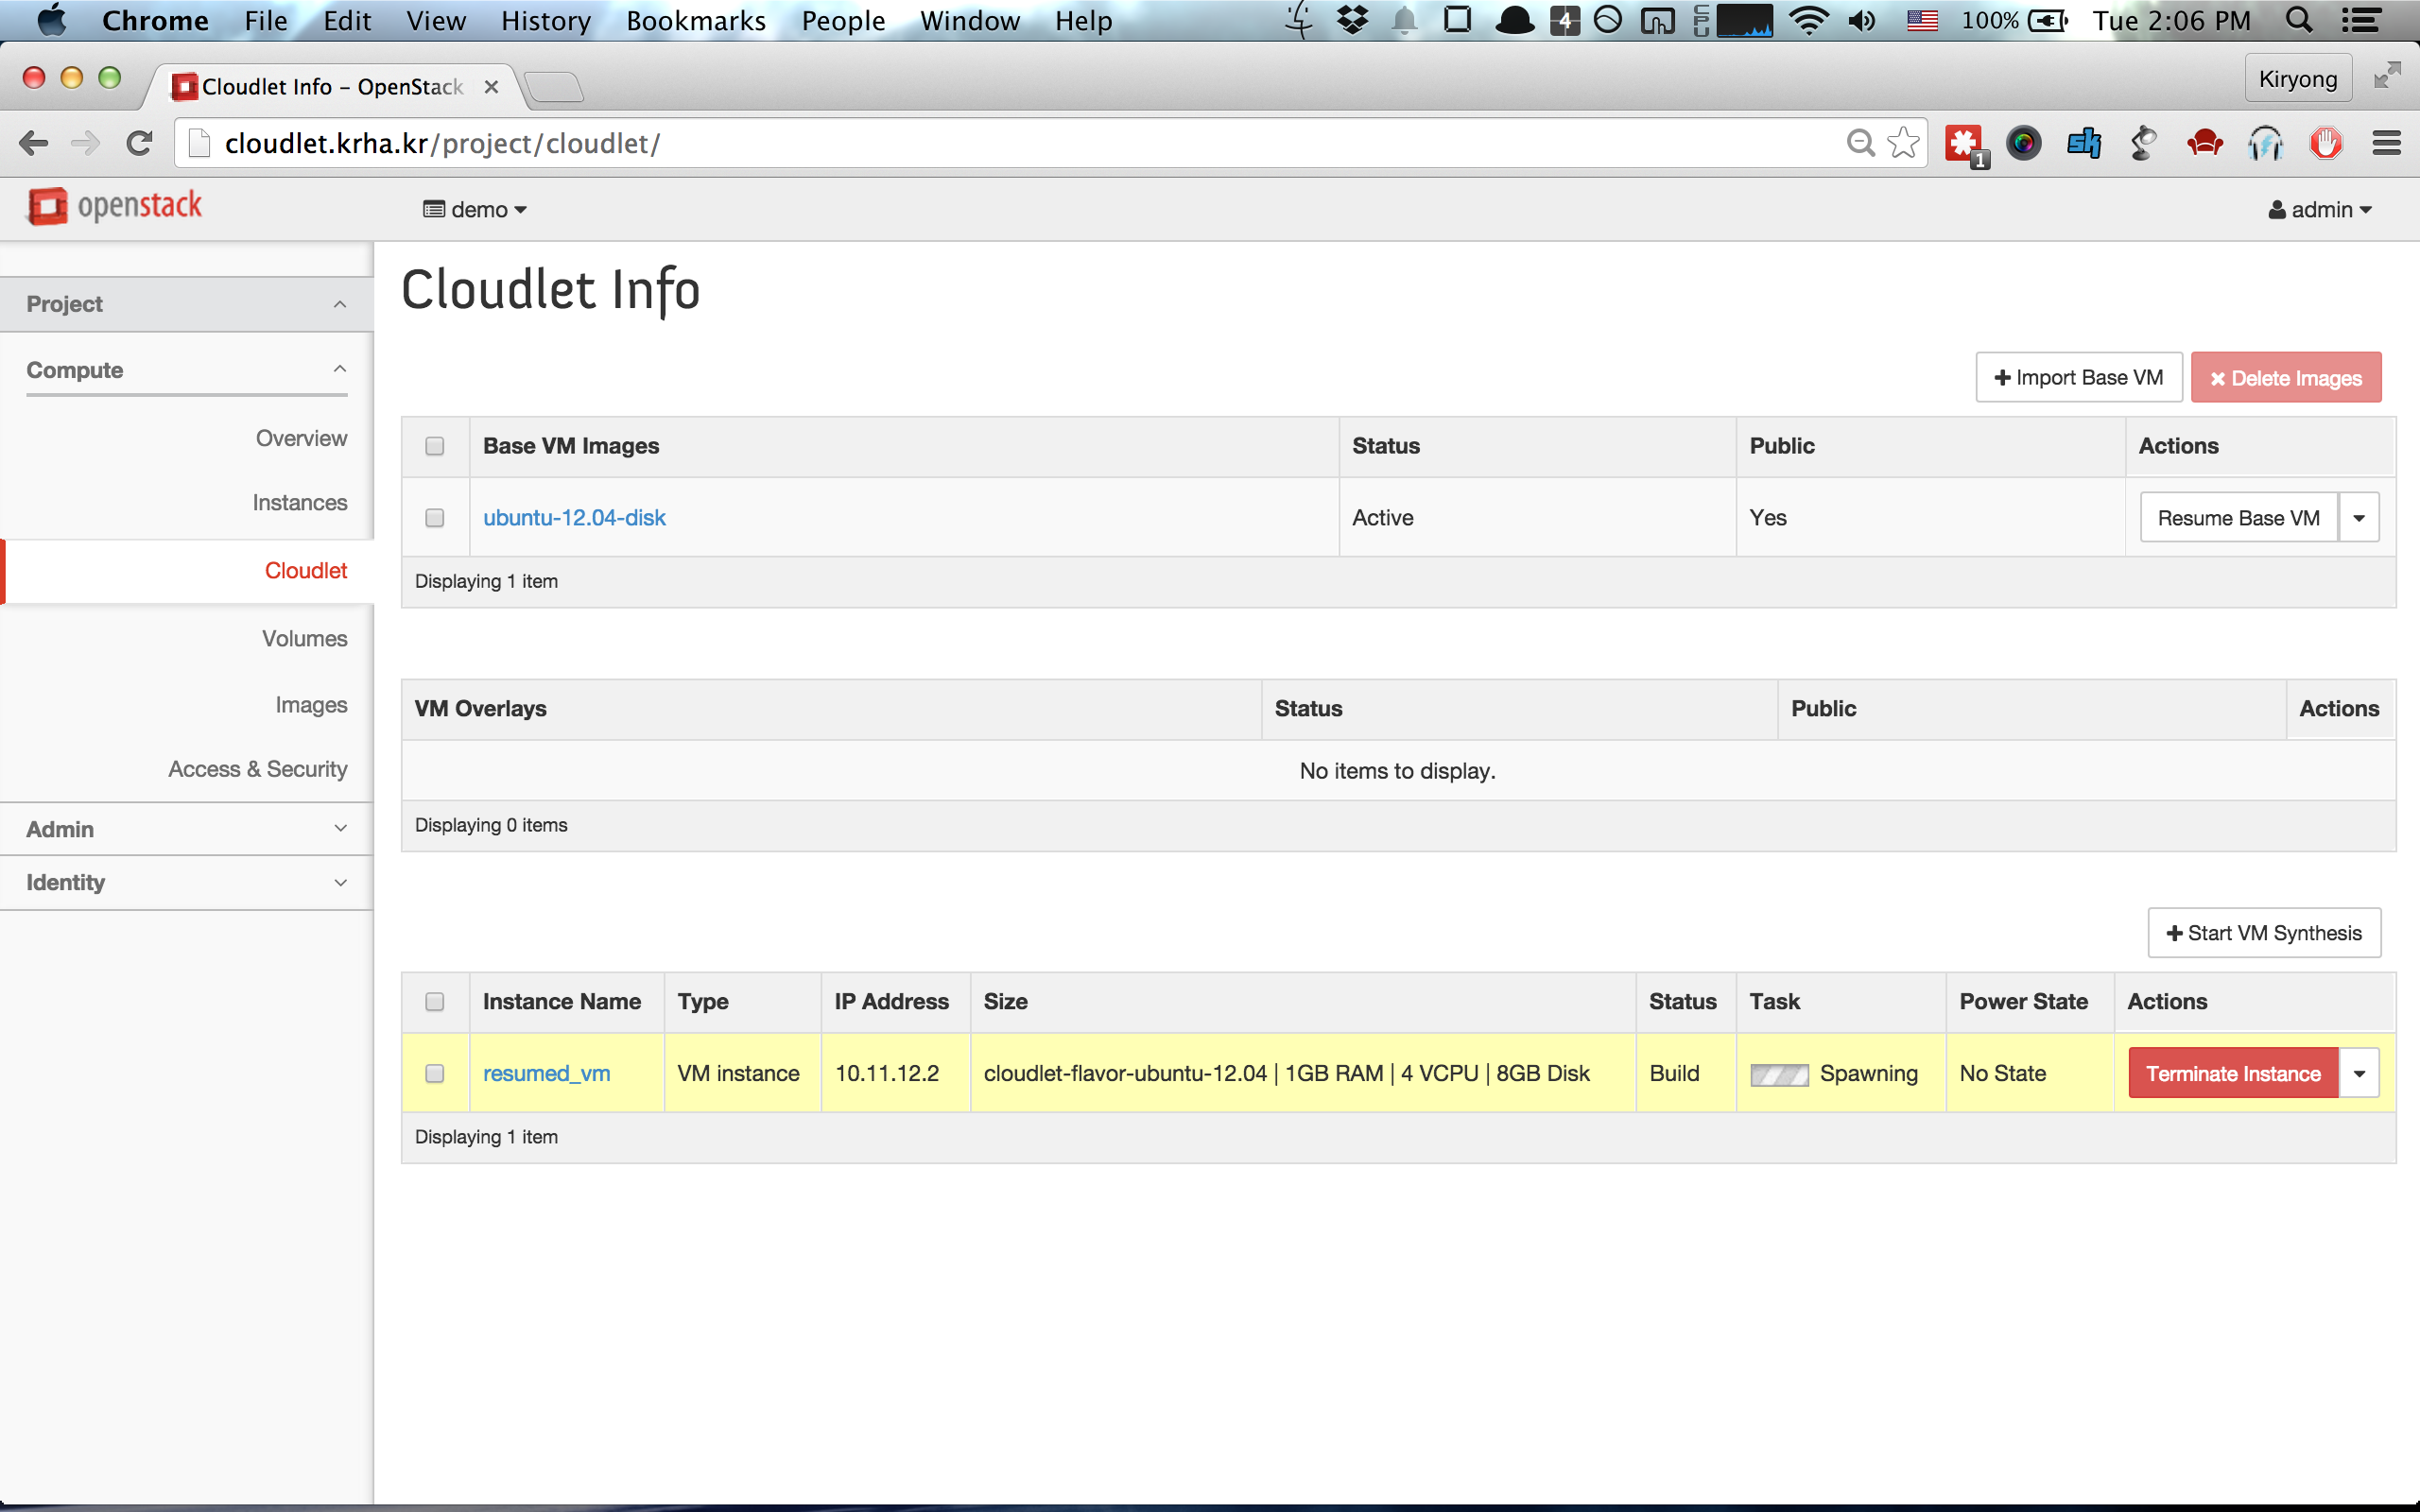
Import Base - Import a Sample Base VM using the "Import Base VM" button (This process may take a while). The zip file in the link above contains both disk and memory snapshots of the vanilla Ubuntu distribution (VM's account:cloudlet, password: cloudlet).

-
Resume VM - To resume a base VM, please use "Resume Base VM" button atop the Base VM image table. Initially, resuming Base VM can take a long time because the Base VM needs to be cached to the compute node.

-
Create VM Overlay - Install application specific libraries and binaries on the resumed VM to customize the image. Then use "Create VM overlay" button when you ready to create a VM overlay from the base VM. This will create a VM overlay which includes the compressed differences of the disk and memory snapshots with the base VM.
 After the VM overlay is generated (this process may take a while), you
can download VM overlay using "Download VM overlay" button.
After the VM overlay is generated (this process may take a while), you
can download VM overlay using "Download VM overlay" button. -
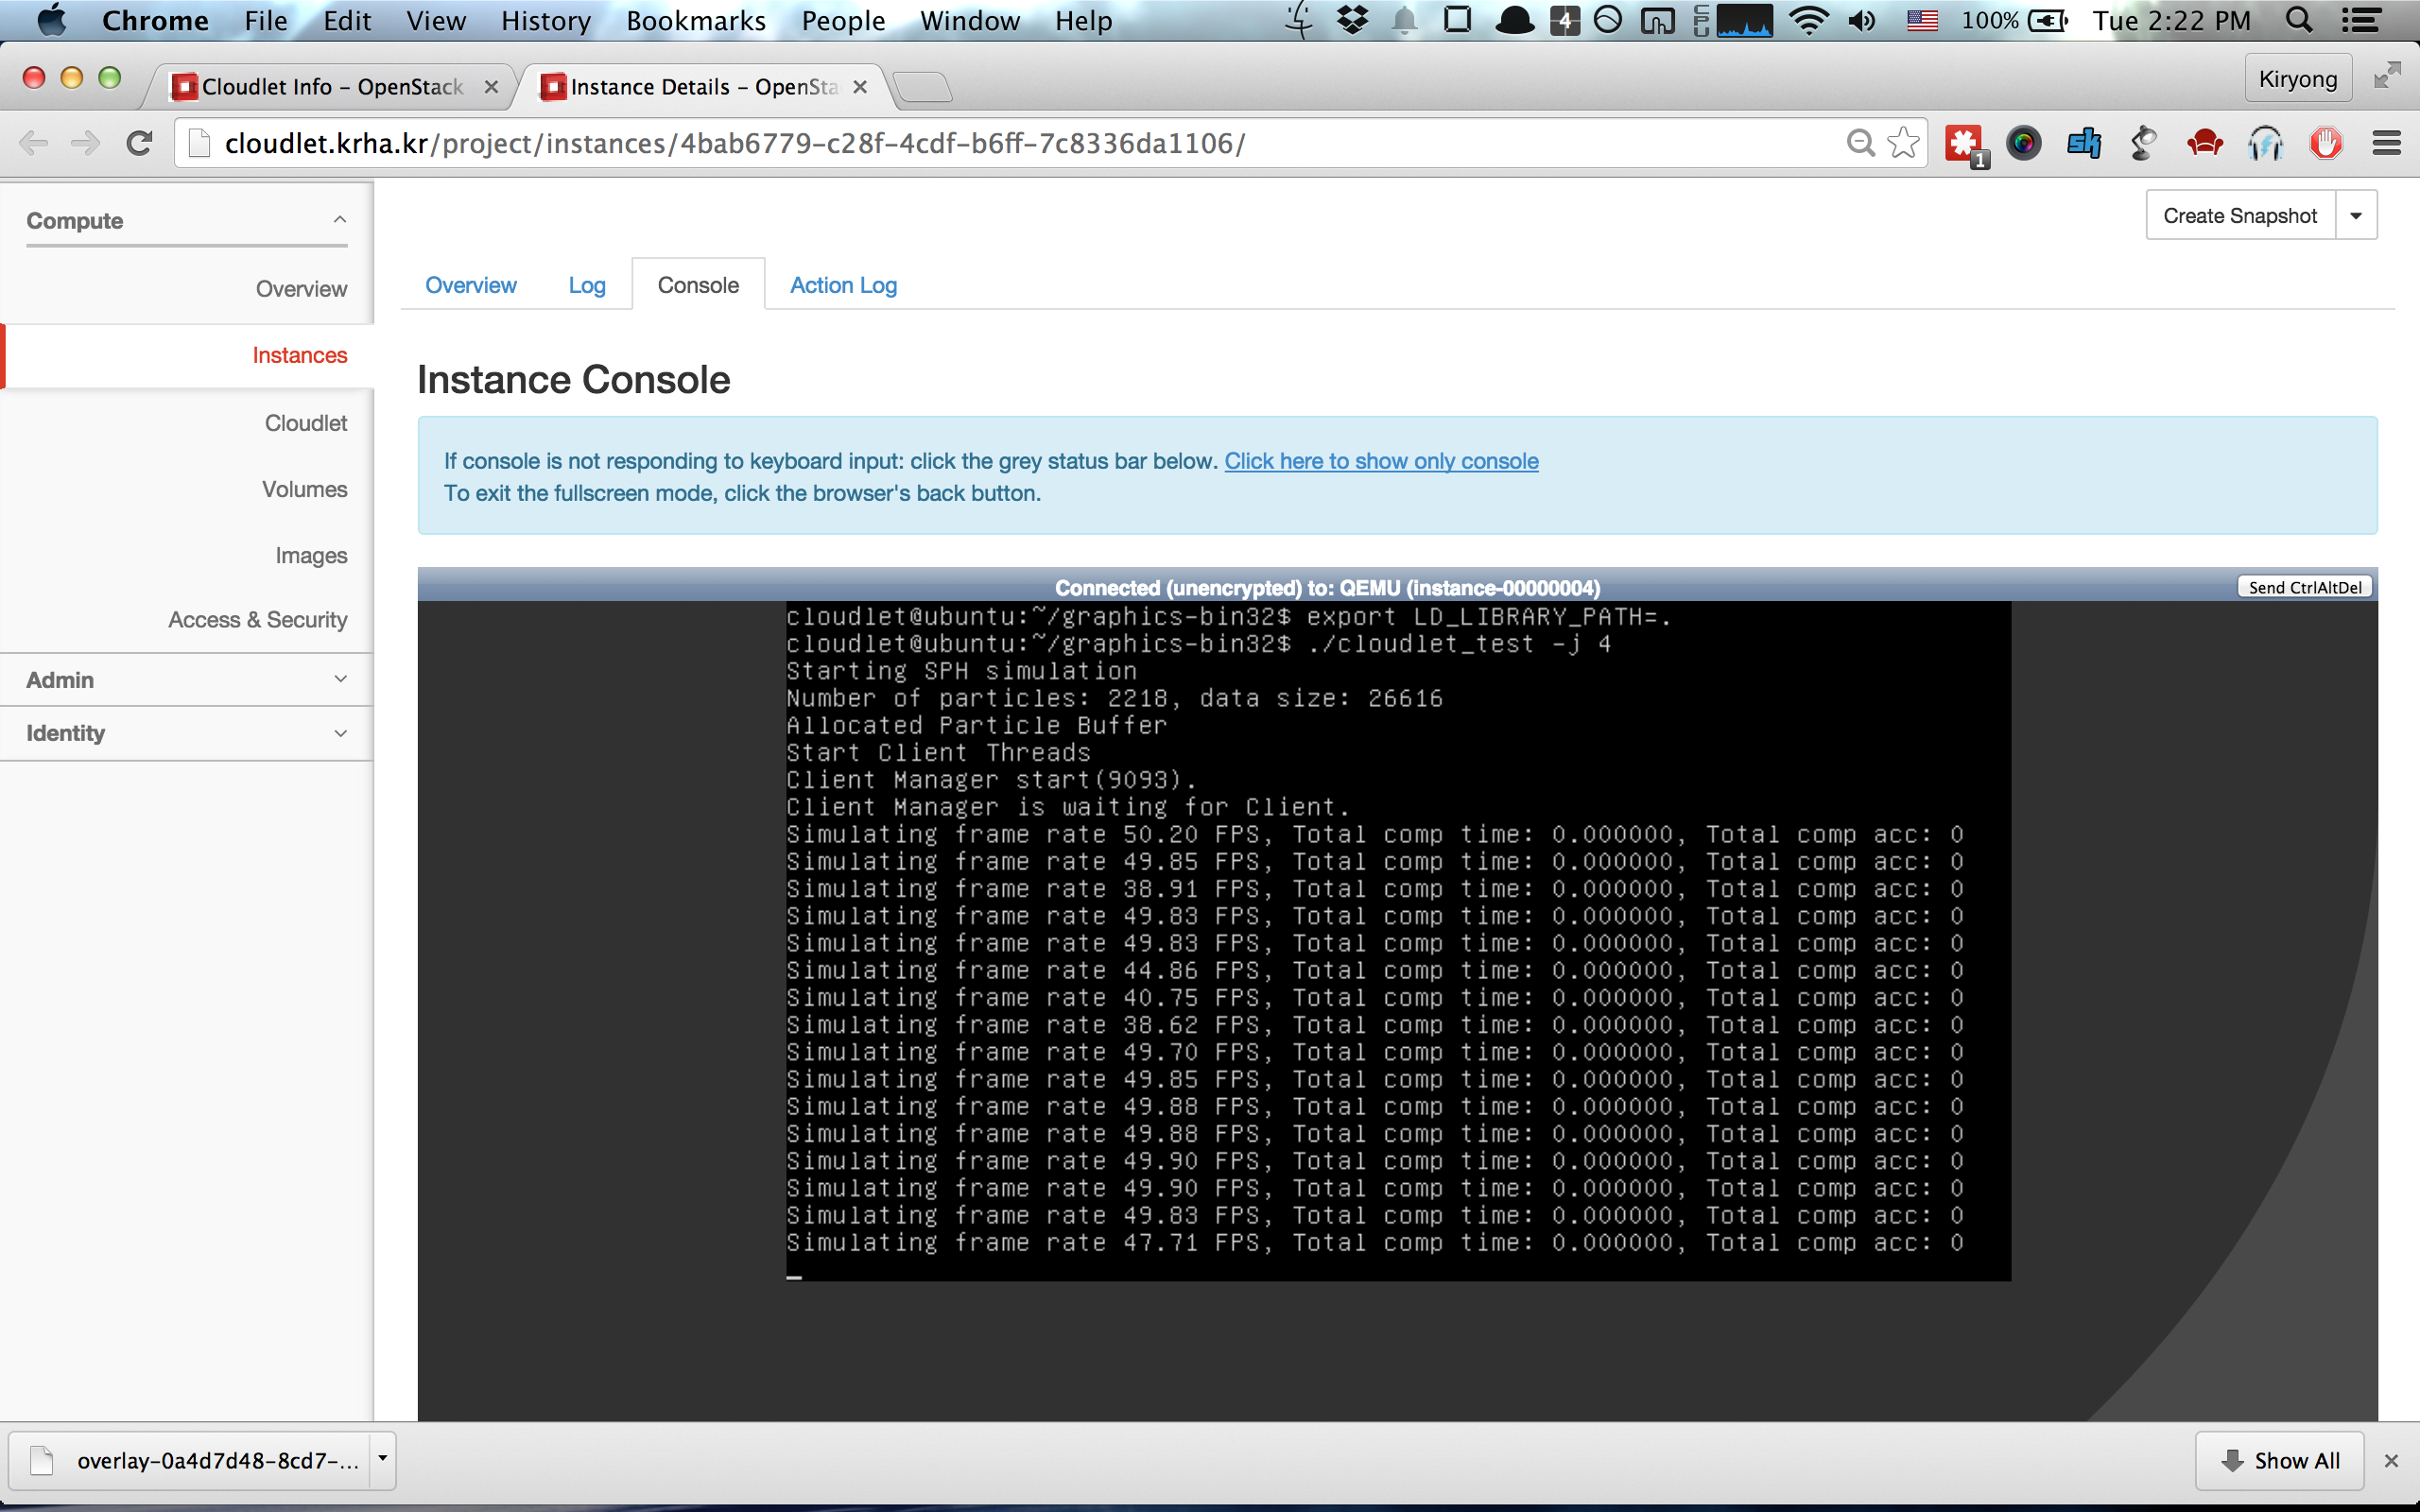
VM Synthesis - VM Synthesis is the instantiation of a VM instance by applying a VM overlay to an existing base VM image. To perform VM synthesis, please use the "Start VM Synthesis" button atop the Instance table. You need to input a URL for your VM overlay. If you have created and downloaded the VM overlay from the previous step, you can put that VM overlay on a separate Web server and point at that URL for the VM overlay. Initially, VM synthesis can be slow if the Base VM is not cached at the compute node.


-
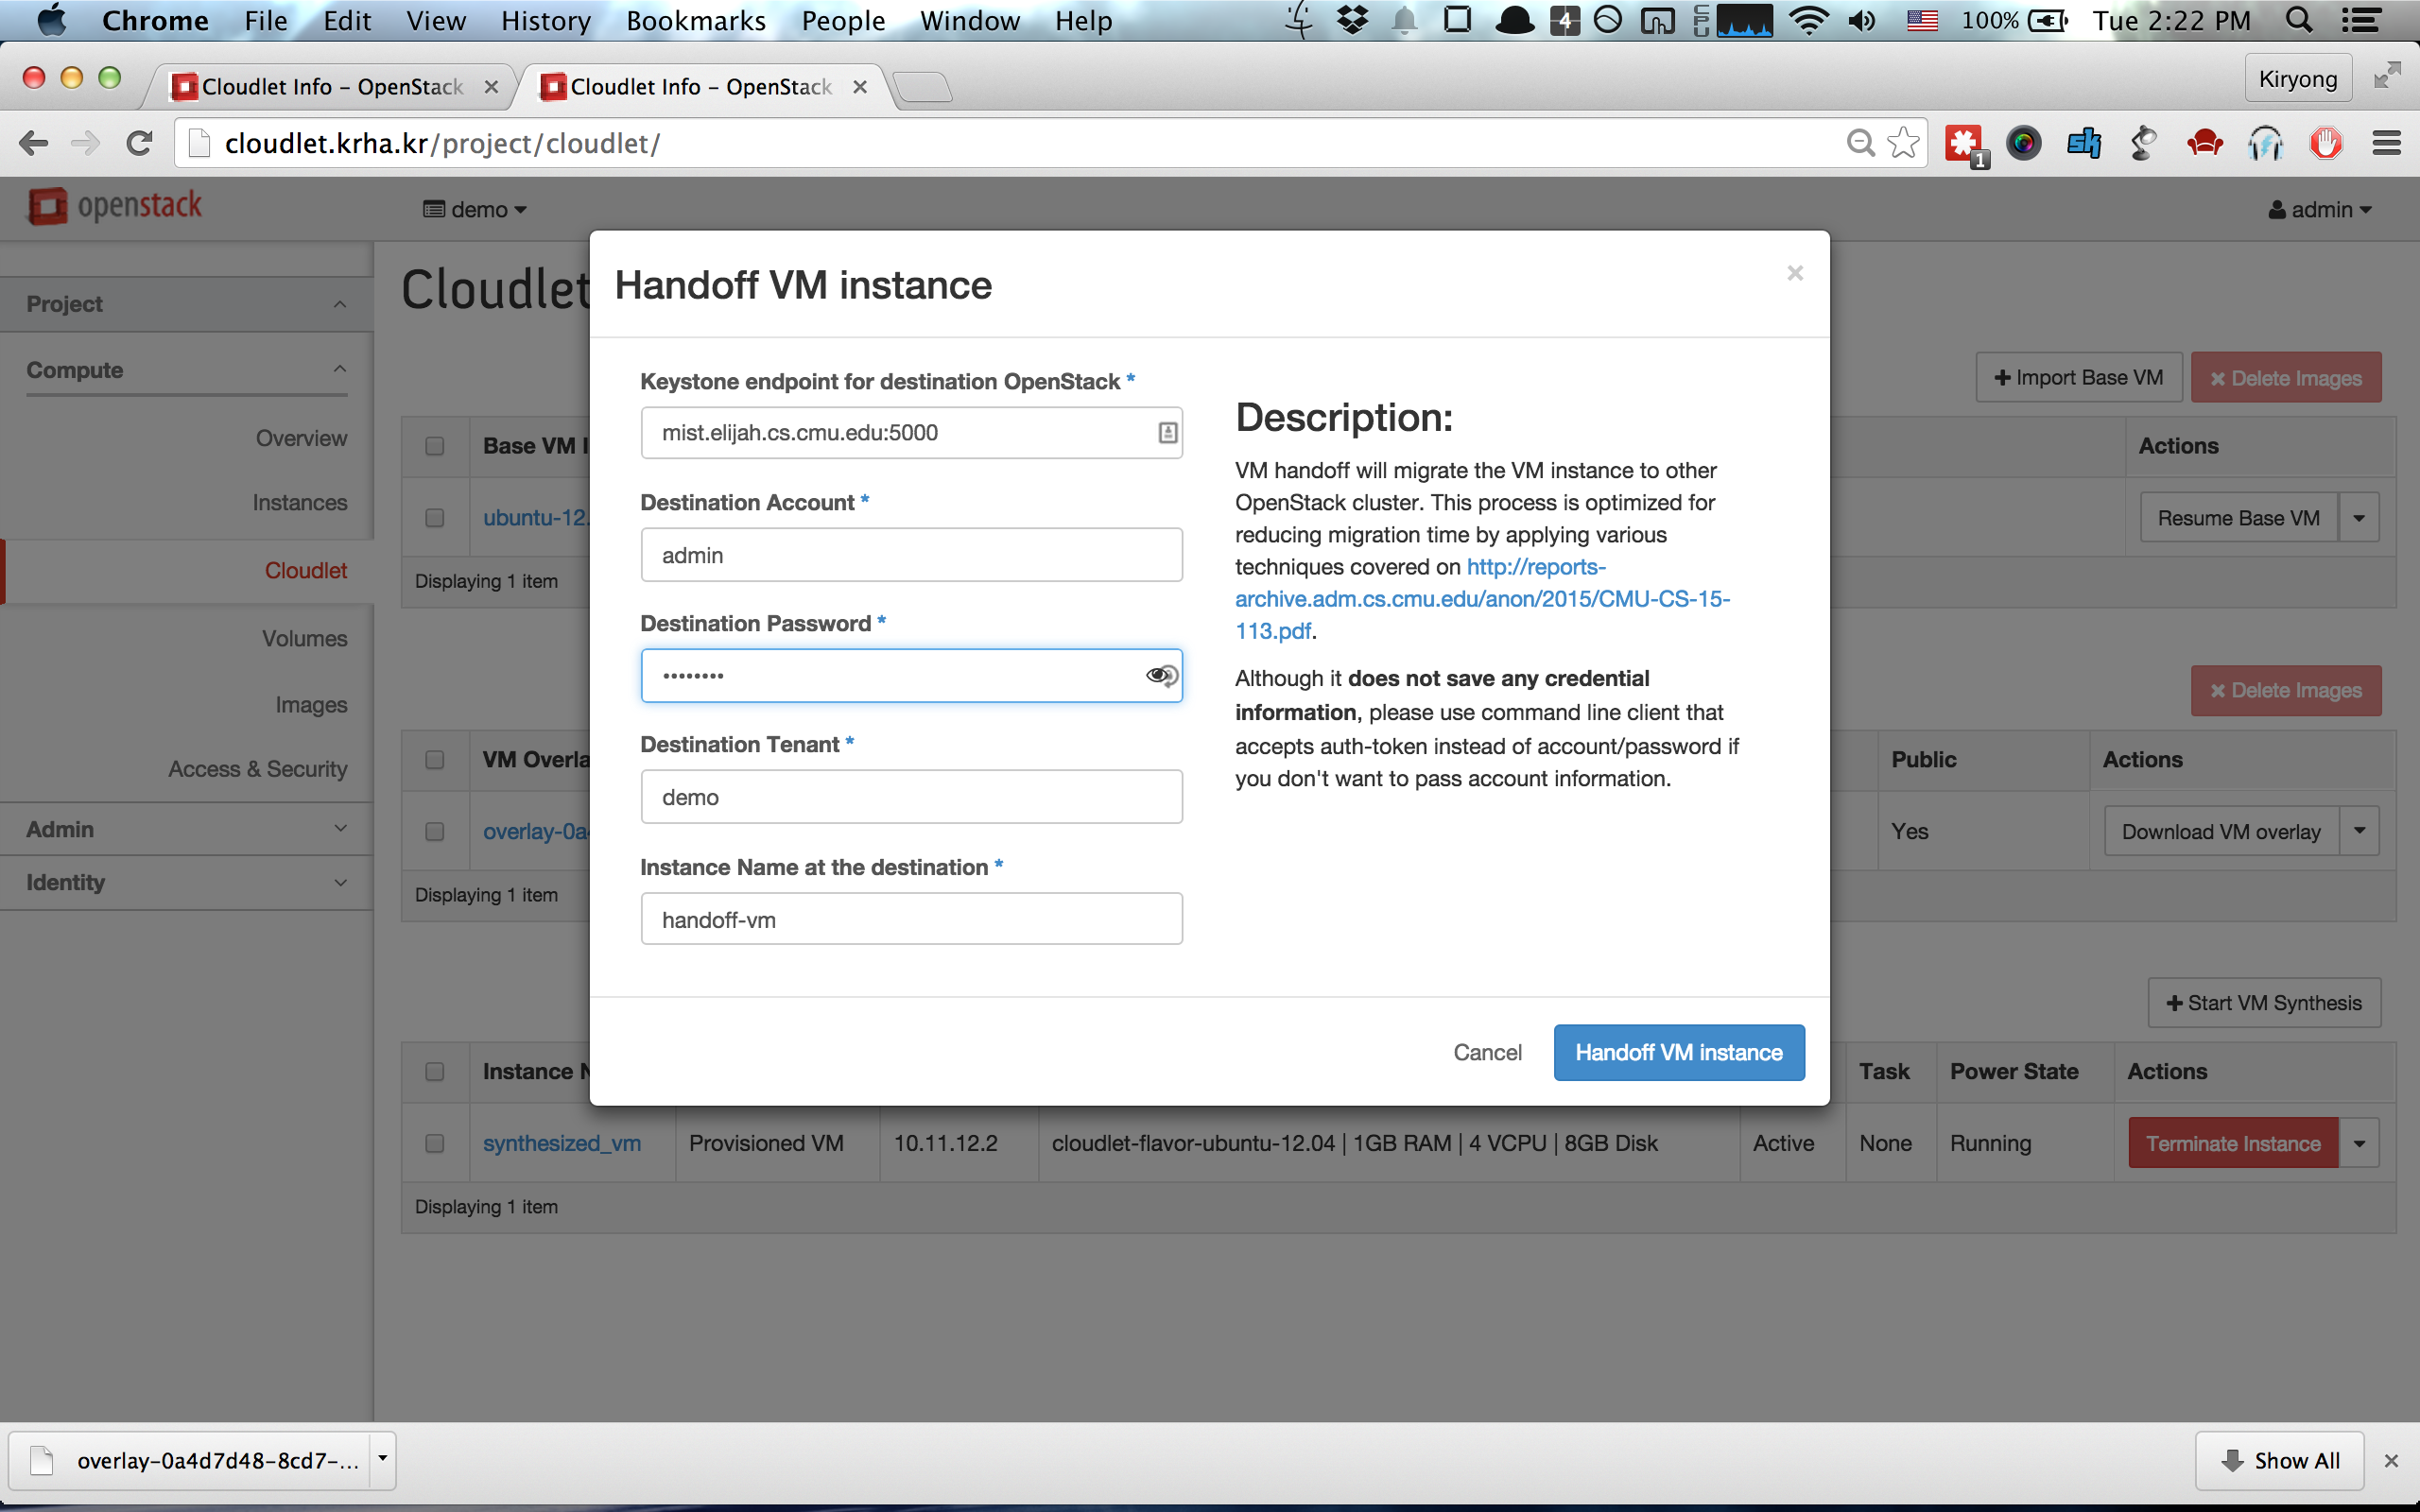
VM Handoff - To migrate a running VM instance to another OpenStack, please use "VM Handoff" button atop the Action column of synthesized VM instance. This will ask for credentials of the destination OpenStack as shown below. Although it does not save any credential information, please use a cloudlet command line client that accepts an auth-token instead of account/password if you don't want to transfer account information.


All the above steps can be done using the command line program at ./client/cloudlet_client.py
If you have any problems after installing OpenStack++ cloudlet extension, please follow below steps to narrow the problem.
-
Checking status of OpenStack after restarting services
$ sudo nova-manage service list
Binary Host Zone Status State Updated_At
nova-conductor krha-cloudlet internal enabled :-) 2014-05-04 15:32:54
nova-network krha-cloudlet internal enabled :-) 2014-05-04 15:32:54
nova-consoleauth krha-cloudlet internal enabled :-) 2014-05-04 15:32:54
nova-scheduler krha-cloudlet internal enabled :-) 2014-05-04 15:32:44
nova-cert krha-cloudlet internal enabled :-) 2014-05-04 15:32:54
nova-compute krha-cloudlet nova enabled :-) 2014-05-04 15:32:54
$If any service is not running, check for error messages in that service. In DevStack, you can find relevant tab using
screen( 'screen -x' to attach to DevStack screen). In regular OpenStack log files are located under/var/log/nova. -
After rejoining the stack (/devstack/rejoin_stack.sh), if you appear to be locked out of the web interface, it is likely that keystone, the authentication component of OpenStack, was not restarted properly.


To restart it manually, you can run the following:
> $ keystone-all
Similarly, if the web interface is not accessible after performing the rejoin, apache may not have started correctly. You can start the service manually:
> $ sudo service apache2 restart
-
If you still have problems using Web interface even though every nova related service is successfully running, then it's likely to be a Dashboard problem. We can debug it by manually running the dashboard in debug mode. In regular OpenStack, Dashboard's code (Django) is located at /usr/share/openstack-dashbaord
You first need to turn on the debug configuration on Django
$ cd /usr/share/openstack-dashboard
$ vi ./settings.pyChange
DEBUG = FalsetoDEBUG = True. Then, turn on the server using specific port$ ./manage.py runserver 0.0.0.0:9090
Validating models...0 errors found
Django version 1.4.5, using settings 'openstack_dashboard.settings'
Development server is running at http://0.0.0.0:9090/
Quit the server with CONTROL-C.At this point, you check detail debug messages of Dashboard when you connect using the specified port (ex. port 9090)
In DevStack, most of steps are as same except that the Dashboard root directory is "/opt/stack/horizon".