

This repository contains the source code for the Lokole cloud server. Its purpose is to connect the application running on the Lokole devices to the rest of the world. Lokole is a project by the Canadian-Congolese non-profit Ascoderu.
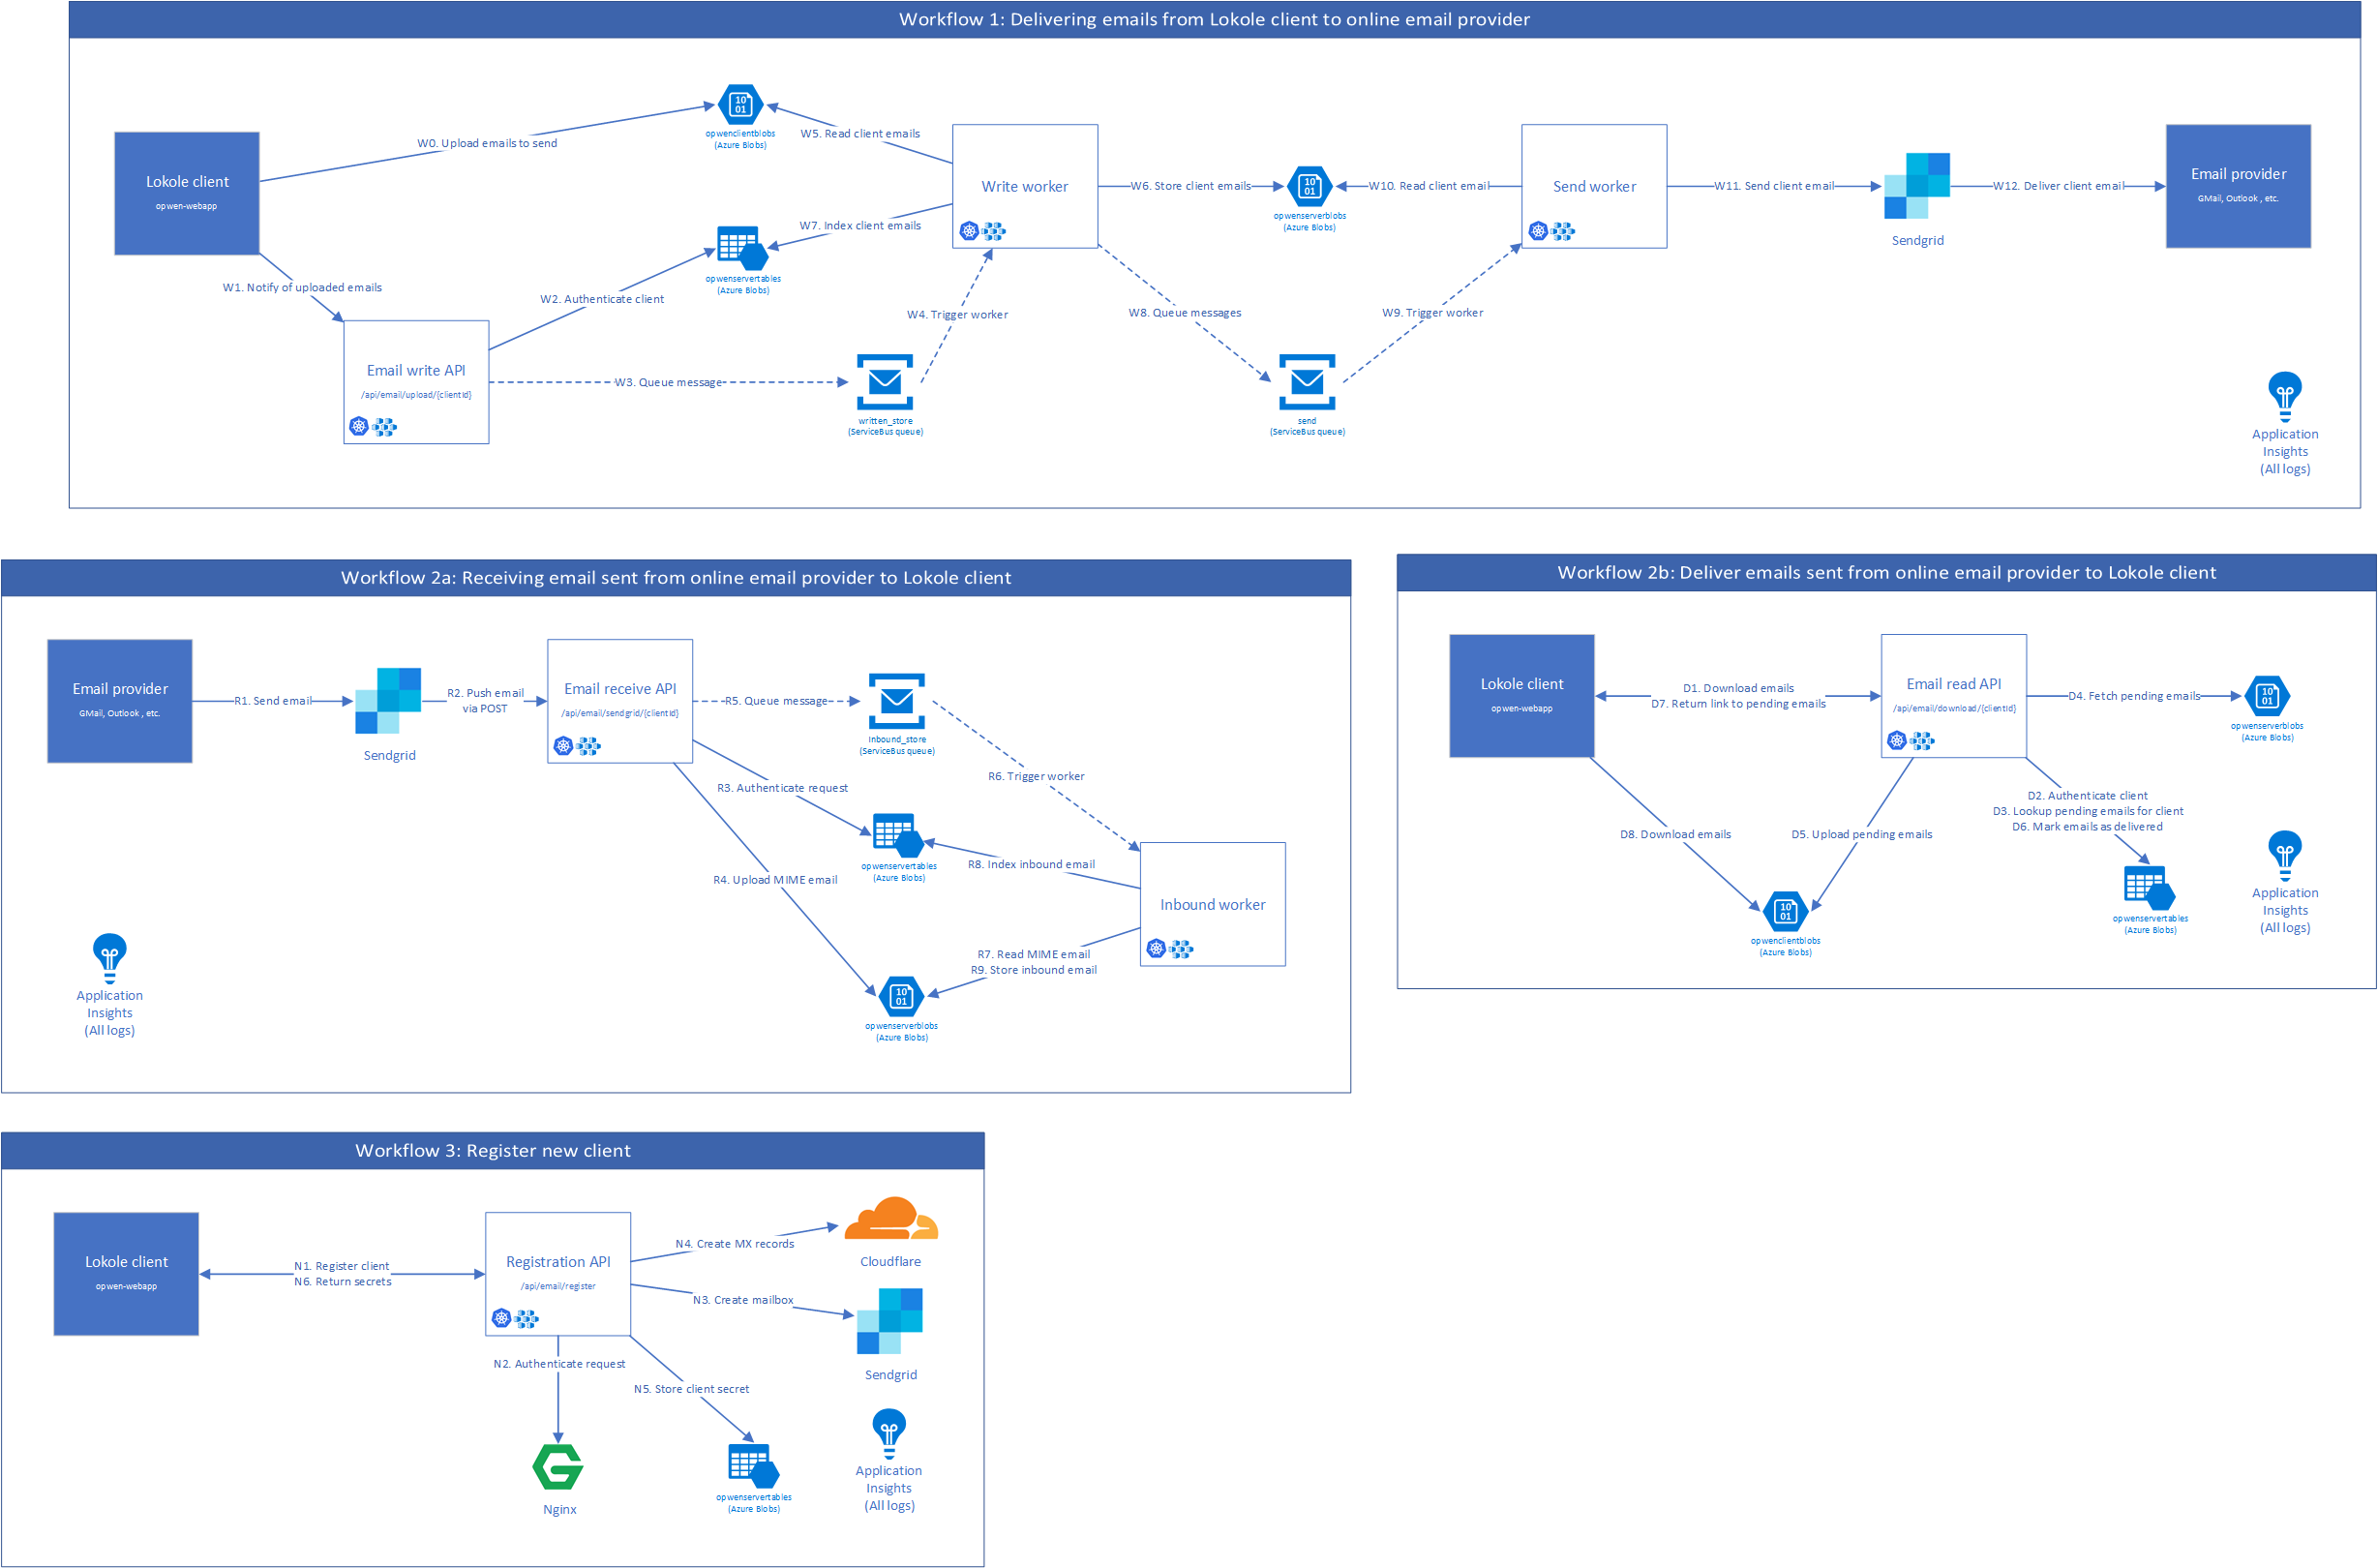
The server is implemented using Connexion and has two main responsibilities:
- Receive emails from the internet that are addressed to Lokole users and forward them to the appropriate Lokole device.
- Send new emails created by Lokole users to the rest of the internet.
More background information can be found in the opwen-webapp README.
In order to communicate between the Lokole cloud server and the Lokole email application, a protocol based on gzipped jsonl files uploaded to Azure Blob Storage is used. The files contains a JSON object per line. Each JSON object describes an email, using the following schema:
{
  "sent_at": "yyyy-mm-dd HH:MM",
  "to": ["email"],
  "cc": ["email"],
  "bcc": ["email"],
  "from": "email",
  "subject": "string",
  "body": "html",
  "attachments": [{"filename": "string", "content": "base64", "cid": "string"}]
}First, install the system dependencies:
Second, get the source code.
git clone git@github.com:ascoderu/opwen-cloudserver.git
cd opwen-cloudserver
Third, build the project images. This will also verify your checkout by running the unit tests and other CI steps such as linting:
make buildYou can now run the application stack:
make start logsThere are OpenAPI specifications that document the functionality of the application and provide references to the entry points into the code (look for the yaml files in the swagger directory). The various APIs can also be easily called via the testing console that is available by adding /ui to the end of the API's URL. Sample workflows are shown in the integration tests folder and can be run via:
# run the services, wait for them to start
make build start

# in another terminal, run the integration tests
make integration-tests

# finally, tear down the services
make stop
Note that by default the application is run in a fully local mode, without leveraging any cloud services. For most development purposes this is fine but if you wish to set up the full end-to-end stack that leverages the same services as we use in production, keep on reading.
The project uses Sendgrid, so to emulate a full production environment, follow these Sendgrid setup instructions to create a free account and take note of you API key for sending emails.
The project also makes use of a number of Azure services such as Blobs, Tables, Queues, Application Insights, and so forth. To set up all the required cloud resources programmatically, you'll need to create a service principal by following these Service Principal instructions. After you created the service principal, you can run the Docker setup script to initialize the required cloud resources.
cat > ${PWD}/secrets/sendgrid.env << EOM
LOKOLE_SENDGRID_KEY={the sendgrid key you created earlier}
EOM

cat > ${PWD}/secrets/cloudflare.env << EOM
LOKOLE_CLOUDFLARE_USER={the cloudflare user you created earlier}
LOKOLE_CLOUDFLARE_KEY={the cloudflare key you created earlier}
LOKOLE_CLOUDFLARE_ZONE={the cloudflare zone you created earlier}
EOM

cat > ${PWD}/secrets/users.env << EOM
REGISTRATION_USERNAME={some username for the registration endpoint}
REGISTRATION_PASSWORD={some password for the registration endpoint}
EOM

docker-compose run --rm \
  -e SP_APPID={appId field of your service principal} \
  -e SP_PASSWORD={password field of your service principal} \
  -e SP_TENANT={tenant field of your service principal} \
  -e SUBSCRIPTION_ID={subscription id of your service principal} \
  -e LOCATION={an azure location like eastus} \
  -e RESOURCE_GROUP_NAME={the name of the resource group to create or reuse} \
  -v ${PWD}/secrets:/secrets \
  setup
The secrets to access the Azure resources created by the setup script will be
stored in files in the secrets directory. Other parts of the
project's tooling (e.g. docker-compose) depend on these files so make sure to
not delete them.
To run the project using the Azure resources created by the setup, use the following command:
docker-compose -f docker-compose.yml -f docker-compose.secrets.yml up --buildTo set up a production-ready deployment of the system, follow the development setup scripts described above, but additionally also pass the following environment variables to the Docker setup script:
KUBERNETES_RESOURCE_GROUP_NAME: The resource group into which to provision the Azure Kubernetes Service cluster.KUBERNETES_NODE_COUNT: The number of VMs to provision into the cluster. This should be an odd number and can be dynamically changed later via the Azure CLI.KUBERNETES_NODE_SKU: The type of VMs to provision into the cluster. This should be one of the supported Linux VM sizes.
The script will then provision a cluster in Azure Kubernetes Service and
install the project via Helm. The secrets to connect to the provisioned
cluster will be stored in the secrets directory.