Mycodo is a remote monitoring and automated regulation system with a focus on modulating environmental conditions. It was built to run on the Raspberry Pi (versions Zero, 1, 2, and 3) and aims to be easy to install and set up.
The core system coordinates a diverse set of responses to sensor measurements, including actions such as camera captures, email notifications, relay activation/deactivation, regulation with PID control, and more. Mycodo has been used for cultivating gourmet mushrooms, cultivating plants, culturing microorganisms, maintaining honey bee apiary homeostasis, incubating snake eggs and young animals, aging cheeses, fermenting foods, maintaining aquatic systems, and more.

A proportional-derivative-integral (PID) controller is a control loop feedback mechanism used throughout industry for controlling systems. It efficiently brings a measurable condition, such as the temperature, to a desired state and maintains it there with little overshoot and oscillation. A well-tuned PID controller will raise to the setpoint quickly, have minimal overshoot, and maintain the setpoint with little oscillation.
In the top graph of the above screenshot visualizes the regulation of temperature in a sealed chamber. The red line is the desired temperature setpoint that has been configured (which also happens to have been configured to change over the course of each day). The blue line is the actual recorded temperature. The green vertical bars represent how long a heater is activated for, per every 20-second period. This regulation was achieved with minimal tuning (Actual tuned gains: KP=0.08, KI=0.005, KD=0.001), and already displays a very minimal deviation from the setpoint (±0.5° Celsius). Further tuning would reduce this variability even more.
- Features
- TODO
- Install
- Install Notes
- Supported Devices and Sensors
- Notes
- HTTP Server
- Daemon Info
- Upgrading
- Restoring Backups
- Directory Structure
- License
- Screenshots
- Links
- Web interface: Visualize data, configure the system, manipulate relays, and more, from anywhere with an internet connection.
- Many Analog and digital sensors supported: Measuring temperature, humidity, CO2, atmospheric pressure, luminosity, infrared heat, soil moisture, and more! --* Analog to digital converter support for reading any analog sensor or signal.
- Event triggers: When certain conditions are met, activate relays, camera recording, email notification, and more.
- Discrete PID control: Regulate environmental conditions with prediction and precision.
- Method creation for dynamic PID setpoints for changing conditions over time . --* Time/Date: Change the setpoint based on specific times and dates (ideal for long-duration changes). --* Duration: Change the setpoint at durations form when it was activated (examples: reflow oven, thermal cycler). --* Daily: Change the setpoint on a daily, repeatable schedule. --* Daily Sine Wave: Change the setpoint on a daily, repeatable schedule that follows a configurable sinusoidal wave. --* Daily Bezier Curve: Change the setpoint on a daily, repeatable schedule that follows a configurable Bezier curve.
- 16x2 and 20x4 I2C LCD support: Create a physical display of conditions or status of the system.
- I2C multiplexer support to allow using multiple devices/sensors with the same address.
- Pi Camera support: Streaming live video, capture still images, or create time-lapses.
- Automated system upgrade: When a new feature is pushed to github, one click will update the entire system.
- Support Serial Port Expander
- Support Atlas Scientific sensors
- Add PID filters (of input or output) and alternate PID functions.
- Add support for wireless communication (z-wave, xbee, or other).
- Support for PWM and servo/stepper motors
- Dashboard to monitor other Mycodo servers
- Add graph export options (width, height, scale)
- Add stepper motor support
- Create custom log from influxdb query
- Notes, flag points of time on graph (text, file upload, graph saving, etc.).
These install procedures have been tested to work with a Raspberry Pi following a fresh intall of Raspbian Jessie (Full or Lite version), with an active internet connection.
Set up the initial settings with raspi-config. It's very important that you don't skip the file system expansion and reboot! This needs to be done before continuing or there won't be any free disk space.
sudo raspi-config
- Expand File system (required)**
- Change User Password
- Internationalisation Options -> Change Locale (set and select en_US.UTF-8 if US)
- Internationalisation Options -> Change Timezone
- Enable Camera
- Advanced Options -> Enable I2C (required)
- Reboot (required)
Mycodo will be installed with the following install script (setup.sh). As a part of the instllation, it will install and modify the default apache2 configuration to host the Mycodo web UI. If you require a custom setup, examine and modify this script accordingly. If you do not require a custom setup, just run the install script with the following commands.
sudo apt-get update && sudo apt-get install -y git
cd
git clone https://github.com/kizniche/Mycodo
cd Mycodo
sudo ./setup.sh
Create an administrator user for the web UI:
sudo ./init_databases.py -A
Make sure the setup.sh and init_databases.py scripts run without error. A log of the setup.sh script output will be created at ~/Mycodo/setup.log.
Follow the on-screen prompts to create an administrator user for the web interface and then reboot.
sudo shutdown now -r
That's it. After the reboot, you should be able to use the user you just created to log into the Mycodo web UI at https://localhost/ (note the 's' in https), with localhost changed to your Raspberry Pi's host or IP address. Once logged in, make sure the Mycodo logo and version number at the top left is green, indicating the daemon is running. Red indicates the daemon is inactive or unresponsive. Ensure any java-blocking plugins are disabled for all the web UI features to work.
If you want write access to the mycodo files, add your user to the mycodo group, changing 'username' to your user.
sudo usermod -a -G mycodo username
In certain circumstances after the initial install, the mycodo service will not be able to start because of a missing or corrupt package. I'm still trying to understand why this happens and how to prevent it. If you cannot start the daemon, try to resinstall the required modules with the following command:
sudo pip install -r ~/Mycodo/requirements.txt --upgrade --force-reinstall --no-deps
Then reboot
sudo shutdown now -r
If you receive an unresolvable error during the install, please create an issue.
Certain sensors will require extra steps to be taken in order to set up the interface for communication. This includes I2C, one-wire, and UART.
Atlas Scientific PT-1000 (I2C): Industrial-grade temperature probe that can be indefinitely submersed in liquid and sustain extreme temperatures (-200˚C to 850˚C, with the use of a thermowell).
DS18B20 (1-wire): Once the one-wire interface has been configured with these instructions, it may be used with Mycodo.
TMP006, TMP007 (I2C): Can measure the temperature of an object without making contact with it, by using a thermopile to detect and absorb the infrared energy an object is emitting. This sensor also measures the temperature of the die (physical sensor).
AM2315 (I2C): Measures relative humidity and temperature.
DHT11, DHT22, AM2302 (GPIO): Measures relative humidity and temperature.
HTU21D (I2C): Measures relative humidity and temperature.
SHT1x, SHT2x, SHT7x (GPIO): Measures relative humidity and temperature.
K30 (UART): Measures carbon dioxide in ppmv
This documentation provides specific installation procedures for the K30 with the Raspberry Pi version 1 or 2. Once the K30 has been configured with this documentation, it can be tested whether the sensor is able to be read, by executing ~/Mycodo/mycodo/tests/test_uart_K30.py
Because the UART is handled differently by the Raspberry Pi 3, from of the addition of bluetooth, there are a different set of instructions for getting the K30 working on the Raspberry Pi 3. If installing on a Raspberry Pi 3, you only need to perform these steps to get the K30 working:
Run raspi-config
sudo raspi-config
Go to Advanced Options->Serial and disable. Then edit /boot/config.txt
sudo vi /boot/config.txt
Find the line "enable_uart=0" and change it to "enable_uart=1", then reboot.
BMP085, BMP180 (I2C): Measures barometric pressure and temperature
TSL2561 (I2C): A light sensor with a flat response across most of the visible spectrum. Light range from 0.1 - 40k+ Lux. Contains two integrating analog-to-digital converters (ADC) that integrate currents from two photodiodes to measure both infrared and visible light to better approximate the response of the human eye.
The detection of a changing signal, for instance a simple switch completing a circuit, requires the use of edge detection. By detecting a rising edge (LOW to HIGH), a falling edge (HIGH to LOW), or both, actions or events can be triggered. The GPIO chosen to detect the signal should be equipped with an appropriate resistor that either pulls the GPIO up [to 5-volts] or down [to ground]. The option to enable the internal pull-up or pull-down resistors is not available for safety reasons. Use your own resistor to pull the GPIO high or low.
Examples of devices that can be used with edge detection: simple switches and buttons, PIR motion sensors, reed switches, hall effect sensors, float switches, and more.
All devices that connected to the Raspberry Pi by the I2C bus need to have a unique address in order to communicate. Some sensors may have the same address (such as the AM2315), which prevents more than one from being connected at the same time. Others may provide the ability to change the address, however the address range may be limited, which limits by how many you can use at the same time. I2C multiplexers are extremely clever and useful in these scenarios because they allow multiple sensors with the same I2C address to be connected.
TCA9548A I2C Multiplexer (I2C): Has 8 selectable addresses, so 8 multiplexers can be connected to one Raspberry Pi. Each multiplexer has 8 channels, allowing up to 8 devices/sensors with the same address to be connected to each. 8 multiplexers x 8 channels = 64 devices/sensors with the same address.
TCA9545A Grove I2C Bus Multiplexer (I2C): This board works a little differently than the TCA9548A, ablove. This board actually creates new 4 new I2C busses, each with their own selectable voltage, either 3.3 or 5.0 volts. Instructions to enable the Device Tree Overaly are at https://github.com/camrex/i2c-mux-pca9545a. Nothing else needs to be done in Mycodo after that except to select the correct I2C bus when configuring the sensor.
An analog to digital converter (ADC) allows the use of any analog sensor that outputs a variable voltage. The detectable voltage range of this ADC is ±2.048 volts. A voltage divider may be necessary to attain this range.
A minimal set of anonymous usage statistics are collected to help improve development. No identifying information is saved from the information that is collected and it is only used to improve Mycodo. No other sources will have access to this information. The data collected is mainly how much specific features are used, how often errors occur, and other similar statistics. The data that's collected can be viewed from the 'View collected statistics' link in the Settings/General panel of the UI or in the file Mycodo/databases/statistics.csv. You may opt out from transmitting this information from the General settings in the Admin panel.
Mycodo/mycodo/scripts/mycodo_wrapper is a binary executable used to update the system from the web interface. It has the setuid bit to permit it to be executed as root ('sudo update_mycodo.sh initialize' sets the correct permissions and setuid). Since shell scripts cannot be setuid (ony binary files), the mycodo_wrapper binay permits these operations to be executed as root by a non-root user (in this case, members of the group 'mycodo'). You can audit the source code of Mycodo/mycodo/scripts/mycodo_wrapper.c and if you want to ensure the binary is indeed compiled from that source, you may compile it yourself with the following command. Otherwise, the compiled binary is already included and no further action is needed.
sudo gcc ~/Mycodo/mycodo/scripts/mycodo_wrapper.c -o ~/Mycodo/mycodo/scripts/mycodo_wrapper
SSL certificates will be generated and stored at ~/Mycodo/mycodo/frontend/ssl_certs/ during the install process. If you want to use your own SSL certificates, replace them as they are named in this directory. letsencrypt.org provides free verified SSL certificates.
If using the auto-generated certificate, be aware that they will not be verified when visiting the https:// version of the WEB UI. You will receive warning messages about the security of your site unless you add the certificate to your browser's trusted list).
The status of the daemon's service can be checked
sudo service mycodo service
The daemon can also be started manually if the systemd method above isn't used or an error needs to be debugged
sudo ~/Mycodo/mycodo/mycodo_daemon.py
Also, use '-d' to log all debug messages to /var/log/mycodo/mycodo.log
sudo ~/Mycodo/mycodo/mycodo_daemon.py -d
If you already have Mycodo installed (>=4.0.0), you can perform an upgrade to the latest version on github by either using the Admin/Update menu in the web UI (recommended) or by issuing the following command at the terminal. Note: You must be a member of the group 'mycodo', else you will have to execute the following command as root. A log of the update process can be found at /var/log/mycodo/mycodoupdate.log
~/Mycodo/mycodo/scripts/mycodo_wrapper upgrade
Upgrading the mycodo database is performed automatically during the upgrade process, however it can also be performed manually with the following commands (Note: This does not create the database, only upgrade them. You must already have a database created in order to upgrade):
cd ~/Mycodo/databases
alembic upgrade head
Refer to the alembic documentation for other functions.
A backup is made when the system is upgraded. If you need to restore a backup, do the following, changing the appropriate directory names:
sudo mv ~/Mycodo ~/Mycodo_old
sudo cp -a /var/Mycodo-backups/Mycodo-TIME-COMMIT ~/Mycodo
sudo service mycodo restart
sudo /etc/init.d/apache2 restart
This is the file structure of Mycodo, so it may assist anyone to understand or modify the system. I'll try to keep this current.
Mycodo/
├── databases - SQLite databases (for configuration)
│   ├── alembic - Alembic SQL database migration tool
│   │   └── versions - Scripts to upgrade/downgrade databases
│   │       ├── 04303bc223c4_create_dynamic_pid_setpoint_table.py
│   │       ├── px5pvbcdpw46_rename_table.py
│   │       └── ...
│   ├── mycodo.db - Mycodo settings
│   ├── notes.db
│   ├── statistics.csv - Anonymous statistics data
│   └── users.db - User settings
├── init_databases.py - Create SQLite databases and add users
├── mycodo
│   ├── config.py - Global configuration file
│   ├── controller_lcd.py - LCD controller class
│   ├── controller_log.py - Log controller class
│   ├── controller_pid.py - PID controller class
│   ├── controller_relay.py - Relay controller class
│   ├── controller_sensor.py - Sensor controller class
│   ├── controller_timer.py - Timer controller class
│   ├── daemonutils.py - Various functions to assist mycodo_daemon.py
│   ├── databases - SQL database manipulation framework (SQLAlchemy)
│   │   └── ...
│   ├── devices - Python modules for devices (such as I2C multiplexer)
│   │   ├── ads1x15.py
│   │   ├── camera_pi.py
│   │   └── ...
│   ├── flaskforms.py - Flask form classes
│   ├── flaskutils.py - Various functions to assist mycodo_flask.py
│   ├── frontend - HTTP server files (Flask)
│   │   ├── ssl_certs - Location of HTTP SSL certificates
│   │   ├── static - Static files reside (images, css, js, etc.)
│   │   └── templates - Flask HTML templates
│   │       ├── 404.html
│   │       ├── flash_messages.html - Error message handler
│   │       ├── layout.html - Template for pages/, settings/, /tools
│   │       ├── layout-remote.html - Template for /remote
│   │       ├── layout-settings.html - Template for /settings
│   │       ├── login.html - Login page
│   │       ├── manual.html - Mycodo usage manual
│   │       ├── pages - Flask general pages
│   │       │   ├── graph.html - Graph display age
│   │       │   ├── live.html - Live data display page
│   │       │   ├── sensor.html - Sensor configuration page
│   │       │   └── ...
│   │       ├── remote - Future remote administration panel
│   │       │   └── setup.html - Add or check the status of remote systems
│   │       ├── settings - Flask settings pages
│   │       │   ├── alerts.html - Alerts settings page
│   │       │   ├── users.html - Users settings page
│   │       │   └── ...
│   │       └── tools - Various tools for Mycodo
│   │           ├── info.html - Information about your system
│   │           ├── logview.html - Display log files
│   │           ├── usage.html - Calculate relay usage/power consumtion
│   │           └── ...
│   ├── mycodo_client.py - Communicates with the running daemon
│   ├── mycodo_daemon.py - Mycodo daemon (core of the system)
│   ├── mycodo_flask.py - Flask routes/views (handles webpage requests)
│   ├── scripts - Miscellaneous helper and test scripts and functions
│   │   ├── mycodo.service - Systemd script
│   │   ├── mycodo_wrapper.c - Source to binary that's setuid, for upgrades
│   │   ├── restore_mycodo.sh - Script to restore a backed up Mycodo version
│   │   ├── update_mycodo.sh - Update script to bring the git repository to HEAD
│   │   ├── update_post.sh - Post update script (commands from the latest version)
│   │   └── ...
│   ├── sensors - Python modules for sensors
│   │   ├── am2315.py
│   │   ├── bmp.py
│   │   ├── dht11.py
│   │   └── ...
│   └── tests - Scripts to test various sensors or devices
│       ├── Test_I2C_LCD.py
│       ├── Test_I2C_MCP342x.py
│       ├── Test_I2C_Multiplexer.py
│       └── ...
├── mycodo_flask_apache.conf - Apache2 configuration file
├── mycodo_flask.wsgi - Start script for Apache2 mod_wsgi
├── old - Archived milestone versions of Mycodo
├── requirements.txt - Python module requirements
└── setup.sh - Install script
Mycodo is free software: you can redistribute it and/or modify it under the terms of the GNU General Public License as published by the Free Software Foundation, either version 3 of the License, or (at your option) any later version.
Mycodo is distributed in the hope that it will be useful, but WITHOUT ANY WARRANTY; without even the implied warranty of MERCHANTABILITY or FITNESS FOR A PARTICULAR PURPOSE. See the GNU General Public License for more details.
A full copy of the GNU General Public License can be found at http://www.gnu.org/licenses/gpl-3.0.en.html
This software includes third party open source software components: Discrete PID Controller. Each of these software components have their own license. Please see Mycodo/mycodo/controller_PID.py for license information.
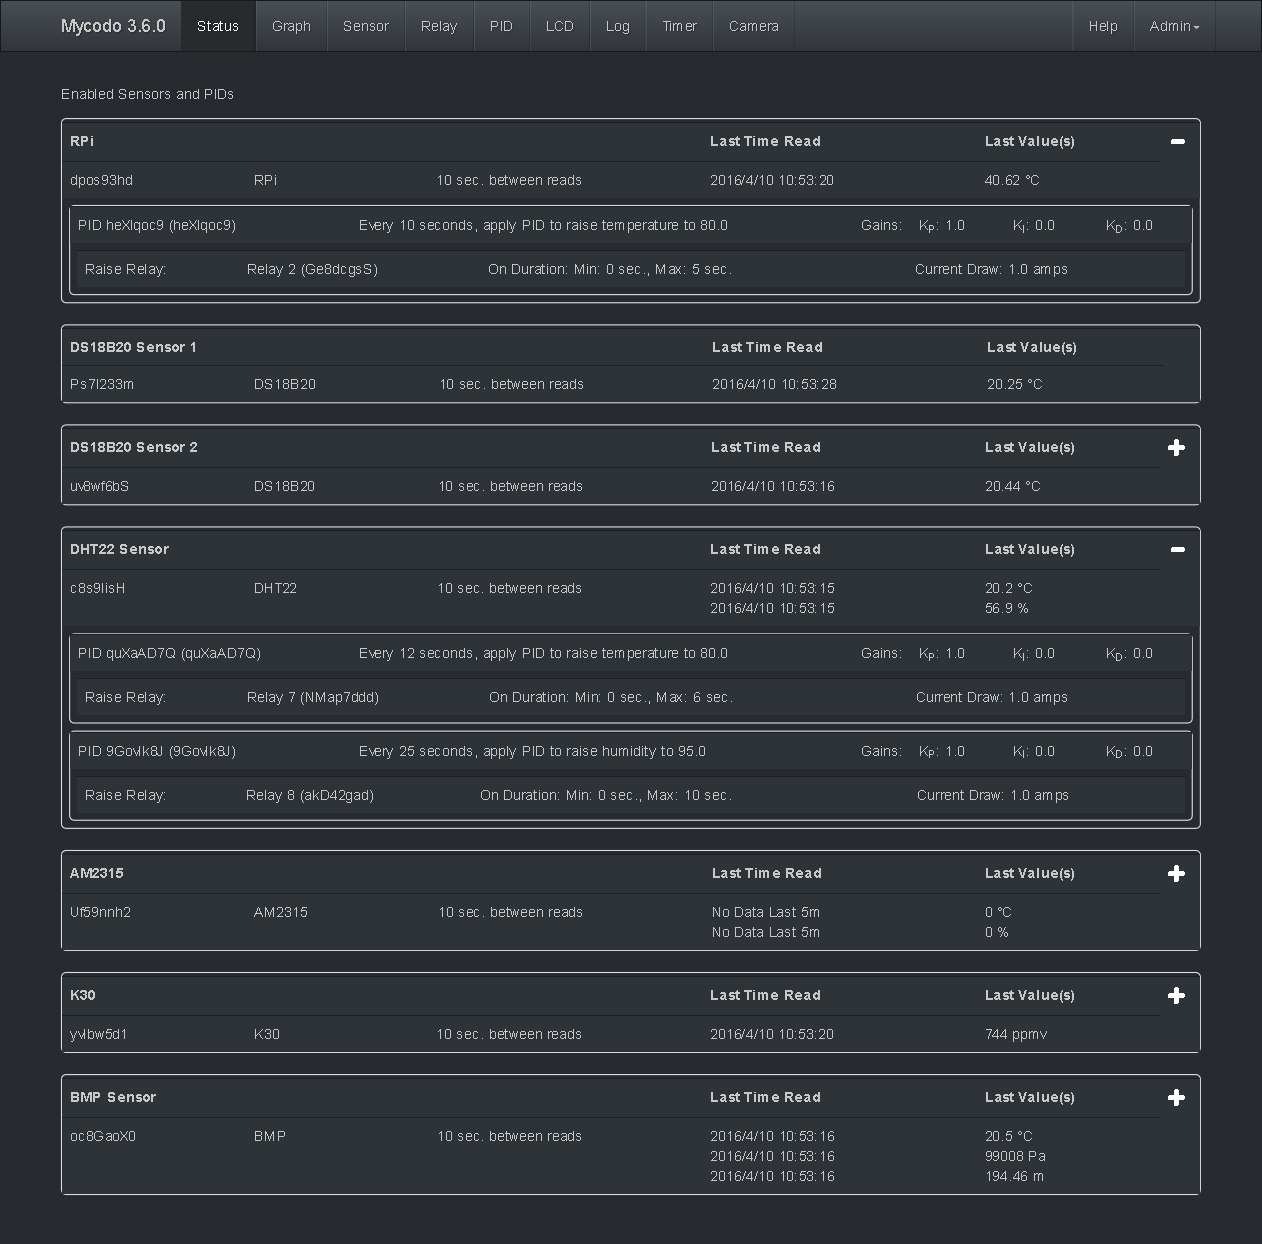
See the status of all sensors on one page
Create custom live graphs

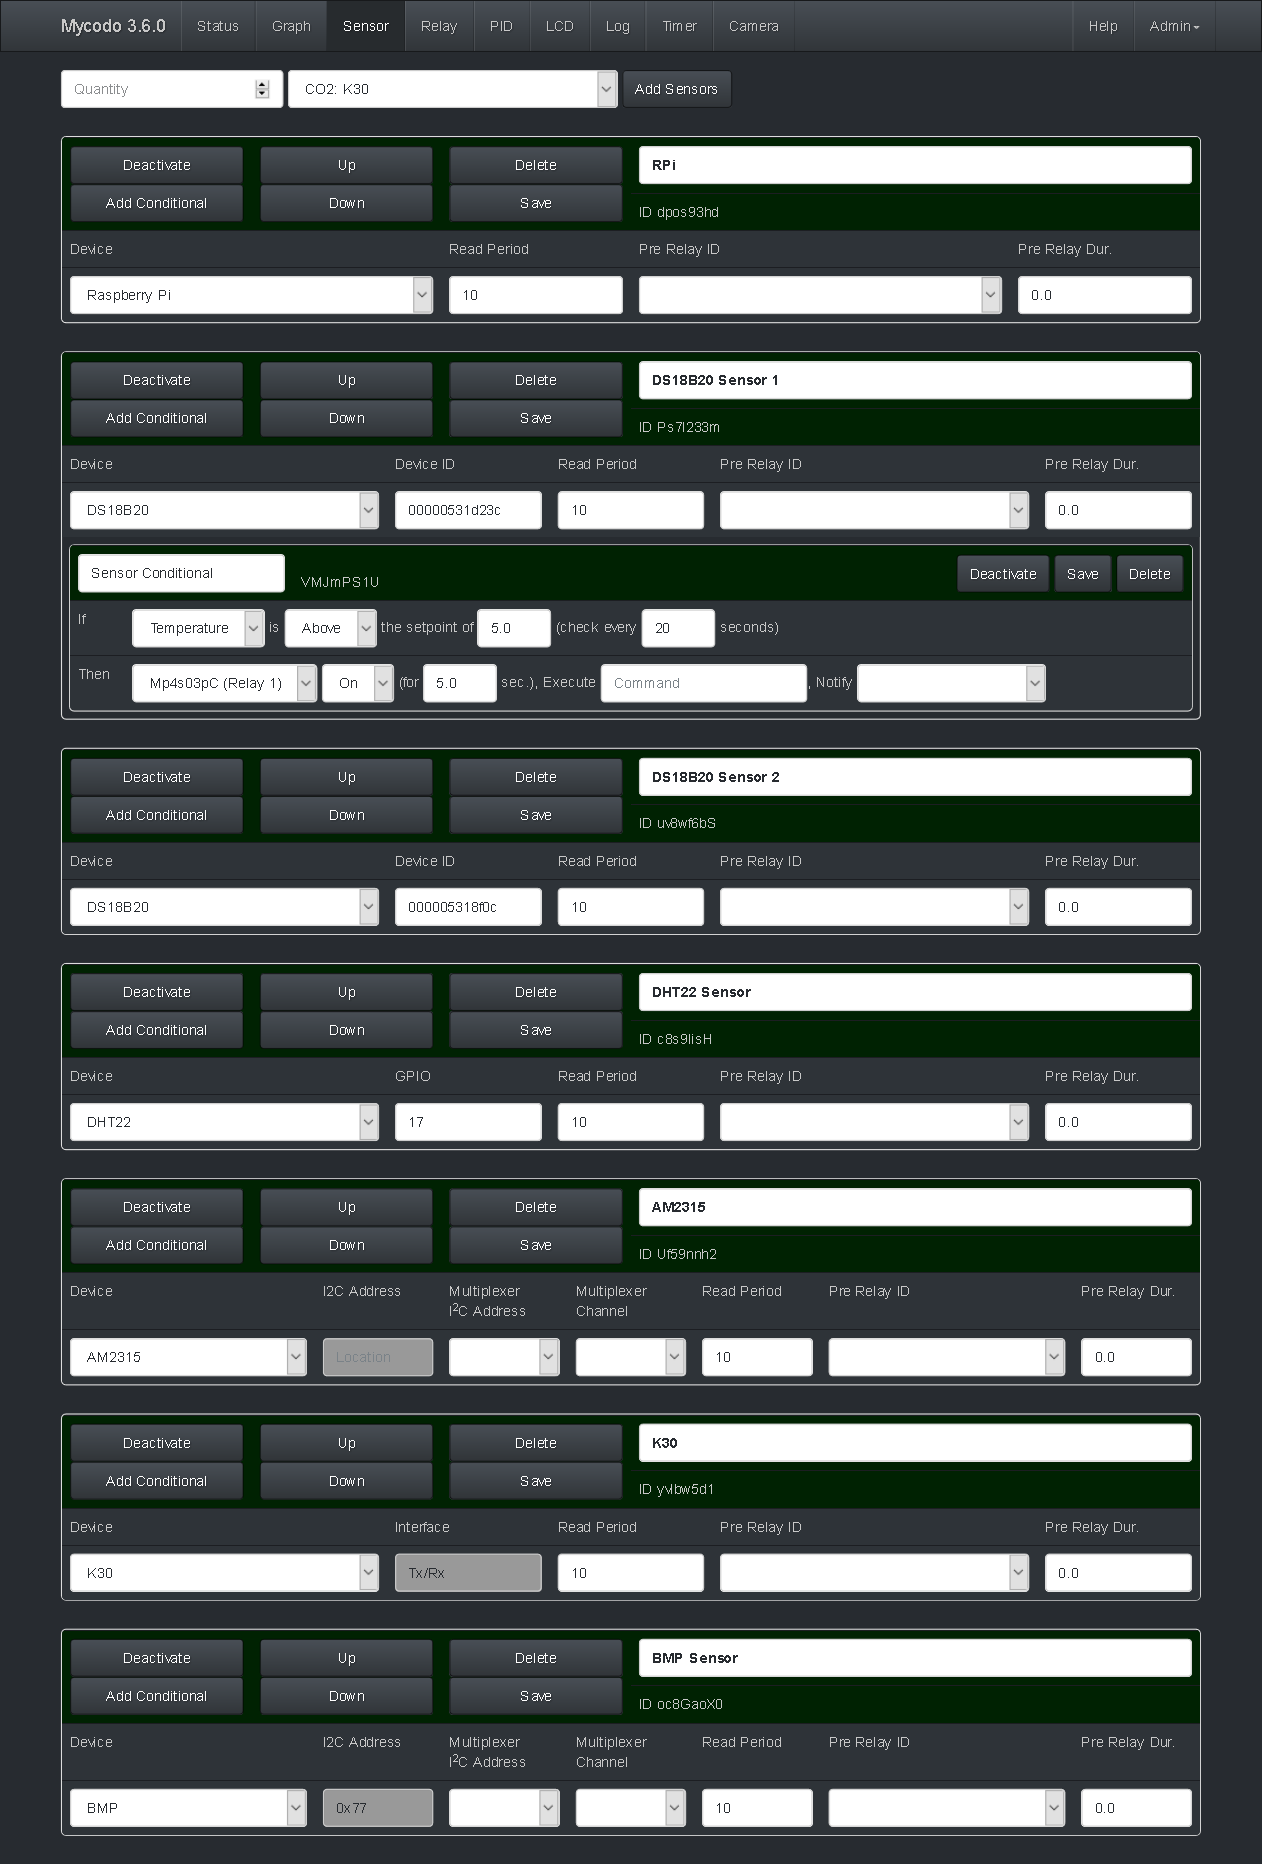
Add sensors
Configure and manipulate relays

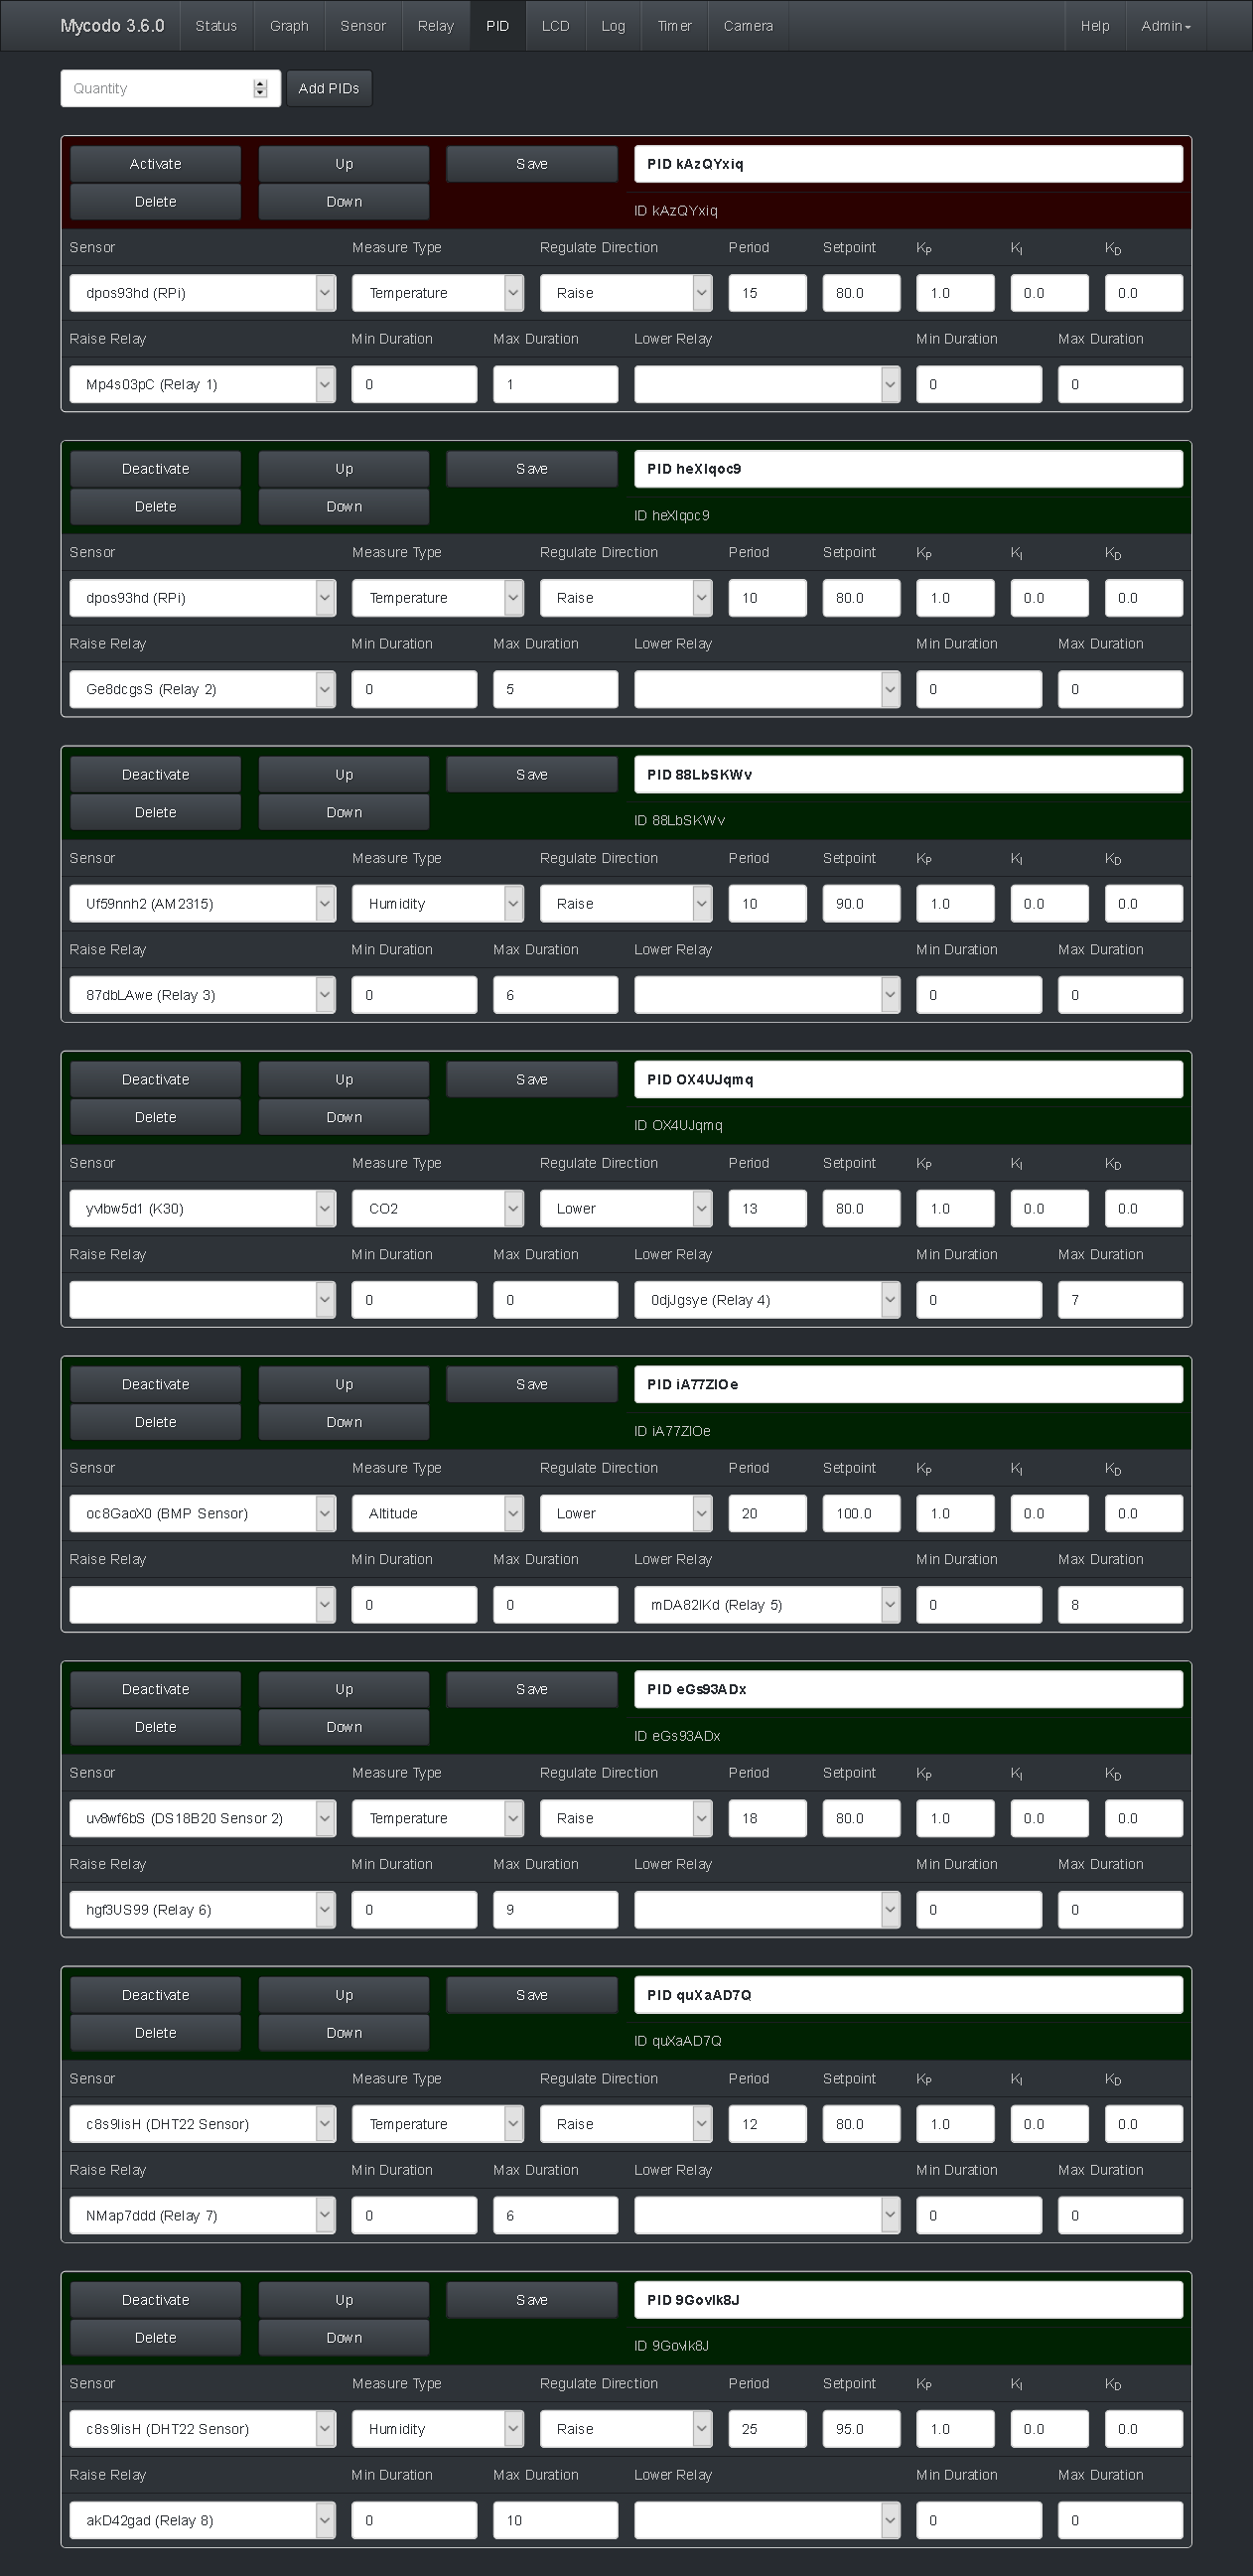
Create PID controllers
Output to LCDs

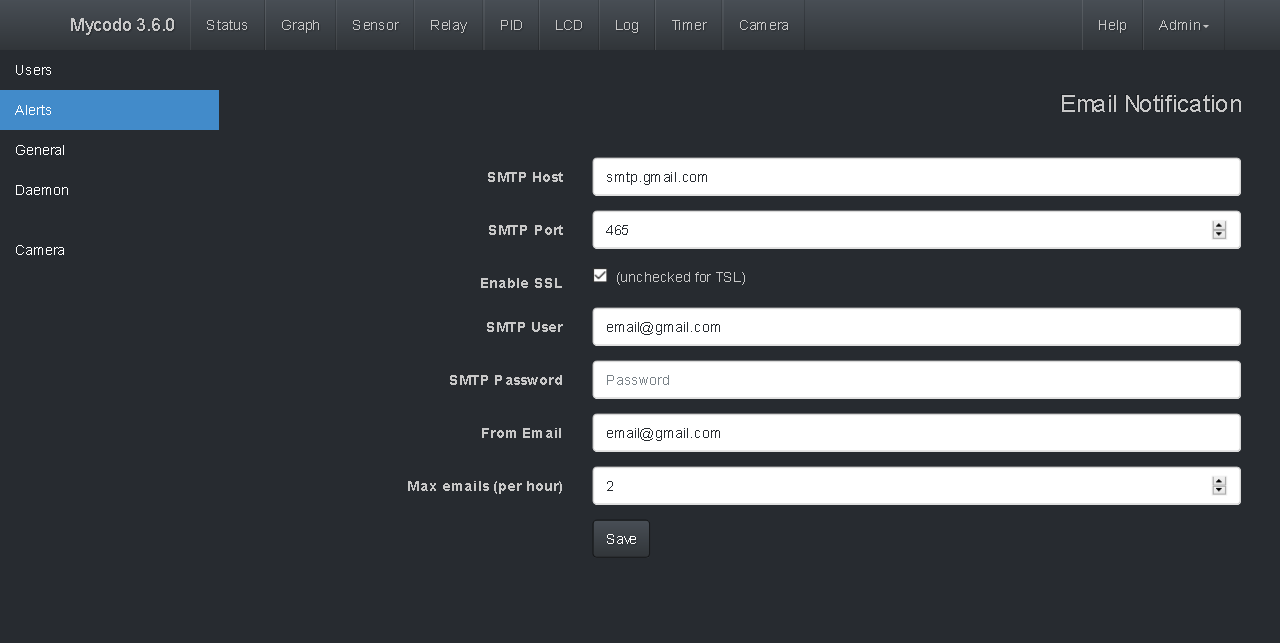
Change settings
Thanks for using and supporting Mycodo, however it may not be the latest version or it may have been altered if not obtained through an official distribution site. You should be able to find the latest version on github or my web site.