A basic autonomous rover built on ROS Indigo and using Seeduino's Hercules base with an RPLIDAR 360 for mapping and an Nvidia Tegra TX1 for higher level robot functions.
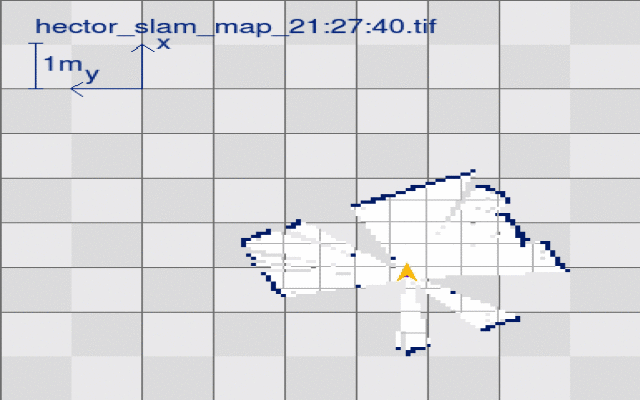
I recently read about the impressive performance people are getting from tiny (< 10 watt) Nvidia-embedded Jetson TX1 platform. This SOC has 256 GPU Cores courtesy of Nvidia's Maxwell architecture. Thanks to the CUDA extensions for C++ or OpenCL/CV, it has become quite reasonable to use all these cores for general tasks, not just graphics. That led me to the realization that the AWS G2 instance type, with its 4 NVidia GPUs, has ~5,000 cores! There is enormous potential in this rapidly maturing area, such as the work Facebook is doing with Torch and Google with TensorFlow. Both of these projects allow for deep learning accelerated by GPUs either using OpenCV or CUDA directly. I felt these technologies could help my team deliver some innovative features for our customers; however, I didn't know enough about them to be sure. I personally learn by doing, so I needed a project where I could use this technology to solve a real world problem. I needed a way to see, first hand, what Nvidia's CUDA or OpenCV could really do when pitted against a top-of-the-line CPU in an intensive task. So, I did what any bored engineer would do I fabricated a complex problem to answer a simple question: "How difficult is it to use a GPU to speed up a largely compute-bound operation?" As a software engineer, I've always been interested in hardware because it's such a different world, yet incredibly coupled/important to what I do every day. Naturally, I decided to build a robot that could use an embedded GPU (Nvidia's Jetson TX1 ... available on Amazon ;)) to run a statistical SLAM (Simultaneous Location and Mapping) algorithm for obstacle detection and avoidance (think Roomba, but without all the annoying bumping-into-stuff). The below GIF shows the first step in this project where the rover uses a spinning laser to get distance information and turns that into a map of the room the rover is currently in. Then, as the rover moves, the software uses a statistical model to "guess" (with relatively high accuracy) the location of the rover in the room given the new set of distances from objects it has seen before.
If you find this interesting, my team at Amazon's NYC headquarters is hiring all levels of engineers! Principal Engineers included. Message me with your resume for more info. If you come for an interview and do well, you might just find out why I'm so excited about the prospect of using the AWS G2 Instance type to accelerate our workloads! Contact me on LinkedIn
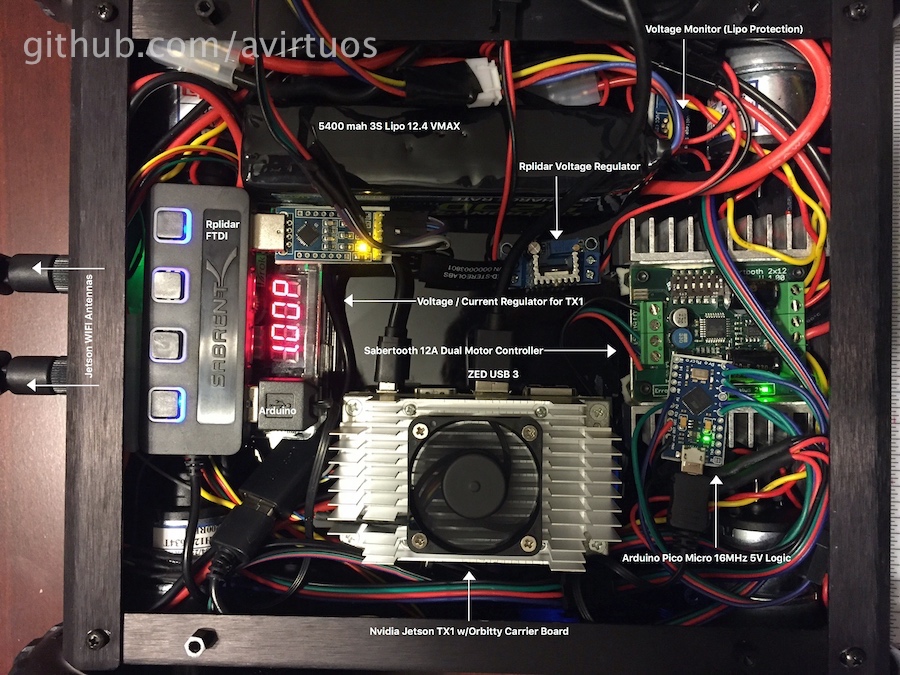
The core of this robotics platform is based around NVidia's Jetson TX1 Single Chip Computer, an RPLidar 360 Laser Scanner, and a LynxMotion 4WD Rover. You should feel free to substitude similar components if you wish but I've specifically selected the Jetson TX1 because of its lower power usage, broad support for ROS (Robot Operating System), and the 256 Cuda Compute Cores on its embedded graphics processor.
- Nvidia Jetson TX1 Module + Dev Kit ($300 after educational discount)
- Orbitty Carier Board ~$148
- RPLidar 360 ~ $440
- ZED Camera by StereoLabs ~ $449 (only useful if you have an Nvida graphics card!)
- Lynxmotion Aluminum A4WD1 Rover Kit ~ $220
- 2 x Lynxmotion Quadrature Motor Encoder (with Cable) ~ $30
- Sabertooth Dual 12A 6V-24V Regenerative Motor Driver ~ $80
- Arduino Pro Micro ~ $8
- LM317 Step Down Converter ~ $2
- 2 x USB Seriat UART ~ $5.44
- 16 GB Micro SdCard ~ $9
- Tamiya Connectors ~ $10
- LM2596 Voltage and Current Regulator ~ $18
- Low Voltage Monitor for 2S to 8S LiPO Batteries ~$10
- ESP8266 NodeMCU wifi Module ~ $6
- Set of 20 4-Pin Plug Male and Female Wire Cable Connectors ~ $7
- Assorted Spacers and Stand Offs
I like to start with some images of what you can expect this project to look like if you attempt it yourself, this usually helps folks understand what they are reading since they have a frame of refference to relate it to.

CP210x USB UART Driver (For RPLidar and ESP8266) https://www.silabs.com/Support%20Documents/Software/Mac_OSX_VCP_Driver.zip
- Comming Soon!
- Comming Soon!
- Comming Soon!
- Comming Soon!
Includes building some Jetson TX1 kernel modules for our USB UART, which were oddly excluded from the Jetson default build but already present in the kernel source!
- Comming Soon!
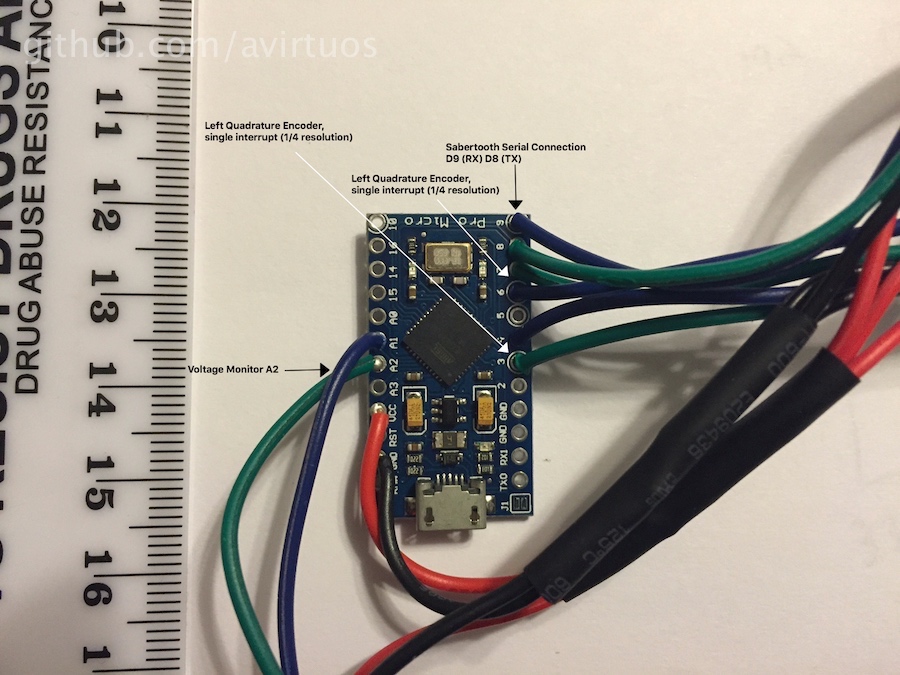
SoftSerial is notoriously difficult to get to work with any ATmega32u4 based Arduino due to an error in the interrupt table. The key is to ensure you are using pin 9 for RX, you can use pretty much any pin you like for TX.
If you don't use pin 9 for RX, what you'll see is that SoftSerial.read() will always return -1 even though there is indeed data to be read. This is because the interupts are not properly set on many (maybe all) ATmega32u4 based Arduinos. I confirmed this with my own set of Pro Micro(s) and a Leonardo.
In fact I spent several hours troubleshooting why I could not get any data from RPLidar 360 using their own Arduino Library when using SoftSerial but it worked when using HardwareSerial. Thankfully I happened to have a Logic analyzer handy and confirmed that my TX was being sent and the RPLidar was indeed responding on my RX line but SoftSerial could not see it.
I didn't fully undertand the difference between interrupts and the variety of pin change interrupt used by SoftSerial until after my several hours of troubleshooting. You can find more on differences Here.
At some point I decided to try and use the amazing Pro Micro (ATmega32u4) to process laser scan data from the RPLidar. After a bit of soldering, and the above SoftSerial nightmare, and the below ATmega32u4 bricking nightmare... I was finally able to read laser data from the arduino using a software serial port. Here is what I learned:
If you plan to do anything but trival activities (Whats direction is the closest obstacle), don't bother doing it on an Arduino. I was originally hoping to use the Arduino to reduce the number of USB ports needed by the Jetson TX1 but found that the ATmega32u4 could only read:
-
~110 samples a second from the RPLidar when also publishing the samples via ROS Serial for Arduino.
-
~900 samples a second from the RPLidar with minimal processing (min direction).
-
~1500 samples a second from the RPLidar with minimal processing (min direction) and my RPLidar perfomance patch
-
RPLidar is capable of 2000 samples a second.
This was rather disappointing but reaffirmed my choice of using the Jetson TX1 because even while processing 2,000 samples a second from the RPLidar it is able to run a hector_mapping node, save generated maps, publish to a remote RViz instance, and run my custom robot software.
If you plan on using an Arduino Leonardo, the Pro Micro, or anything based on the ATmega32u4 you should be careful not to upload a sketch that causes a reset loop. This is because the ATmega32u4 actually uses a compile time injected piece of code that allows for programming of the board. You WILL brick your arduino if you submit a sketch like the one below.
void setup(){

}

void loop(){
	Print* myPrinter = null;
	pointer->->print("This call triggers an NPE and reset of the board because myPrinter is null!");
}
I bricked three ATmega32u4s before realizing what was going on, oddly there is VERY little online about how easy it is to brick them. There are some tricks to try and recover from this but in the above example none of them will work because the board resets so quickly that your Operating Systems's USB port will not be able to recognize the device. Your only option at that point is to program the chip directly, assuming your board has the appropriate pinouts... unlike the Pro Micro.
So, as a safety I recommend always adding a short sleep to the setup() method so you ensure your Operating System will have time to recognize the device and allow you to upload a corrected sketch.
void setup(){
	delay(4000);	//sufficient for USB to be detected and sketch upload to begin.
}

void loop(){
	Print* myPrinter = null;
	pointer->->print("This call triggers an NPE and reset of the board because myPrinter is null!");
}
While the ZED camera from StereoLabs was very quick to get up and running thanks to their tutorials, there were a few aspects of the camera's performance that puzzled me but are easily explained once your find the supporting reasons.
- HD2K is not supported on the TX1, yet... so if you change the resolution setting past 1080 you'll get strange errors from the sed_wrapper for ros.
- The point cloud or depth image were unusable for 2D laser scan projection ( via depthimage_to_laserscan ) but looking at the depth image myself it was actually very good at detecting obstacles as they approach. This was indoors, so outdoor performance may vary but generally the performance mode was much better at mapping out a room, detecting walls and furniture. The quality mode was better at detecting a shoe in the path of my rover though.
- You may be tempted to use the point cloud to do obstacle detection, either natively or via pointcloud_to_laserscan, but both of these options will produce far lower frame rates than using the depth image directly. After performance providing the zed_wrapper with callgrind its pretty clear that generating the point cloud from the depth image is costly. I was only able to achieve 2 - 4 HZ in with the 1080 resolution when subscribing to the pointcloud even though the depth image was being publish at nearly 18 HZ. This is when I switched to depthimage_to_laserscan and was able to produce laserscans at the same rate as the depth image. This makes sense since the laser scan is only using a small portion of the depthimage and not generating nearly as many points as the point cloud.
- I've yet to test the ZED outdoors as the weather hasn't been the best for that but I'll update when I get the chance to do so.