The goal of this repository is to provide a working example and framework of an FRC robot using ROS to other teams, so that they too can explore the advantages of ROS. This repository hosts the ROS code from the 2020 FRC Season Robot created by FRC Team 624 and is configured for the game Infinite Recharge with certain sensors. However, it is not difficult to implement your own sensors and game specific content into this framework. When testing on a non-FRC robot, the proxy node can be replaced to interface with your hardware. If you are interested in learning how to get ROS working for yourself with a simulator and the physical robot or looking for a more detailed documentation, check out the ROS wiki of this repository.
This is a quick demo that briefly covers many of the features that our team utilized this season.

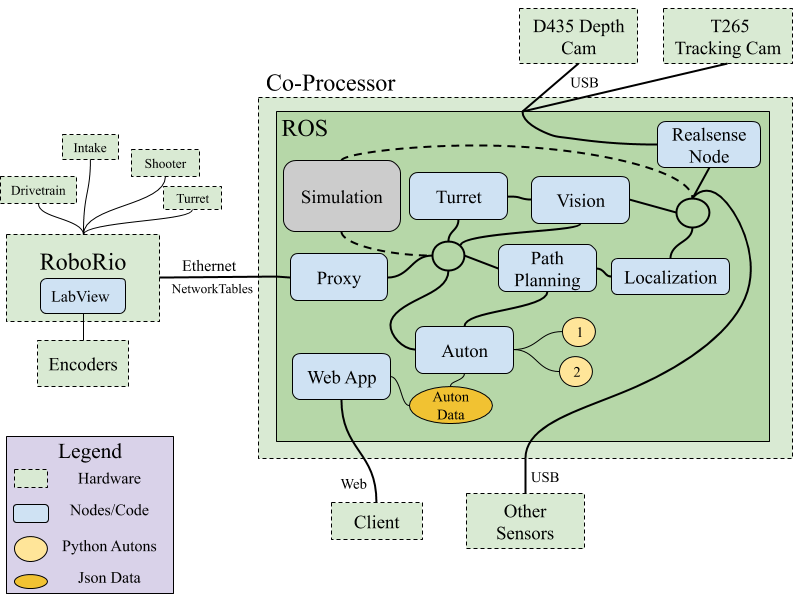
Shown below is a diagram of how ROS was configured to work with a FRC robot.
-
- The proxy node handles all the communication between the RoboRio and the co-processor. It passes simple data like strings, booleans, and integers through networktables. In our case the proxy receives data indicating if the robot is in auton and which auton to run, along with data from the different sensors on the robot. The node outputs command velocities for the robot's drivetrain, turret angle, and other subsystem controls.
-
- The code on the RoboRio takes in data from the ROS proxy as setpoints for PIDs running on the robot while also using joystick input and ROS state data to manage different subsystems throughout the robot during both autonomous and teleop.
-
- We used the T265 Realsense Tracking camera as our main sensor source during autonomous. It uses visual odometry combined with a built in IMU to accurately reflect the robot's position. The realsense node shown above is needed to transform the robot pose if the camera was offset from the center of the robot base.
- We used the D435 Depth Camera to do vision tracking of the target. The choice of camera was probably a mistake for this year on account of cheaper cameras being available or just using a limelight. We hoped to use the point cloud but did not really find the use in this year's game.
- We also used encoders as a feedback device for the PIDs in subsystems like the turret and shooter
-
- We used the ROS package robot-pose-ekf to publish the robot's position from the sensor sources. This year we did not use the package's full capabilities as a Kalman filter by combining multiple sensor sources, but the use of this package makes it really easy to add other sources in the future. The robot pose is then used by the autonomous node to guide the robot along a path.
We started the 2020 season hoping to achieve full field localization using move_base and a variety of sensors including the rplidar. We got an early form of this working but ran into some problems close to the end of build season and were forced to switch over to a simpler solution to planning included in diff_drive which proved enough for the sort of autonomous needed in FRC. The nice thing with ROS is that if we ever need to switch to a more complicated solution it won't be too hard to scale up.
-
- The Path Editor node creates a web app to easily create autonomous paths that can be later used in the autonomous script. The edited data is saved in a json file located on the co-processor that the autonomous scripts can then load and use. The web server is started on the robot so, users should be able to connect to the robot's wifi and use the web app.
-
- The autonomous on the robot is managed by a node that loads simple python statemachines that define the wanted actions of the robot. Once receiving data from the proxy indicating that autonomous is enabled it will run the specified auton and send data back to the proxy and RoboRio in order to control the robot.
-
- The node uses opencv to do tracking on the target. It sends pixel values of the y and x offset from the target to be used for shooting.
-
- The node uses a PID to output a wanted velocity to the proxy in order to control the turret. The feedback is the x-offset from the vision tracking and the setpoint is the middle of the camera frame.
-
- We also used the y-offset as an input to a regression of the needed hood angle and flywheel rpm to make the shot.
- Simulation of the robot in FRC replaces the proxy node and RoboRio, accepting all the data the robot normally would. It also replaces the sensor sources with ones which are simulated. Otherwise the bulk of the ROS code remains the same allowing for effective testing of the robot code. As of now the simulator is a simple node replacing the sensor data and visualizing it through rviz, but in the future we plan to use the ros-sharp library to further expand this with Unity.
NOTE: This repository was made to run on Ubuntu 16 with ROS Kinetic already installed. If you don't have this set up, there are many ways to do this which are outlined within the wiki of this repository. If you want to quickly get set up and run a demo without installing Ubuntu, follow the quick start instructions for ROS Development Studio.
Before starting, make sure to install the ROS package below. It is critical that this package is properly installed as the repository is dependent upon it.
sudo apt-get install ros-kinetic-robot-pose-ekf
In order to run a simple simulation of the robot code, clone the workspace below into your home folder.
git clone https://github.com/LeonidasVarveropoulos/robot-frc.git
There are two subrepositories within the main repository: diff_drive and realsense-ros. In order to use these two subrepositories, you must first initialize and update them. For more information on how to use submodules, visit the wiki.
NOTE: If you do not plan to use or physically don't have the realsense cameras, do not initialize the realsense-ros sub-repository because there are additional items you need to install first. To continue with the demo, just remove the directory from the project
First, change the directory to the sub-repository. Then, initialize the submodule and update it.
cd robot-frc/src/diff_drive
git submodule init
git submodule update
First, only if you have the physical cameras, install the necessary dependencies by following the instructions on the realsense repository. Afterwards, change the directory to the sub-repository. Then initialize and update the repository, instead of cloning it, into the directory as the normal instructions specify.
cd robot-frc/src/realsense-ros
git submodule init
git submodule update
Now you should see all of the directories and files within those sub-repositories. Next, build the Catkin workspace in the repository's base directory and make sure that there were no errors.
cd
cd robot-frc
catkin_make
In order to run a simple example of an autonomous executing in simulation, run the following commands in different terminals:
source ./scripts/demo.sh
Launches the launch file to start all of the nodes in simulation.
rviz
Launches a visualization tool for viewing the robots odometry and other information.
rqt or rqt --perspective-file ./config/DefaultDash.perspective
Launches a tool for managing the ROS system while the simulation is running.
Before starting make sure to load in the correct view in rviz by going to file/OpenView and then selecting the file with the path robot-frc/config/defualt_view.rviz.
In order to start the ROS state machine that manages autonomous, we need to publish two topics: auto/state and auto/select. While we could do this through the command line with rostopic pub, it is much easier to use the tool rqt that you launched above. To load the pre-made dashboard, go to the perspectives tab of the app and choose to load in a configuration file with the path of robot-frc/config/DefaultDash.perspective.
Once loaded in, you will see an option to publish to these two topics. Simply check the box with the topic name to have it publish. To start the auton, set auto/state to True and auto/select to 1. This will start the auton and you should be able to see ROS logging what the state machine is doing on the left side of rqt. If you switch over to rviz you should see the robot following the paths given.
To stop and reset the auton state machine, set the auto/state to false. On a non-simulated robot, this would be accomplished by disabling the robot.
For more information on how to configure ROS for your own physical robot and learn how to create your own autonomous, visit the repository's wiki.
For information on how to setup the vision processing, including tuning, look here vision_targeting
The parameters effecting many of the nodes existing within this repository are documented below.
This is a ROS node that publishes cmds to the robot in order to follow the given path. This is a modified documentation of the forked repository. We only use the diff_drive_go_to_goal node in this repo.
2. autonomous
This is a ROS node that runs the python auton scripts created as a statemachine during autonomous.
3. path_editor
This is a ROS node that runs a web app with Flask for creating autonomous paths. All data is stored within a file called data.txt in the package.
4. proxy
This is a ROS node that manages the transfer of data from the ROS system to the RoboRio. This node uses networktables to communicate with the RoboRio.
5. robot_pid
This is a ROS node that allows for the quick creation of simple PIDs to be used throughout the robot.
6. reset_pose
This is a ROS node that allows for the resetting of the robot pose without restarting all the sensors.
This is a ROS node that allows for the tracking of the vision target. Tuning and setup will be explained here.