Deep Learning for Sign Language Recognition using ResNet
This is the final article in a series of experiments with deep learning for image recognition. In the first one, it is a simple deep learning model with two hidden layers and an output layer. In the second one, it uses a convolutional neural network which follows LeNet-5 architecture. And in this one another convolutional neural network model which is called ResNet (Deep Residual Learning for Image Recognition) is used.
It is observed that when a neural network is very deep with many layers, with the network depth increasing, at certain point the accuracy starts to degrade. This is due to vanishing/exploding gradients.
ResNet mitigates this problem by introducing residual learning building block. In this block a few layers are stacked together and input X is added to the output of the last layer before final activation. This is called “skip connection” or “shortcut” and illustrated below:

And ResNet is formed by stacking many of these blocks together. In the authors’ paper, depending on the number of blocks and the number of layers per block, they proposed 18-layer, 34-layer, 50-layer, 101-layer and 152-layer models as follows:
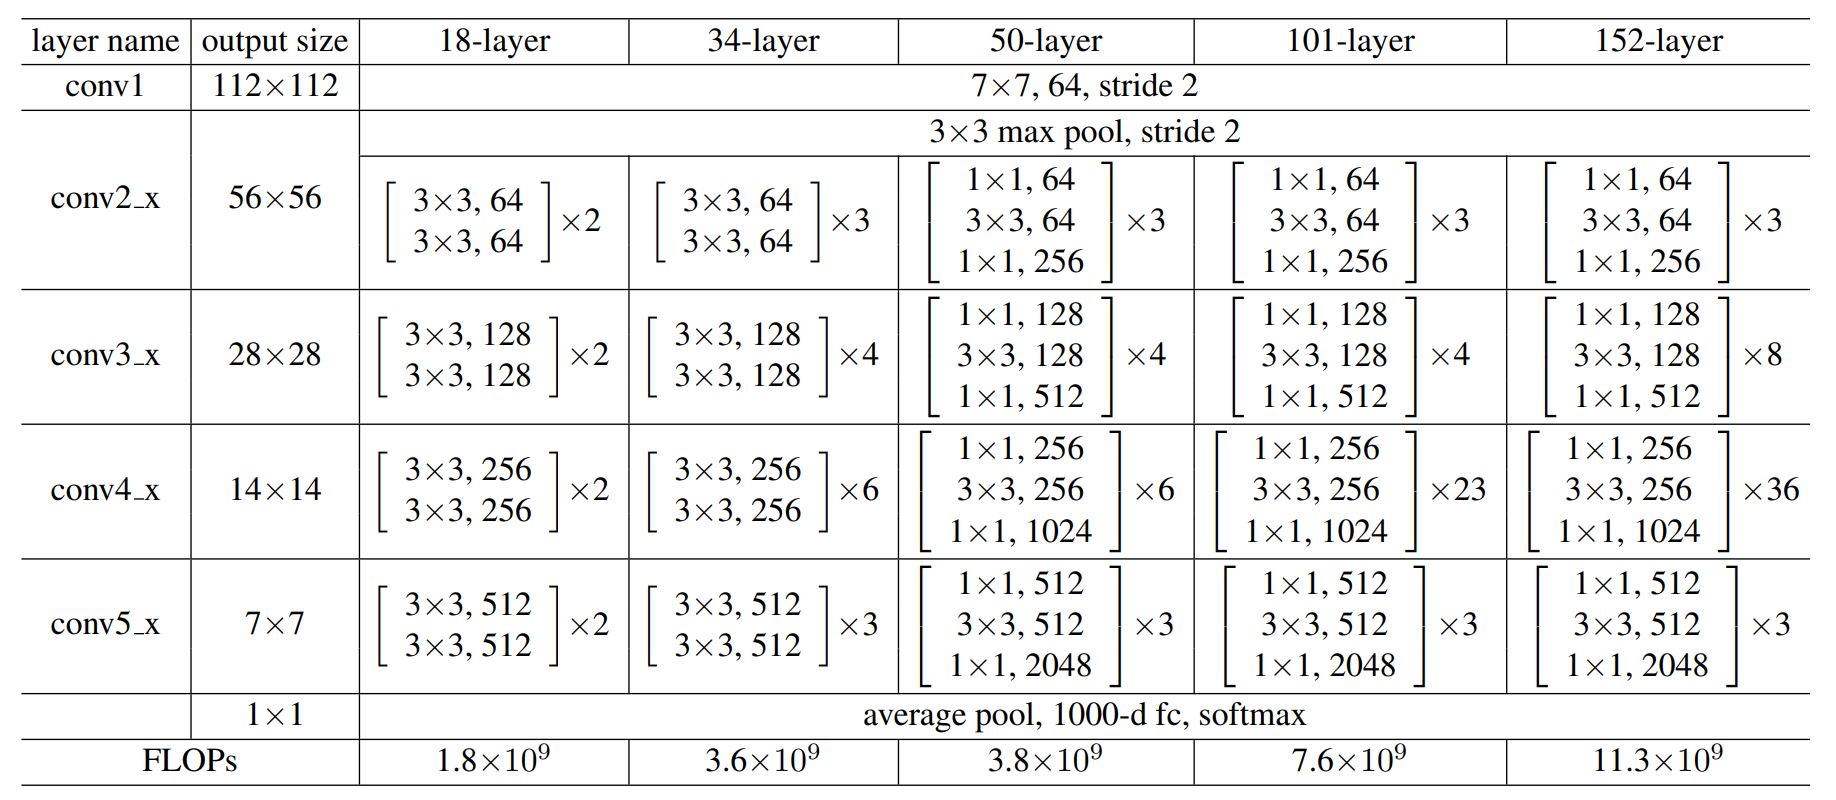
In ResNet’s implementation when the number of filters is doubled (e.g. from 64 to 128), the feature map size is halved, and downsampling is done by convolutional layers that have a stride of 2.
In this sign language recognition task, the image size is small (28×28) and downsampling has become an issue as the feature map size will become 1×1 quite rapidly. So I decided to use the 18-layer model and not use max pooling and average pooling to make sure the feature map size does not go below 1×1.
As mentioned above a fundamental element of ResNet is the learning block. Each block in the 18-layer model has 2 layers, with the filter size is 3×3. The number of filters goes from 64 -> 128 -> 256 -> 512.
A residual learning block, a.k.a identity block, is implemented below:
def identity_block(X, filters, stage, block):
    """

    Arguments:
    X -- input tensor of shape (m, n_H_prev, n_W_prev, n_C_prev)
    filters -- python list of integers, defining the number of filters in the CONV layers of the main path
    stage -- integer, used to name the layers, depending on their position in the network
    block -- string/character, used to name the layers, depending on their position in the network

    Returns:
    X -- output of the identity block, tensor of shape (n_H, n_W, n_C)
    """

    # defining name basis
    conv_name_base = 'res' + str(stage) + block + '_branch'
    bn_name_base = 'bn' + str(stage) + block + '_branch'

    # Retrieve Filters
    F1, F2 = filters

    # Save the input value. You'll need this later to add back to the main path.
    X_shortcut = X

    # First component of main path
    X = Conv2D(filters = F1, kernel_size = (3, 3), strides = (1,1), padding = 'same', name = conv_name_base + '2a', kernel_initializer = glorot_uniform())(X)
    X = BatchNormalization(axis = 3, name = bn_name_base + '2a')(X)
    X = Activation('relu')(X)

    # Second component of main path
    X = Conv2D(filters = F2, kernel_size = (3, 3), strides = (1,1), padding = 'same', name = conv_name_base + '2b', kernel_initializer = glorot_uniform())(X)
    X = BatchNormalization(axis = 3, name = bn_name_base + '2b')(X)
    # Final step: Add shortcut value to main path, and pass it through a RELU activation
    X = Add()([X, X_shortcut])
    X = Activation('relu')(X)

    return X
When the dimensions increase, such as in the case of going from 64 to 128 filters (dotted line in figure below), we need to match up the dimension of input X.

Hence we need another implementation of identity block for those cases. I named it convolutional_block:
def convolutional_block(X, filters, stage, block):
    """
    Implementation of the convolutional block as defined in Figure 4

    Arguments:
    X -- input tensor of shape (m, n_H_prev, n_W_prev, n_C_prev)
    filters -- python list of integers, defining the number of filters in the CONV layers of the main path
    stage -- integer, used to name the layers, depending on their position in the network
    block -- string/character, used to name the layers, depending on their position in the network

    Returns:
    X -- output of the convolutional block, tensor of shape (n_H, n_W, n_C)
    """

    # defining name basis
    conv_name_base = 'res' + str(stage) + block + '_branch'
    bn_name_base = 'bn' + str(stage) + block + '_branch'

    # Retrieve Filters
    F1, F2 = filters

    # Save the input value
    X_shortcut = X
    ##### MAIN PATH #####
    # First component of main path
    X = Conv2D(F1, (3, 3), strides = (2, 2), padding = 'same', name = conv_name_base + '2a', kernel_initializer = glorot_uniform())(X)
    X = BatchNormalization(axis = 3, name = bn_name_base + '2a')(X)
    X = Activation('relu')(X)
    # Second component of main path
    X = Conv2D(F2, (3, 3), strides = (1, 1), padding = 'same', name = conv_name_base + '2b', kernel_initializer = glorot_uniform())(X)
    X = BatchNormalization(axis = 3, name = bn_name_base + '2b')(X)
    ##### SHORTCUT PATH ####
    X_shortcut = Conv2D(F2, (3, 3), strides = (2, 2), padding = 'same', name = conv_name_base + '1', kernel_initializer = glorot_uniform())(X_shortcut)
    X_shortcut = BatchNormalization(axis = 3, name = bn_name_base + '1')(X_shortcut)
    # Final step: Add shortcut value to main path, and pass it through a RELU activation (≈2 lines)
    X = Add()([X, X_shortcut])
    X = Activation('relu')(X)

    return X
And finally we can put them together to create ResNet-18 model:

def ResNet18(input_shape = (28, 28, 1), classes = 24):
    """
    Implementation of the popular ResNet18
    Arguments:
    input_shape -- shape of the images of the dataset
    classes -- integer, number of classes
    Returns:
    model -- a Model() instance in Keras
    """

    # Define the input as a tensor with shape input_shape
    X = X_input = Input(input_shape)

    # Zero-Padding
    X = ZeroPadding2D((3, 3))(X_input)

    # Stage 1
    X = Conv2D(64, (7, 7), strides = (2, 2), name = 'conv1', kernel_initializer = glorot_uniform(seed=0))(X)
    X = BatchNormalization(axis = 3, name = 'bn_conv1')(X)
    X = Activation('relu')(X)
    #X = MaxPooling2D((3, 3), strides=(2, 2))(X)
    # Stage 2
    X = convolutional_block(X, [64, 64], stage=2, block='a')
    X = identity_block(X, [64, 64], stage=2, block='b')
    # Stage 3
    X = convolutional_block(X, [128, 128], stage=3, block='a')
    X = identity_block(X, [128, 128], stage=3, block='b')
    # Stage 4
    X = convolutional_block(X, [256, 256], stage=4, block='a')
    X = identity_block(X, [256, 256], stage=4, block='b')
    # Stage 5
    X = convolutional_block(X, [512, 512], stage=5, block='a')
    X = identity_block(X, [512, 512], stage=5, block='b')
    # AVGPOOL
    # X = AveragePooling2D(pool_size=(2,2), name='avg_pool')(X)
    # output layer
    X = Flatten()(X)
    X = Dense(classes, activation='softmax', name='fc' + str(classes), kernel_initializer = glorot_uniform(seed=0))(X)

    # Create model
    model = Model(inputs = X_input, outputs = X, name='ResNet18')
    return model
To save time I run it with only 2 epochs:
# train the neural network
model = ResNet18(input_shape = (28, 28, 1), classes = 24)
model.compile(optimizer='adam', loss='categorical_crossentropy', metrics=['accuracy'])
model.fit(X_train, Y_train, epochs = 2, batch_size = 32)
And here is the result:

It achieved 97.99% accuracy on training set and 85.58% accuracy on test set.
If the number of epochs is increased to 10:


I achieved 99.36% accuracy on training set and 92.31% accuracy on test set.