BiSpark is a highly parallelized bisulfite-treated read aligner algorithm that utilizes distributed environment to significantly improve aligning performance and scalability. BiSpark is designed based on the Apache Spark distributed framework and shows highly efficient scalability.
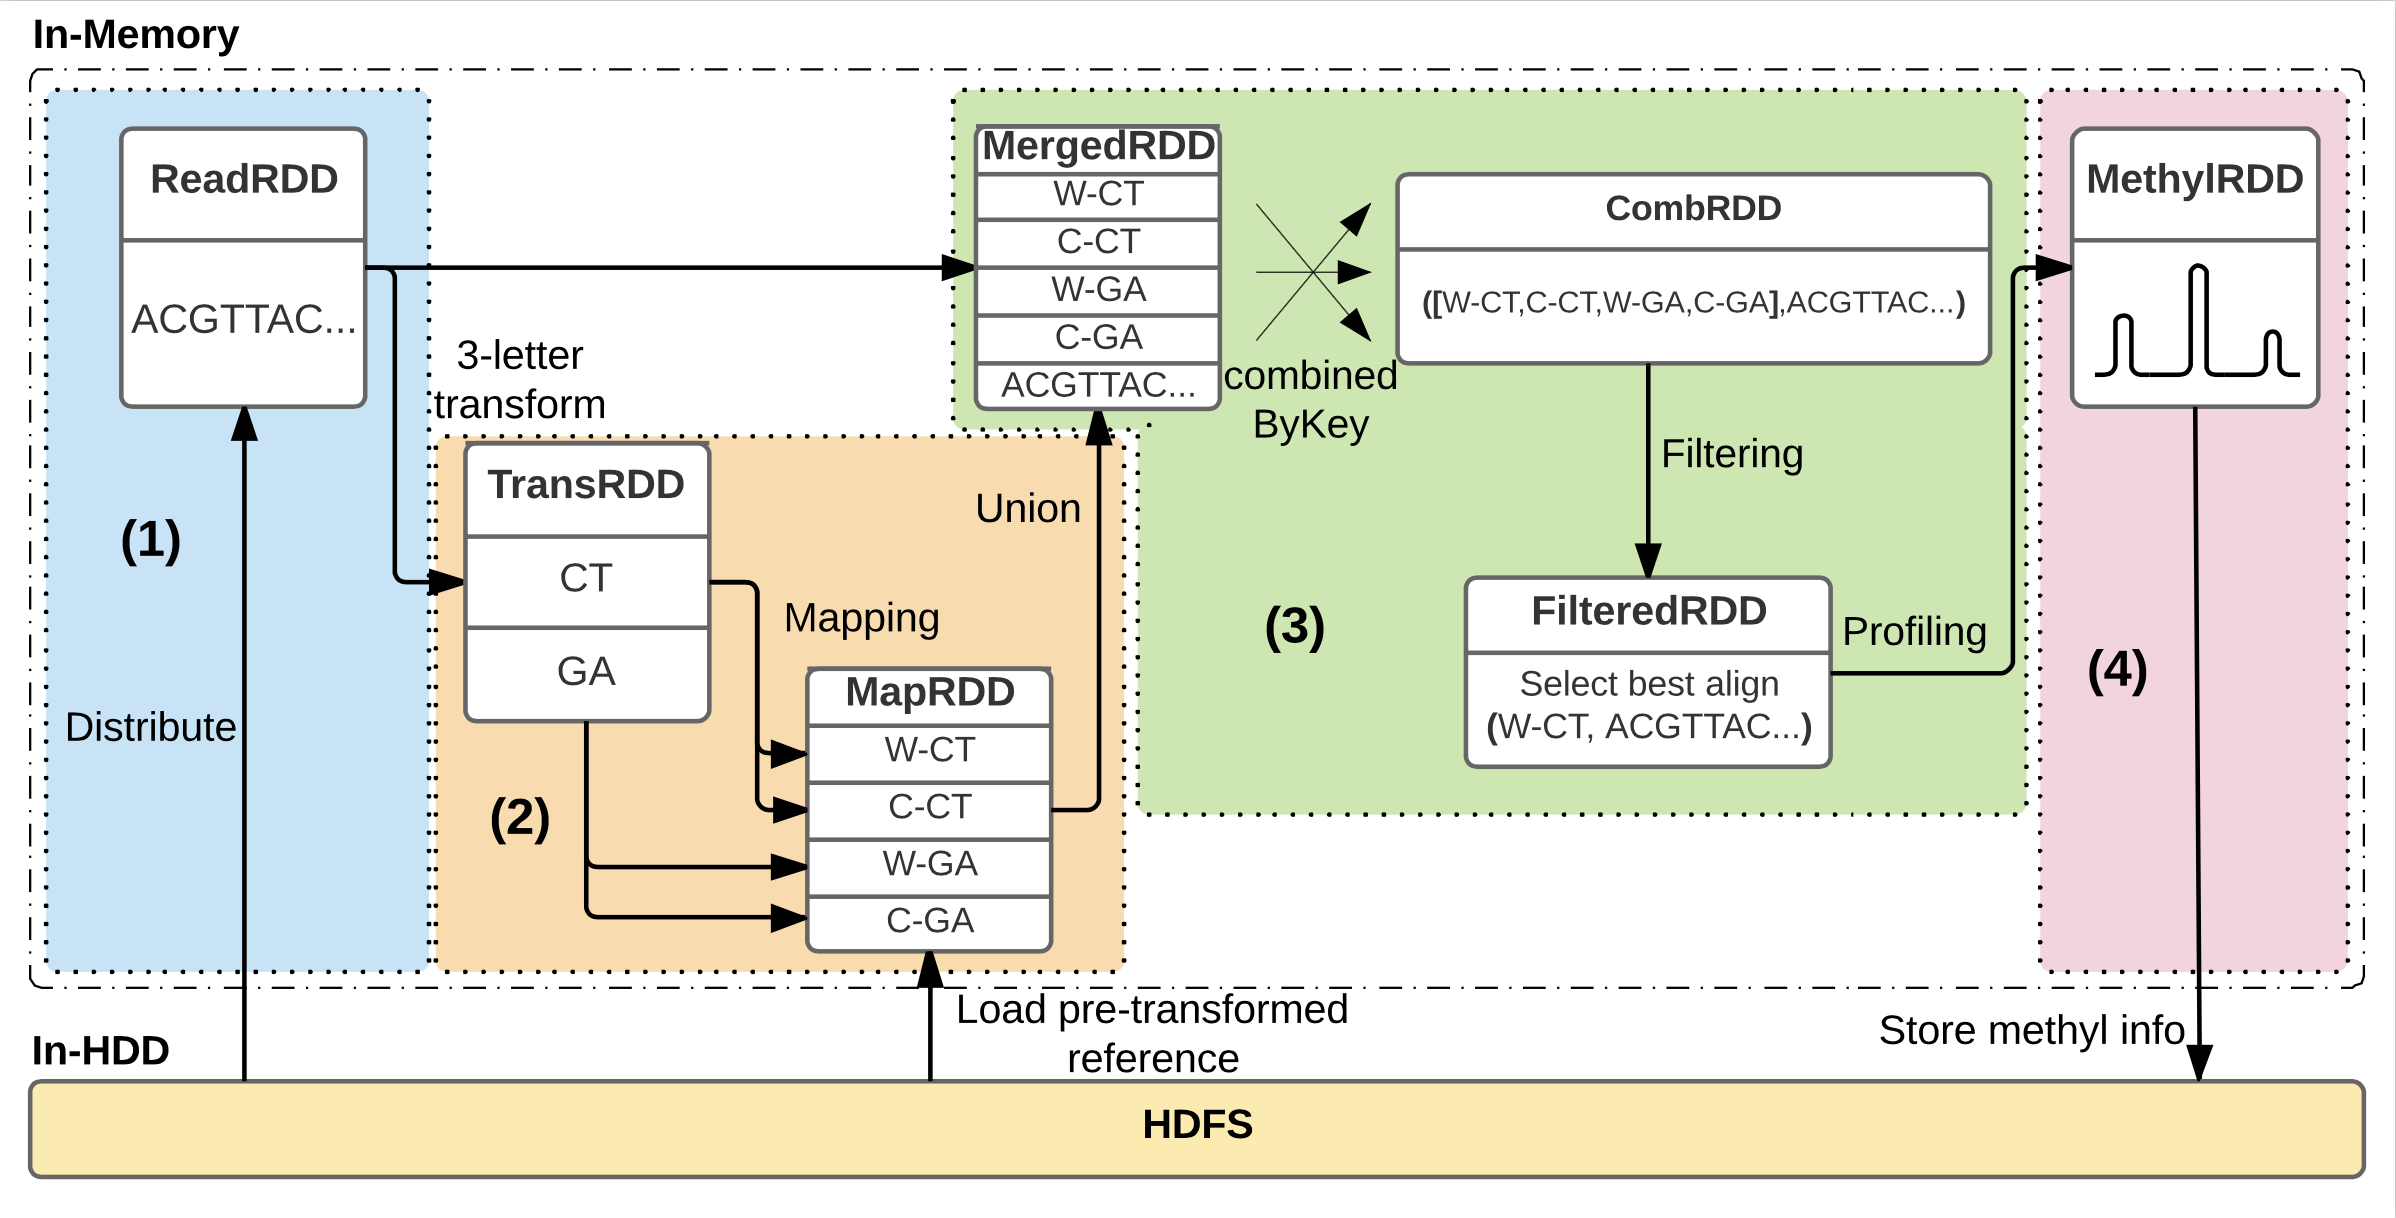
Analysis workflow within BiSpark consists of 4 processing phases: (1) Distributing the reads into key-value pairs, (2) Transforming reads into ‘three-letter’ reads and mapping to transformed reference genome, (3) Aggregating mapping results and filtering ambiguous reads, and (4) Profiling the methylation information for each read. The figure depicts the case when library of input data is a non-directional.
- Fast and well scalable to both data size and cluster size.
- Based on Apache Spark: Easy to use. No restriction on the number of nodes.
- Using HDFS: Do not need to consider files to be distributed by user.
BiSpark is implemented on Apache Spark framework and HDFS file system. Bowtie2 is also used to alignment, thus all three frameworks and programs should be installed before running BiSpark. Bowtie2 should be callable on all slave nodes.
- Python: 2.6, 2.7
- Apache Spark: >= 1.6
- HDFS: 2.6
- Building Index (reference: ./src/build_index/run.sh)
- --input: Input reference FASTA file located in HDFS.
- --output: Output directory for indexing files in HDFS.
- --log: Local log file path.
- Alignment (reference: ./src/alignment/run.sh)
- --input: Input reference FASTA file located in HDFS.
- --output: Output directory for indexing files in HDFS.
- --log: Local log file path.
- --ref: Index dicrectory in HDFS. Should be same path as denoted as '--output'.
- --nodes: The number of executors. = (# of nodes of cluster) * (# of spark executors in each node)
- --num_mm: The number of maximum mismatches (default: 4)
- --local_save: Local output sam file path.
- --testmode: Switching testmode for experiment. Should be one of 'balancing' or 'plain'.
- --appname: Application name that are used for Spark's application name.
Now pre-built BiSpark AMI(AMI#:ami-dcab9ab9, Region: Ohio) is available on the Amazon EC2. Belows are step-by-step procedure of how to deploy the BiSpark by using the AMI.
-
Creating cluster instance based on BiSpark AMI.
- Set the region of EC2 as US East (Ohio).
- In the left menu, select ‘IMAGES – AMIs’.
- Change search filter from ‘Owned by me’ to ‘Public Images’.
- Enter the image name ‘ami-dcab9ab9’.
- After selecting the AMI with the name ‘BiSparkImg’, press Launch button.
- Select the instance type that has more than 8GB memory and press ‘Next: Configure Instance Details’.
- Set the number of instances in the cluster and press ‘Next: Storage’.
- Set the size of /dev/sda1 with more than 20GB and press ‘Next:Add Tags’.
- Skip configuring Add Tags and press ‘Next:Configure Security Group’.
- Add Rule with TCP 7077, 8020, 8031, 8032, 8042, 8080, 8088, 50010,50070 sources from anywhere (for simplicity, open all ports from 4000-55000).
- Review and launch the cluster.
-
Checking if the cluster is correctly deployed.
- In the left menu, select INSTANCES – instances.
- Select one of the instances as the master. Memorize the private IP of the master node. (Not public IP).
- For each instance, run the script ‘./init.sh’ in the home directory and enter the master node's private IP.
- Open ‘http://{{ master public ip }}:50070/dfshealth.html#tab-overview’ with your browser and check whether every instance is connected to the hdfs system (i.e., the number of the live node is equal to that of instances).
- Also check ‘http://{{ master public ip }}:8080/cluster’ if all instances are participating into yarn system.
-
Initializing the Spark & HDFS.
- Log-in to master node.
- Execute ‘cd ~/BiSpark/src/build_index/’ and run the‘./run.sh’ script.
-
Test run with test data set.
- Execute ‘cd ~/BiSpark/src/alignment/’ and run the ‘./run_100_000.sh {{number of nodes in the cluster }}’.
- The test aligned result will be generated at ‘~/BiSpark/src/alignment/alignment_100_000.txt’, and elapsed time will be printed out on the screen.
To improve the mappability and alignment accuracy, snitizing the poor reads before the main BiSpark phase is highly recommended. Following is recommended procedure for read quality control.
- Run Cutadapt to remove adaptor sequence from the reads.
- Run FastQC to visualize the various aspects of your data including read quality.
If you have any question or problem, please send a email to dane2522@gmail.com