In the website, users are able to search and view a range of animals. Users are able to create new animals with specific fields required. Users can also edit any animal of their liking and delete them from the website.
I have started this project by creating mockups and wireframes to help give me an idea of how I was going to design the website across all platforms considered, laptops, iPads and mobile devices. Below is attached my mocks and wireframes:
Click to open mockups and wireframes.
-
As a user, I would like to search for animal or key word which will bring up the animal(s).
- End User Goal: User's animal result will be shown correctly.
- End Business Goal: Website search result is working properly showing appropriate animal(s).
- Acceptance Criteria: When an animal is searched, correct animal to search word is shown.
- Measurement Of Success: Check Manual Tests document.
-
As a user, I would like to be able to view all of the animals on a page when I click View Animals.
- End User Goal: User selects View Animals in navbar resulting in all of the animals showing.
- End Business Goal: Navbar View Animals link working and all of animals being displayed for user.
- Acceptance Criteria: When View Animals is clicked, all the animals in the database are displayed.
- Measurement Of Success: Check Responsiveness On Different Devices document and test with Heroku live link.
-
As a user, I would like to select an animal type e.g. Mammals, which will show all of the Mammals, as it would be easier to study what animals are mammals.
- End User Goal: User selects animal type on View Animals page, e.g. Mammals.
- End Business Goal: Animals with selected animal type are displayed properly.
- Acceptance Criteria: Animals with selected animal type are displayed properly.
- Measurement Of Success: Check Manual Tests document and test on live Heroku link.
-
As a user, I would like to click on Edit which will direct me to a page where I can update an animal, as I would like to change the information of that animal.
- End User Goal: User selects the Edit button on an animal which will bring then to an edit animal page.
- End Business Goal: When Edit button is selected, the page is redirected to the edit animal page.
- Acceptance Criteria: Edit button works and user directed to edit animal page.
- Measurement Of Success: Check Manual Tests document and test on live Heroku link.
-
As a user, I would like to click on the Delete button which will delete that animal from the website.
- End User Goal: User selects the Delete button on an animal which will then delete that animal from the website.
- End Business Goal: When Delete button is selected, that particular animal is deleted from database and website.
- Acceptance Criteria: Delete button works and animal is deleted from database and website.
- Measurement Of Success: Check Manual Tests document and test on live Heroku link.
-
As a user, I would like to click on any of the social media icons and be directed to their page as I would like to see more content from this website.
- End User Goal: User click on any of the social media icons which directs them to their homepage.
- End Business Goal: When social media links are clicked on, links are working and directing user to social media homepage.
- Acceptance Criteria: Social media icons hoverable and linked to their website homepage.
- Measurement Of Success: Check footer element in the base.html file and test on live Heroku link.
I have chosen to use Bootstrap 4 for the design and layout of my website. Bootstrap is simple, effective and very efficient to use.
I have also used the Flask framework including jinja templates to also help me create this website.
For the font used, I have used Roboto from Google Fonts. I have used this font as it is clear and can be easily read by users.
- Access to desktop, laptop, table or mobile devices.
- Internet connection.
There are a few features included for this application to work:
- Text Search: Used for users to text search for an animal.
- View Animals: Shows all animals including their information displayed in a presentable fashion.
- Add Animal: Allows user to add an animal to the database and website.
- Edit Animal: Allows user to make changes to an animal in the database and website.
- Delete Animal: Allows users to delete an animal from the database and wesbite
- List Group Animal Types: Allows users to filter between different animal types on showing animals with that animal type.
For this project I have selected to work with MongoDB which is a non-relational database. This worked well for me as each document can contain a great deal of information for each animal.
I have used three collections within my database animals, diets and types.
In the animals collection, it contained several fields of data which were displayed on the website.
This is an example of one of the records in this animals collection:

Setting Up An Account And Database in MongoDB:
- Sign In Or Sign Up.
- Click on Build a New Cluster.
- Click on + Create Database:


- Click CREATE COLLECTION to add a collection:


- Click INSERT DOCUMENT:


- Overview > CONNECT:

- Click on the option with Mongo Shell:

- Copy number 3 into GitPod's command line.
- Overview > CONNECT:
- Click Connect your application

- In GitPod, create a file called env.py, inside that file:
- 'import os'

- In app.py:

This application was deployed using Heroku which can be viewed from here: Animal Adventures
I have used GitPod to build this application and close to the end of finishing up. This was pushed to Heroku through the command line by linking the master git from my remote GitHub repository to a new app created in Heroku.
There are no differences between the website's development version and the deployed version to Heroku.
-
Go to the Heroku website here.
-
Sign Up or Sign In which will direct you to the dashboard.
-
Click on New > Create new app.
-
Enter app name and choose region then press Create App.
-
Go to Settings > Reveal Config Vars:
- Enter Keys and their values, example keys below:

-
In the CLI, login into Heroku by heroku login -i, where you will be asked to your enter email address and password.
-
If you have already created your Heroku app, you can remote to your local repository with the heroku git:remote command.
-
Set debug=False for deployment.
-
To deploy your app to Heroku, use the git push command to push the code from your local repository’s master branch to your heroku remote:

-
When the build is complete, on the Heroku website, in the app click Open App.
Software used to complete this game: GitPod
First go to GitHub: https://github.com/
- Sign In or Sign Up to GitHub.
- Once signed in, go to the left side of the screen and you will see:

- Click New.
- Fill out new repository details.
- Click Create Repository at the bottom.
- At the top right click GitPod (if installed) or enter URL Prefix.
- Follow instructions below.
How to install GitPod:
- URL Prefix:
- Browser Extension
- GitHub App
Here is the link for instructions: https://www.gitpod.io/
URL Prefix: Browser Extension GitHub App Here is the link for instructions: https://www.gitpod.io/
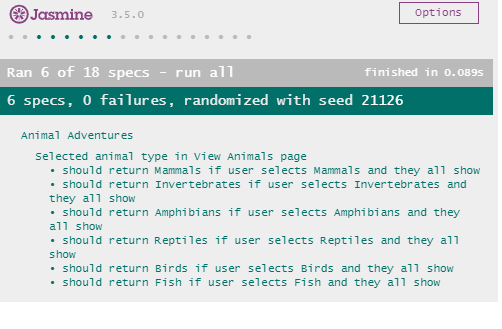
I have conducted tests using Jasmine Testing Framework click here, such tests involve:
- Selecting the animal types should return the matching animals:
- When the Edit button is clicked, users should be brought to the Edit Animal page:

- When a user enters an animal which is in the database, those searched animals will appear:

- When user enters an animal which is not in the database, all animals should show:

- When the user clicked the Delete button, the selected animal will be deleted from the database:

I have also carried out manual tests which show the CRUD operations in use and filtering animal types.
Here is a link how to run the application on a live server by configuring and exposing ports with GitPod: https://www.gitpod.io/docs/43_config_ports/
To view responsive applications:
- Right click then go to Inspect Element
- Click on the Toggle Device Toolbar (Icons showing two devices):

- Click on any device, for example, iPhone 5/SE selected:

HTML: https://validator.w3.org/
- Only errors relate to Flask framework.
CSS: https://jigsaw.w3.org/css-validator/
- style.css: No errors.
JavaScript : https://codebeautify.org/jsvalidate
- main.js: Warnings.
I have tested the responsiveness of this application using Google Chrome. I have tested it over different phones (Portrait and Landscape), iPad and iPad Pro (Portrait and Landscape) and on the laptop view.
Click below to see tests:
- HTML5
- CSS3
- JavaScript
- jQuery
- Markdown
- Used for the README.md file
- Bootstrap v4.3.1
- This framework used in this appplication for:
- Navbar
- Styling
- Responsive Layouts
- Buttons
- This framework used in this appplication for:
- MongoDB
- A document-orientated database which was used for the project.
- Google Fonts
- Helped with the visibility of the text for users to see clearly.
- Git
- Version control to the GitHub repositories.
- Ran the code to expose a live port.
- GitHub
- Remote repository.
- Google Chrome Developer Tools
- Helped with small changes.
In the future, I would like to implement:
- A register and login form for users.
- SVG graphs containing information regarding the database.
- More fields to be filtered for users, e.g. filtering between animal diets.
- Here is a link how to clone a repository: https://help.github.com/en/github/creating-cloning-and-archiving-repositories/cloning-a-repository
- To add, commit and push files to the repository, e.g. index.html, open a New Terminal and type:
- git add index.html
- git commit -m "Leave a message here"
- git push origin master - (which is for the master branch).
- To create a new branch within your current application, open a New Terminal:
- Create a branch: git checkout -b new-branch-name
- Edit, add to your application and commit the files.
- Push the branch to the remote repository: git push origin new-branch-name.
To contact GitHub, follow this link: https://support.github.com/
- I got the background image from a free open sourced website: https://www.pexels.com/.
- For the uploaded images in my database, I used Wikipedia Commons: https://commons.wikimedia.org/wiki/Main_Page
- Animal facts were researched from National Geographic - Animals
- Autor: Terence Logue
- Acknowledgment: Code Institute Slack, Code Institute Tutor Support, Assigned Mentor: Maranatha Ilesanmi