Deep Q-learning agent for replicating DeepMind's results in paper "Human-level control through deep reinforcement learning". It is designed to be simple, fast and easy to extend. In particular:
- It's Python :).
- ALE native Python interface is used.
- Fastest convolutions from Neon deep learning library.
- Every screen is kept only once in replay memory, fast minibatch sampling with Numpy array slicing.
- The number of array and datatype conversions is minimized.
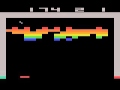
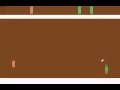
See the example gameplay videos for Breakout and Pong:
Restriction from Neon is, that it currently works only on Maxwell architecture GPU-s. Hopefully this will change. You can still simulate playing from pretrained models using just CPU, see the example below.
Currently only instructions for Ubuntu are provided. For OS X refer to ALE and Neon documentation.
Install prerequisites:
sudo apt-get install libhdf5-dev libyaml-dev libopencv-dev pkg-config
sudo apt-get install python python-dev python-pip python-virtualenv
Check out and compile the code:
git clone https://github.com/NervanaSystems/neon.git
cd neon
make
If you want to make use of the filter visualization, run make -e VIS=true instead. If you’ve already installed Neon without enabling visualization dependencies you’ll need to touch vis_requirements.txt prior to the make -e VIS=true call to ensure virtualenv Python dependencies get triggered.
Neon installs itself into virtual environment in .venv. You need to activate that to import Neon in Python:
source .venv/bin/activate
Install prerequisites:
sudo apt-get install cmake libsdl1.2-dev
Check out and compile the code:
git clone https://github.com/mgbellemare/Arcade-Learning-Environment.git
cd Arcade-Learning-Environment
cmake -DUSE_SDL=ON -DUSE_RLGLUE=OFF -DBUILD_EXAMPLES=ON .
make -j 4
Install Python library (assuming you have activated Neon virtual environment):
pip install .
Prerequisities:
pip install numpy argparse logging
Neon virtual environment already contains those libraries, but they are listed here, just in case.
Also you need OpenCV, which is pain to install to virtual environment. I ended up with this hack:
sudo apt-get install python-opencv
ln -s /usr/lib/python2.7/dist-packages/cv2.so NEON_HOME/.venv/lib/python2.7/site-packages/
NEON_HOME here means the folder where you installed (cloned) Neon.
Then just check out the code:
git clone https://github.com/tambetm/simple_dqn.git
cd simple_dqn
For plotting install matplotlib:
pip install matplotlib
For producing game videos install avconv:
sudo apt-get install libav-tools
To run training for Breakout:
./train.sh roms/breakout.bin
There are plethora of options, just run ./train.sh --help to see them. While training, the network weights are saved to snapshots folder after each epoch. Name of the file is <game>_<epoch_nr>.pkl. Training statistics are saved to results/<game>.csv, see below how to produce plots from it.
NB! Currently there are issues when training new models with the latest Neon. In short you need to use Neon commit 7a56fa9 for training. For details refer to tambetm#4.
You can resume training by running
./train.sh roms/breakout.bin --load_weights snapshots/breakout_10.pkl
Pay attention, that exploration rate starts from 1 and replay memory is empty. To start with lower exploration rate add --exploration_rate_start 0.1 --exploration_decay_steps 0 to the command line.
To run only testing on a pre-trained model:
./test.sh snapshots/breakout_77.pkl
To play one game and show game screen while playing:
./play.sh snapshots/breakout_77.pkl
You can do this even without GPU, by adding --backend cpu to command line. During gameplay you can use following keys: 'a' - slow down, 's' - speed up, 'm' - manual control mode, '[' - volume down, ']' - volume up. Visualization works even in text terminal!
To play one game and record a video:
./record.sh snapshots/breakout_77.pkl
First game frames are extracted to videos/<game> folder as PNG files. Then avconv is used to convert these into video, which is saved to videos/<game>_<epoch_nr>.mov.
To plot results:
./plot.sh results/breakout.csv
This produces results/breakout.png, which includes four main figures: average reward per game, number of games per phase (training, test or random), average Q-value of validation set and average network loss. You can customize the plotting result with --fields option - list comma separated CSV field names (the first row). For example default results are achieved with --fields average_reward,meanq,nr_games,meancost. Order of figures is left to right, top to bottom.
To produce filter visualizations with guided backpropagation:
./nvis.sh snapshots/breakout_77.pkl
What the filter visualization does:
- first it plays one game to produce a set of states (one state is 4 frames),
- then it finds the states which activate each filter the most,
- finally it carries out guided backpropagation to show which parts of the screen affect the "activeness" of each filter the most.
The result is written to file results/<game>.html. By default only 4 filters from each convolutional layer are visualized. To see more filters add --visualization_filters <nr_filters> to the command line.
NB! Because it is not very clear how to visualize the state consisting of 4 frames, I made a simplification - I'm using only the last 3 frames and putting them to different color channels. So everything that is gray hasn't changed, blue is the most recent change, then green and then red. It is easier to understand if you look at the trace of a ball - it is marked by red-green-blue.
There are three additional scripts for profiling:
profile_train.sh- runs Pong game 1000 steps in training mode. This is for figuring out bottlenecks in minibatch sampling and network training code. Prediction is disabled by setting exploration rate to 1.profile_test.sh- runs Pong game 1000 steps in testing mode. This is for figuring out bottlenecks in prediction code. Exploration is disabled by setting exploration rate to 0.profile_random.sh- runs Pong game 1000 steps with random actions. This is for measuring performance of ALE interface, network is not used at all.
- Testing experiences are stored in replay memory. I initially tought it was harmless and made code simpler, but on a second thought it may affect the replay memory distribution in unexpected ways and it's just not correct to see test data during training.
- DeepMind considers loss of life as episode end, but only during training.
These are currently in TODO list.
This wouldn't have happened without inspiration and preceding work from my fellow PhD students Kristjan Korjus, Ardi Tampuu, Ilya Kuzovkin and Taivo Pungas from Computational Neuroscience lab run by Raul Vicente in University of Tartu, Estonia. Also I would like to thank Nathan Sprague and other nice folks at Deep Q-Learning list.