Created by : Jean-Christophe Hurault
Email : jeanchristophe.hurault@gmail.com
A series of plugins that allows non-intrusive body motion capture and gesture detection of a participant by making OpenSesame communicate with a Kinect sensor.
Feel free to contact me if you have any problems, comments or suggestions for improvements !
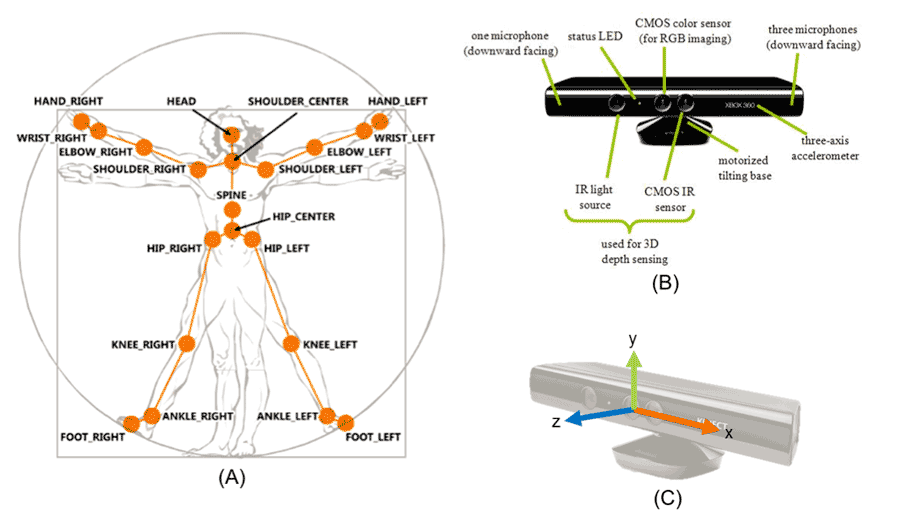
The Kinect is a motion-sensing input sensor developed by Microsoft© and introduced in November 2010 (https://en.wikipedia.org/wiki/Kinect). Originally designed for the video game industry, offers an affordable, inexpensive and portable solution for studying body movement. This sensor consists of a box equipped with sensors and cameras that connects to a computer. Positioned in front of the participant, it collects movements in three-dimensional space by providing real-time positions and rotations of the human body (Shotton et al., 2011). By evaluating the Kinect errors in the temporal and spatial domain compared to reference systems (Clark et al., 2012), previous research validated the measurement qualities of this tool.
The study of body movements is an important source of knowledge for psychology, these systems of analysis often require the use of skills outside the laboratories. This is why I present here an innovative sensor allowing both researchers and students, with the simplest possible and minimal resources, to measure and use as response the body movements of participants during experiments.
These plugins provide Python bindings between OpenSesame and a Kinect sensor. They integrate “pykinect”, a package providing access to the Kinect sensor, to control it as an input for OpenSesame. By using the “pykinect” package (https://github.com/Microsoft/PTVS/wiki/PyKinect), these plugins can interact with the Kinect and track the skeleton of one participant.
Thus, it’s possible to record the position of a participant during any phase of an experiment and, by using a python inline script, to detect and use specific gestures as responses.
First, you need to install the driver, runtime environment and Software Development Kit (SDK) required for Windows applications using Kinect sensor technology. You can find them here:
- Kinect for Windows Runtime v1.8 : https://www.microsoft.com/en-us/download/details.aspx?id=40277
- Kinect for Windows SDK v1.8 : https://www.microsoft.com/en-us/download/confirmation.aspx?id=40278
The “pykinect” package is already included, so you don’t need to download it.
Then, to install Kinect plugins in OpenSesame, simply copy every folder (kinect_init, kinect_calibration, kinect_start_recording, kinect_stop_recording) from the “/plugins” folder and paste them to the OpenSesame program folder (for OpenSesame 3.0 or newer) :
- C:\Program Files (x86)\OpenSesame\share\opensesame_plugins

That’s it ! Launch OpenSesame and you should now see new items in the left bar (restart if it’s already open).
Requirements :
- Only one person in front of the Kinect !
- Adequate space (130 centimeters/4.25 feet minimum and 300 centimeters/938 feet maximum) between the camera and the participant.
- Cleared space between the camera and the participant to ensure accurate measurements.
- If possible, a uniform background color behind the participant.
- The version of the Kinect sensor with an adapter for windows !


You should now see 4 news items in the OpenSesame left bar (with the sketchpad, keyboard,loop… items) :
-
 The "kinect_init" plugin
This plugin initiates a Kinect object. After this, the Kinect is connected (if not, you will have an error message when you start your experiment) and always active (but not recording the data). You have to insert it first, before any other Kinect plugins ! I recommend putting it at the start of the experiment (AVOID to put it in a loop, if not, it will create a new Kinect object at each trial and probably crash OpenSesame). -
 The "kinect_calibration" plugin
This plugin serve as a calibration phase for the detection of the participant. Basically, it waits (infinitely) until the Kinect detect a body. When it detects one, it saves the position of the body in a variable name “first_skeleton”. You can use this plugin to make sure your trial begin only if the Kinect detect the participant (if not, you will only have “0” as data). This plugin is optional. -
 The "kinect_start_recording" plugin
This plugin start the recording of the participant’s position data in the Kinect log file. When active, it constantly records if the participant is detected until the kinect_stop_recording plugin is launched. You can put the plugin everywhere, and use several in the same experiment (for multiple start/stop plugin, don’t forget to check the log file part below). -
 The "kinect_stop_recording" plugin
This plugin only serves to stop the recording. You have to put it after the kinect_start_recording plugin.


To resume, for example, use the init plugin at the beginning of the experiment to connect the Kinect and (it’s only optional) you can put the calibration plugin before a loop to make sure it detects the participant. In the loop, you start by adding the start recording plugin, you show a stimulus and at the end of the loop you add the stop recording plugin. By doing that, you will have a log file (see below) with data of the participant position during the presentation of the stimulus.
Find an example of an OpenSesame experiment that only collect the participant’s position during trials : “examples/Exp_Kinect_example.osexp”
Data collected by the Kinect are three-dimensional coordinates of the human body’s joints, at 30 measures per second (i.e., every 30 ms).

Photo credit: Resna.org
These plugins create their own log file (so you will have 2 log files, the OpenSesame log file and the Kinect data log file) directly in the experiment’s folder. The name of that specific (Kinect) log file is the same as the normal (OpenSesame) log file but with “kinect.csv” at the end. This file is in CSV format (it’s a simple text file, with a comma to separate each value). The log file also gets data from Opensesame (to avoid confusion when analysing data).
The log file’s headers correspond to :
- “Participant” : The number you indicate at the beginning of the experiment that corresponds to the participant.
- “Trials” : The trial number. Caution, if you have multiple start/stop plugins in different loops, the trial number will continue to increase and won’t start from “1” at each loop.
- “Row” : The measure number for each trial, it starts from “1” at each trial.
- “Time (ms)” : The time in milliseconds, from the start of the measurement, of each measure.
- “Skeleton index” : The index number (attribute by the Kinect) for the person in front of the Kinect. It allows you to make sure data are from the same person.
- “hip_center.x” : The distance in meter on the horizontal axis, from the Kinect referential. The “0” is the center of the Kinect. For example, if you have “0.3”, it means that the center of the hip is 30 centimeters on the right side (if you facing the Kinect) of the center of the Kinect. If you have “-0.3”; it’s 30 centimeters on the left side.
- “hip_center.y” : The distance in meter on the vertical axis, from the Kinect referential. The “0” is the center of the Kinect. For example, if you have “0.3”, it means that the center of the hip is 30 centimeters higher than the Kinect, if you have “-0.3”, the hip is 30 centimeters lower than the Kinect.
- “hip_center.z” : The distance in meter on the depth axis, from the Kinect referential. The “0” is the center of the Kinect. For example, if you have “1.3”, it means that the distance between the center of the hip and the Kinect is 130 centimeters. You can’t have negative value for this one.
- This “x”, “y”, “z” architecture is the same for the 20 joints
- After, it gets the data from the OpenSesame variables. So next columns are the same as the “normal” log file. It allows you to easily make correspondence between trials in OpenSesame and the Kinect data you have collected.

Be careful : you can have other head lines after the first row in the log file. It appears when an item in your OpenSesame’s experiment is launched. By adding a variable in OpenSesame, the plugin adds a new head line to fit the data it gets from OpenSesame.
You can’t directly use gestures as response in your experiment. But it is possible to add an inline_script item in your experiment with some python code to add this functionality. You can use a code like the one below and adjust it to your needs. By adding the inline script item just before the kinect_start_recording plugin, the trial will begin only if the participant make the gesture and you won’t have data about the realisation of the gesture (because it happened before the start plugin). You can also add the code after the start plugin, to use it as a response to a stimulus, end a trial…
Find an example of an OpenSesame experiment that only collect participant position during a trial only when specific gestures are recognised : “examples/Exp_Kinect_example_gesture.osexp”
Here is an example on how to use python in an inline script to recognise and use gestures in an experiment.
Inline script :
-- Prepare part --
## Initialize new variables in OpenSesame, so they exist from the start and there is no shift in the log file
# Variable for the time of the movement
var.mvt_time = 0
# Variable for the type of the movement
var.mvt_type = None
-- Run part --
# Get the time when the element started
start_time = self.experiment.time()
# Infinite loop until 'break' is called
while 1 :
	# Call the get_data function (in libkinect.py) to access the data from the kinect
	skeleton = self.experiment.kinect.get_data()
	# Indicate the correspondance of each skeleton's joints
	# For each joints, you have 3 coordinates (x - horizontal axis, y - vertical axis, z - depth axis)
	hip_center      = skeleton.SkeletonPositions[0]
	spine           = skeleton.SkeletonPositions[1]
	shoulder_center = skeleton.SkeletonPositions[2]
	head            = skeleton.SkeletonPositions[3]
	shoulder_left   = skeleton.SkeletonPositions[4]
	elbow_left      = skeleton.SkeletonPositions[5]
	wrist_left      = skeleton.SkeletonPositions[6]
	hand_left       = skeleton.SkeletonPositions[7]
	shoulder_right  = skeleton.SkeletonPositions[8]
	elbow_right     = skeleton.SkeletonPositions[9]
	wrist_right     = skeleton.SkeletonPositions[10]
	hand_right      = skeleton.SkeletonPositions[11]
	hip_left        = skeleton.SkeletonPositions[12]
	knee_left       = skeleton.SkeletonPositions[13]
	ankle_left      = skeleton.SkeletonPositions[14]
	foot_left       = skeleton.SkeletonPositions[15]
	hip_right       = skeleton.SkeletonPositions[16]
	knee_right      = skeleton.SkeletonPositions[17]
	ankle_right     = skeleton.SkeletonPositions[18]
	foot_right      = skeleton.SkeletonPositions[19]
	## Examples of movement you can handle by comparing the position of different parts of the participants body
	# If the participant has the right hand higher (the vertical axis of the Kinect, so the 'y' part) than the shoulder,
	# it considers that the participant rise the right hand
	if hand_right.y > shoulder_right.y :
		# Set the time of the movement, by subtracting the actual time to the starting time
		var.mvt_time = self.experiment.time() - start_time
		# Set the type of the movement
		var.mvt_type = "rising right hand"
		# Ends the loop and end the inline script element
		#break
	# If the participant has the left hand higher (the vertical axis of the Kinect, so the 'y' part) than the shoulder,
	# it considers that the participant rise the left hand
	if hand_left.y > shoulder_left.y :
		# Set the time of the movement, by subtracting the actual time to the starting time
		var.mvt_time = self.experiment.time() - start_time
		# Set the type of the movement
		var.mvt_type = "rising left hand"
		# Ends the loop and end the inline script element
		#break
	# If you add the calibration plugin, you can compare the actual position of the participant to the position during
	# the calibration (aka, 'initial position')
	# So, if the right hand is closer (50% of the initial distance) to the kinect than during the calibration,
	# it considers that the right hand move forward
	# Indicate the correspondance of each skeleton's joints
	# For each joints, you have 3 coordinates (x - horizontal axis, y - vertical axis, z - depth axis)
	first_hip_center      = self.experiment.first_skeleton.SkeletonPositions[0]
	first_spine           = self.experiment.first_skeleton.SkeletonPositions[1]
	first_shoulder_center = self.experiment.first_skeleton.SkeletonPositions[2]
	first_head            = self.experiment.first_skeleton.SkeletonPositions[3]
	first_shoulder_left   = self.experiment.first_skeleton.SkeletonPositions[4]
	first_elbow_left      = self.experiment.first_skeleton.SkeletonPositions[5]
	first_wrist_left      = self.experiment.first_skeleton.SkeletonPositions[6]
	first_hand_left       = self.experiment.first_skeleton.SkeletonPositions[7]
	first_shoulder_right  = self.experiment.first_skeleton.SkeletonPositions[8]
	first_elbow_right     = self.experiment.first_skeleton.SkeletonPositions[9]
	first_wrist_right     = self.experiment.first_skeleton.SkeletonPositions[10]
	first_hand_right      = self.experiment.first_skeleton.SkeletonPositions[11]
	first_hip_left        = self.experiment.first_skeleton.SkeletonPositions[12]
	first_knee_left       = self.experiment.first_skeleton.SkeletonPositions[13]
	first_ankle_left      = self.experiment.first_skeleton.SkeletonPositions[14]
	first_foot_left       = self.experiment.first_skeleton.SkeletonPositions[15]
	first_hip_right       = self.experiment.first_skeleton.SkeletonPositions[16]
	first_knee_right      = self.experiment.first_skeleton.SkeletonPositions[17]
	first_ankle_right     = self.experiment.first_skeleton.SkeletonPositions[18]
	first_foot_right      = self.experiment.first_skeleton.SkeletonPositions[19]
	if hand_right.x < (first_hand_right.x * 0.8) :
		# Set the time of the movement, by subtracting the actual time to the starting time
		var.mvt_time = self.experiment.time() - start_time
		# Set the type of the movement
		var.mvt_type = "approaching right hand"
		# Ends the loop and end the inline script element
		break
Don't forget that coordinates (x, y, z) can be negative and it might change the logic of comparison
I hope this documentation is helpful and understandable. If not, don't hesite to contact me for more informations or help.
No rights reserved. All files in this repository are released into the public domain.
Clark, R.A., Pua, Y.H., Fortin, K., Ritchie, C., Webster, K.E., Denehy, L., & Bryant, A.L. (2012). Of the Microsoft Kinect for assessment of postural control. Gait & posture, 36 (3), 372-377.
Mathot, S., Schreij, D., & Theeuwes, J. (2012). OpenSesame: An open-source, graphical experiment builder for the social sciences. Behavior Research Methods, 44 (2), 314-324.
Shotton, J., Fitzgibbon, A., Cook, M., Sharp, T., Finocchio, M., Moore, R. & Blake, A. (2011). Real-time human poses recognition in parts of single depth images. In Computer Vision and Pattern Recognition (CVPR), 2011 IEEE Conference on (pp. 1297-1304).