LetsRobot.tv is a robotic telepresence network. Anyone can connect a robot and allow users all over the world to interact with it.
Our vision is to have a social platform that powers robots worldwide. These robots will be controlled by the crowd to offer experiences unlike that of any current media experience, turning passive viewers into active doers.
You can find additional documentation including information about our API on our readme.io page as well.
We've re-written the entire robot side code to be more modular and easily extendable. It's still in the testing phase, but everything needed to run a robot is there. If you would like to help us test it out, we've put it on a new repo here: https://github.com/letsRobot/letsrobotA few highlights:
- Everything is modular, with a .conf file instead of using text parameters
- Extending scripts is done in separate files
- Default support for more robots
- Includes most features avaible with current repo
We are also developing a GUI to help make the setup process easier. Shout out to Nocturnal, Roy, and Skeeter for making a more awesome developer friendly tool!
We still need to test on more robots before we can make the official switch, and we still need to do more documentation. We highly encourage you to give this a shot and let us know if you run into any issues.
The brain of your robot is the Raspberry Pi, it connects everything to LetsRobot.tv and runs all of the hardware. The first step is to set up your Pi.
Start by flashing an 8GB microSD card on your PC or Mac. You will need a micro SD card reader, or an adapter and a standard SD card reader.
Download Etcher and flash an 8GB (or more) micro SD card with the Raspian Stretch Lite disk image (.img file). You can also do it manually.
For these instructions we are using the non GUI (Graphical User Interface) and instead setting things up using the command line. The reason for this is so that you begin to familiarize yourself with programming and navigating the brain of your robot this way. There are many ways to do this part but learning to navigate the terminal and command line will be important for your learning process.
If it is your first time with a Raspberry Pi you should connect an HDMI monitor and keyboard as well as power the Pi with a quality micro USB cord with a power supply that is providing 5V and at least 2.0 amps. The official Raspberry Pi power supply provides 5V 2.5 amps.
One of the major issues most robot builders come across is poor quality USB Power packs and USB cables. Many batteries will not actually provide the amperage they say they are rated for. The Raspberry Pi should optimally be run at a steady 5V 2.4amps
#### FYI: Common Raspberry Pi CommandsWelcome to Linux, here are the basics of understanding common commands
Username: pi Password: raspberry
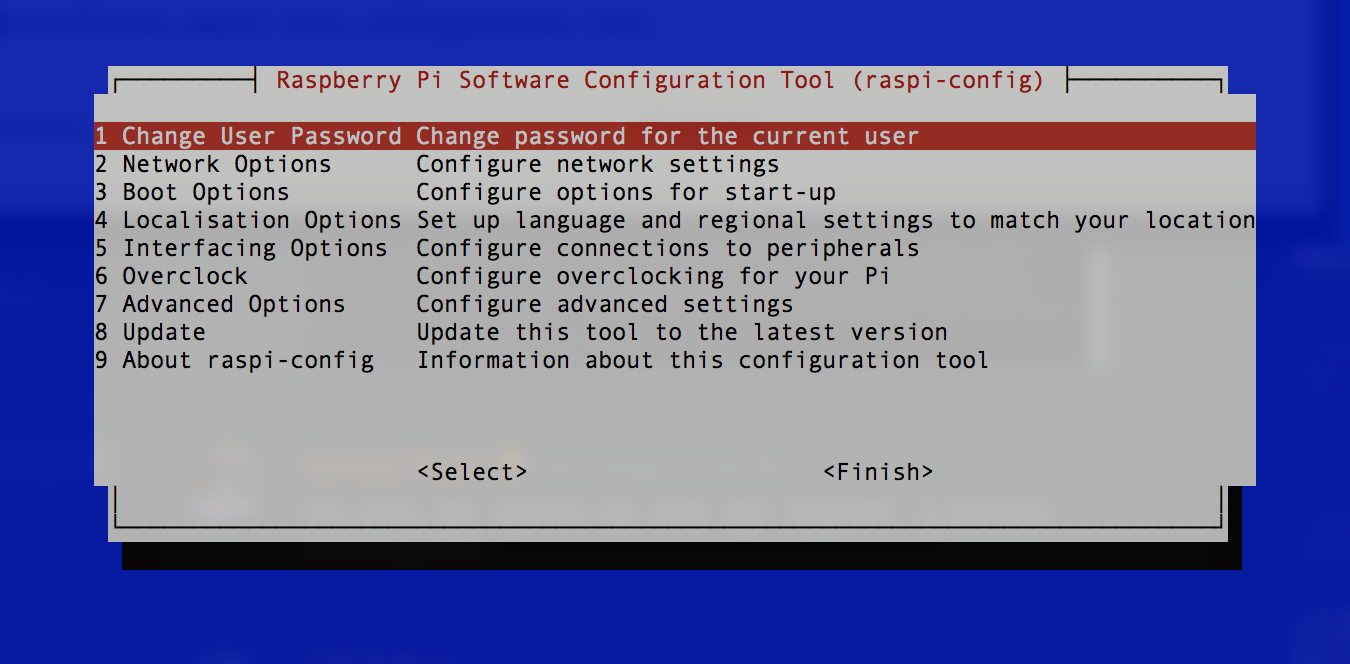
Enter raspi-config by entering the following at the command prompt:
sudo raspi-config
-
Setup Locale, Timezone, and Wifi Country As soon as you start raspi-config it will prompt you to set these.
-
Change your password! This is very important as others can break into your network simply by using your robot as the gateway.
If that fails to connect try these instructions.
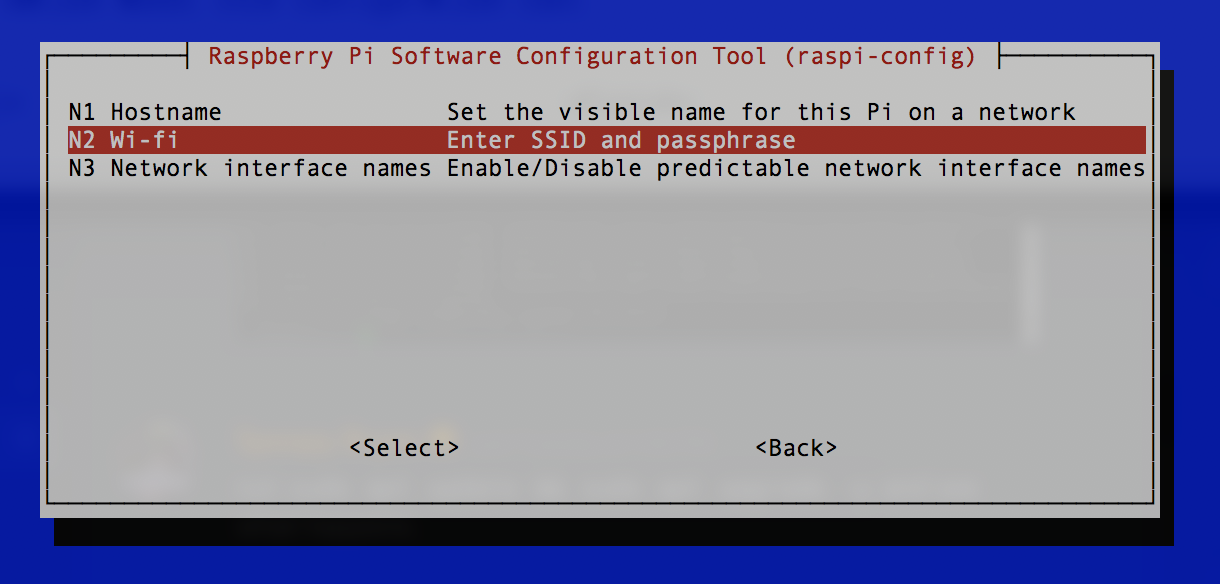
- Network Options Add your wifi SSID and Password
-
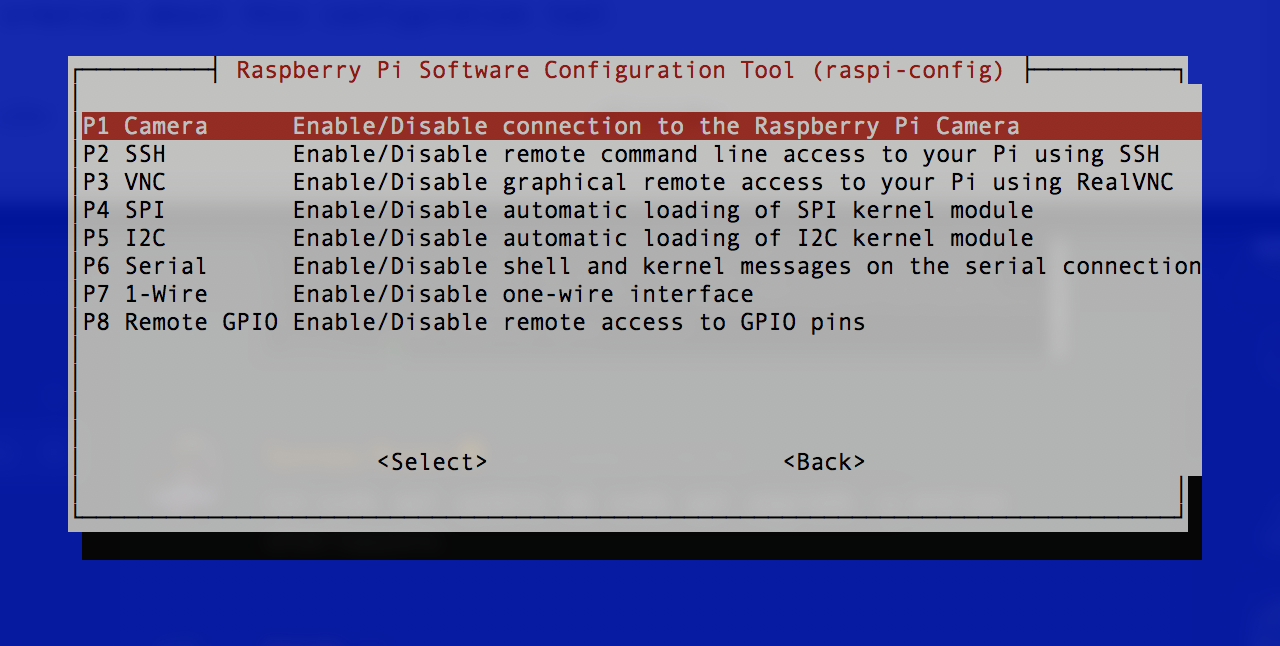
Enable SSH in Interfacing Options You will want to be able to connect to your robot using your computer (if for no other reason to copy and paste the command line instructions to avoid typos)
-
You may want to also enable I2C here if you plan on using the Adafruit Motor Hat*
- Exit the Raspi-config and reboot
To exit use your right arrow key to move and select , hit enter. Then do the same thing to select the
Type the following into the command prompt:
sudo reboot
When you reboot to the command line your IP address should be shown in the last few messages before the login prompt. Write it down.
Switch over to your computer on the same Wifi network.
Open the Terminal program on your PC or Mac.
ssh pi@YOUR-PI-IPADDRESS
Then enter your login:
username: pi
password: the new password you just set
- copy and paste all of the commands below into the terminal instead of typing them arduously line by line.
sudo apt-get update
Make sure you don’t get any errors in the console when doing the step below. If you have an issue, you can run this line again, and that will usually fix it!
sudo apt-get install ffmpeg python-serial python-dev libgnutls28-dev espeak python-smbus python-pip git
Download the Let’s Robot / Run My Robot software from our github
git clone https://github.com/runmyrobot/runmyrobot
Go into the /runmyrobot directory
cd runmyrobot
Install requirements
sudo python -m pip install -r requirements.txt
Load LetsRobot.tv and select sign up / log in on the upper right of the page.
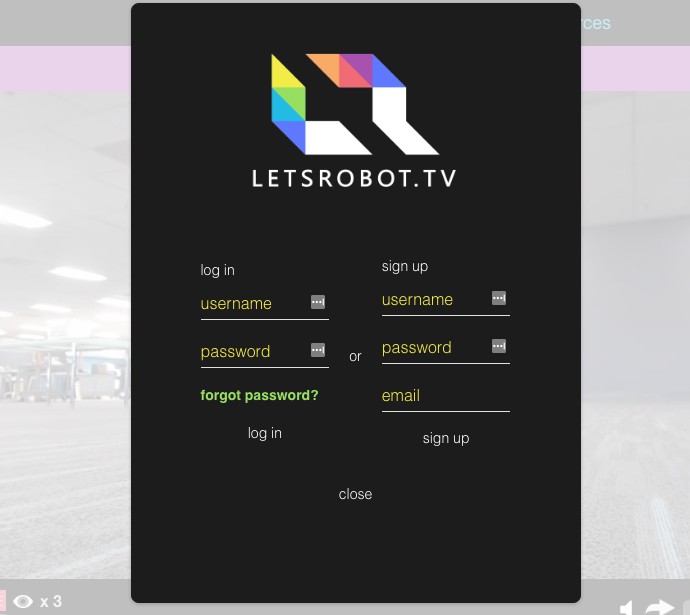
Login or create an account
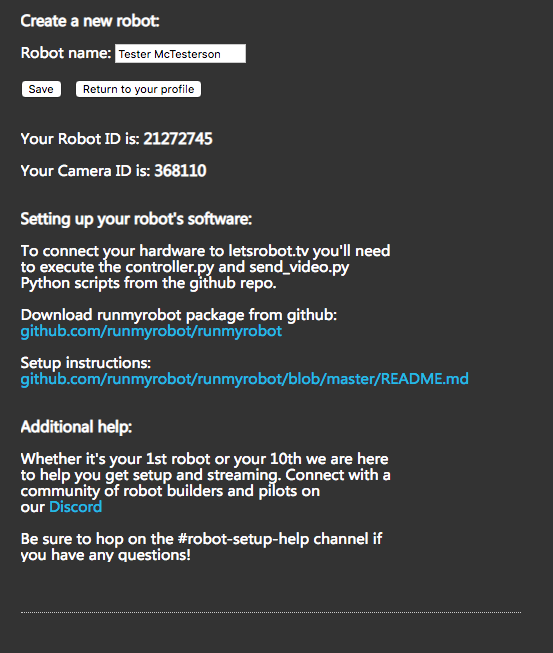
Navigate to your profile and click + Add a new Robot!

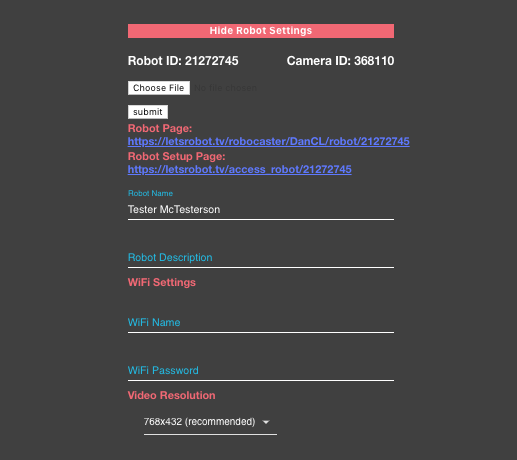
Fill out the Name and Description, then select the recommended resolution (if using the C920).
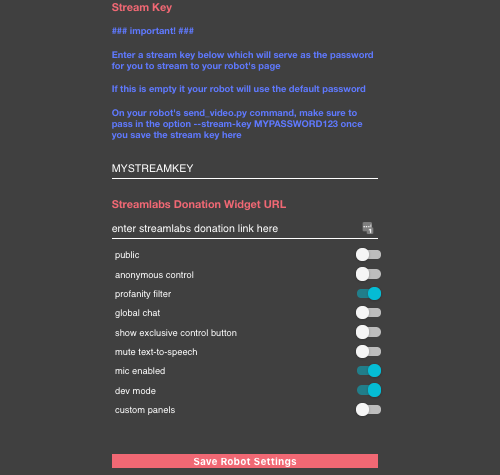
Enter a Stream Key and BE SURE TO SAVE
Back on the Pi once you have accessed it by SSH again, copy the start_robot script to your home directory.
cp ~/runmyrobot/scripts/start_robot ~
You will need to edit start_robot in order to sync it with your robot:
nano ~/start_robot
Once you open it up, it will look something like this:
#!/bin/bash
# suggested use for this:
# (1) Put in the id's for your robot, YOURROBOTID and YOURCAMERAID
# (2) use sudo to create a crontab entry: @reboot /bin/bash /home/pi/start_robot

cd /home/pi/runmyrobot
nohup scripts/repeat_start python controller.py YOURROBOTID &> /dev/null &
nohup scripts/repeat_start python send_video.py YOURCAMERAID 0 &> /dev/null &
You will need to replace “YOURROBOTID” and “YOURCAMERAID” with the numbers generated from the site for your robot. You also need to add your stream key. If you haven’t done that step, go to your letsrobot.tv profile and add a robot (Be sure to click the SAVE button).
Move your cursor to the bottom and delete/backspace everything in this file. Copy and Paste the following:
#!/bin/bash
# suggested use for this:
# (1) Put in the id's for your robot, YOURROBOTID and YOURCAMERAID
# (2) use sudo to create a crontab entry: @reboot /bin/bash /home/pi/start_robot
#

cd /home/pi/runmyrobot
nohup scripts/repeat_start python controller.py YOURROBOTID --type none --filter-url-tts --tts-volume 80 --female --voice 1 &> /dev/null &
nohup scripts/repeat_start python send_video.py YOURCAMERAID 0 --stream-key YOURSTREAMKEY --audio-device-name C920 --pipe-audio --mic-channels 2 &> /dev/null &
This has all the arguments (--ARGUMENT ) to set up the a bot with the C920 camera with onboard stereo mic and the USB speaker. This disables the motor controller. You'll change the --type to the correct motor controller or serial input command.
In order to exit the nano editor, control + x
Once you have your start_robot file filled in appropriately to have it run on startup run the following:
crontab -e
Note: If you accidently use the wrong editor try
EDITOR=nano crontab -e
and insert the following text at the bottom
@reboot /bin/bash /home/pi/start_robot
Example:
# Edit this file to introduce tasks to be run by cron.
#
# Each task to run has to be defined through a single line
# indicating with different fields when the task will be run
# and what command to run for the task
#
# To define the time you can provide concrete values for
# minute (m), hour (h), day of month (dom), month (mon),
# and day of week (dow) or use '*' in these fields (for 'any').#
# Notice that tasks will be started based on the cron's system
# daemon's notion of time and timezones.
#
# Output of the crontab jobs (including errors) is sent through
# email to the user the crontab file belongs to (unless redirected).
#
# For example, you can run a backup of all your user accounts
# at 5 a.m every week with:
# 0 5 * * 1 tar -zcf /var/backups/home.tgz /home/
#
# For more information see the manual pages of crontab(5) and cron(8)
#
# m h  dom mon dow   command

@reboot /bin/bash /home/pi/start_robot
Now just plug in the Camera and USB Speaker and reboot
sudo reboot
Hopefully you’ll hear your robot say “OK” and everything will be working!
If not, it is time to checking the Technical FAQ and Troubleshooting Tips. Also drop in to our Discord Channel and ask for help.
The is a community project. Making your own bot? Adding your own control stuff? Cool! We'd like to hear from you.
Adafruit Motor Hat
Serial Port based commands
GoPiGo
L298N
MotoZero
Missing something?, you can add it, open source!
For GoPiGo3, you will need to install the gopigo3 python module (which is different than older versions). It will need to be installed with the installation script from Dexter. Also, PYTHONPATH needs to be set to "/home/pi/Dexter/GoPiGo3/Software/Python"
Refer to this: https://github.com/DexterInd/GoPiGo3
sudo git clone http://www.github.com/DexterInd/GoPiGo3.git /home/pi/Dexter/GoPiGo3
sudo bash /home/pi/Dexter/GoPiGo3/Install/install.sh
sudo reboot
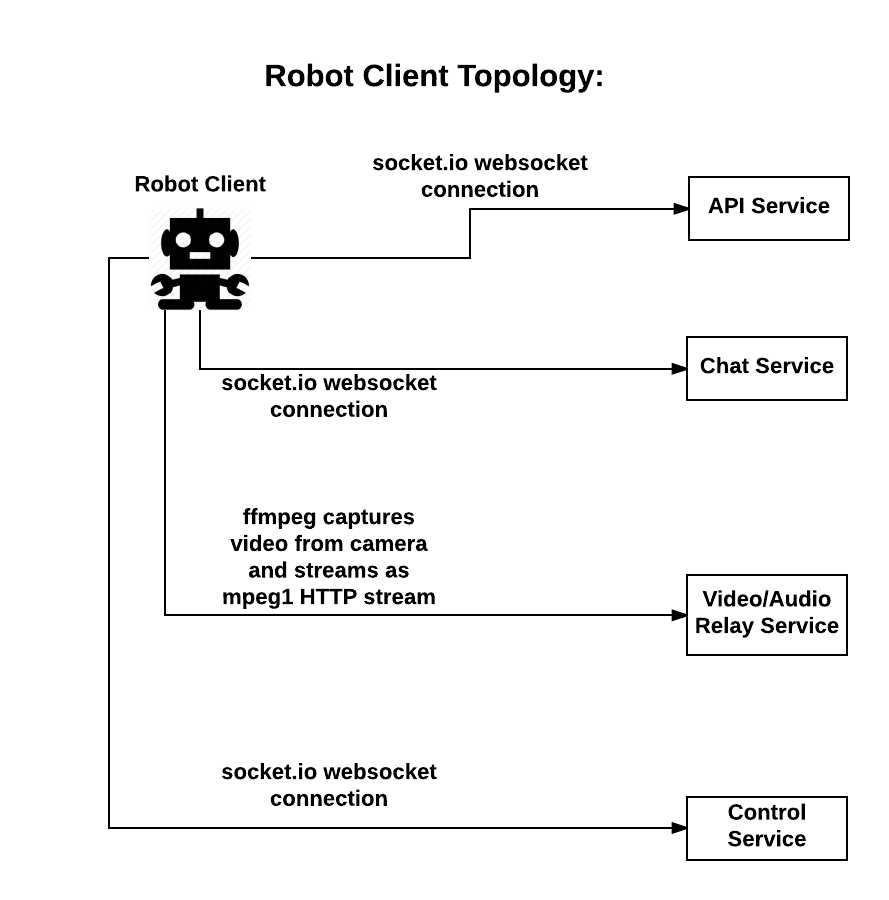
The robot client connects via websockets to the API service to retrieve configuration information, to the chat to receive chat messages, the video/audio relays to send its camera and microphone capture, and to the control service to receive user commands.
Control server via socket.io Application server via socket.io and HTTP Chat server via socket.io Sends video stream via websockets Sends audio stream via websockets Capturing Audio and Video Relays commands to robot hardware Text to Speech Supports remote login for diagnostics and updates Configuration updates from the web client (partially implemented) The robot client connects to four external services: API Service, Chat Service, Video/Audio Service, and the Control Service. Provides information about which host and port to connect to for the chat service, video/audio service, and control service Relays chat messages sent from the web clients to the robot The robot client streams ffmpeg output to the video/audio service Relays control messages sent from the web clients to the robot