So my high-schooler son Andre is drafted by the robotics club, just because someone heard he knew C++, which apparently is not common among his peers. As a result, I become an adult mentor to help prepare for the FRC Stronghold 2016 robotics competition, launched January 9, 2016. Not that I needed a new time sucking project, but what can you do!
However, the team is awesome, John (our benevolent dictator - er leader) is super nice, and fantastic at organizing and motivating everyone. We have some very qualified mentors (mostly robotics / mechanical / electric), and a great group of students with unlimited enthusiasm and experience - indeed last year's team did very well and went to the national event.
When the rules of the competition were made available, it became clear that having some kind of autonomous vision tracking and aiming software/hardware onboard would be quite advantageous, so we started thinking about it. Very exciting project, right. The only problem is that no one on the theam had any experience doing somethinganything like that. But after all, how hard can it be?
As it turned out, pretty hard!
One of the goals of this robotics game is to be able to pick up large foam balls from the ground, and to shoot them through a hole placed on a wall approx. 8 feet high. The software described here needs to be able to control the robot to move it in position, and the shooter to automatically shoot the ball through the hole when in range.
This repository describes the shooter software for the robotics FRC Stronghold 2016 competition, running on a Raspberry Pi 2 model B.
Here is the full game manual.
I code in C++ every day for work, and I like the language, but we decided to use python to make development faster. OpenCV seems to be the standard for processing the camera output, so that's what we'll use. This is my first try at robotics, so I thought I would take baby steps and proceed as follows:
- setup raspberry pi with camera attached to the swing/tilt servo, and use OpenCV to do face detection and have the camera track the detected face.
- mount the Raspberry PI (from now on called The PI) and camera to the robot, with a flashlight attached to the servo in the same axis as the camera, and see if we can have the camera trach the target when the robot is driven around.
- finally connect the PI to the roboRIO and control the shooter and vehicle to shoot the boulders.
- CanaKit Raspberry Pi 2 Ultimate Starter Kit with WiFi ($84.99 - amazon)
- Raspberry PI 5MP Camera Board Module ($24.99 - amazon)
- Mini Pan-Tilt Kit - Assembled with Micro Servos ($24.99 - amazon)
When the order arrived (love Amazon's 2 day shipping), I quickly connected everything together. The USB ports are very tight, so make sure you align the connectors well and gently wiggle them, and they will slide right in. The camera connector is tricky, you need to pull up a small white plastic tab on the top, slide in the ribbon, and push the plastic tab back down. Connected a spare monitor via the HDMI cable, et voila!
After inserting the micro sd memory card and connecting the micto-usb power supply, the system booted right up into NOOBS, an utility program which allows to select and install a real operating system.
Note: If you don't have a sd card with NOOBS preinstalled, you can download it from here, and just copy the contents of this unzipped archive to a freshly formatted (FAT) sd card.
The PI booted into NOOBS in a couple seconds, and from there it was super easy to install raspbian, the Ubuntu based lunix operating system which is optimized for the PI. Raspbian booted straight into an X11 desktop, which has a command window and a web browser. I found I had ro run a few commands immediately (ymmv)
- sudo raspi-config             # set locale to en_US, keyboard 105 keys, US english, timezone (eastern), enable camera, disable overscan
- sudo reboot                   # if not done after raspi-config
- enter wifi passord            # network icon on top right
- sudo apt-get update           # update the system package list
- sudo apt-get upgrade          # if you feel like it - upgrade all installed packages
- sudo rpi-update               # upgrade raspberry firmware
- sudo reboot                   # using the new firmware
- sudo apt-get install emacs    # what can I say, I like emacs, but vi and nano are OK too
- transfer startup files from my PC (.emacs, .el files, .Xdefaults, etc...) using Filezilla downloaded on the PC
  use: sftp://ip_address, username=raspberry, password=pi
- raspistill -o img.jpg         # test camera -> camera not detected
- vcgencmd get_camera           # outputs: supported=1 detected=0
Well, I coundn't get the camera to work. So I played with it, connected and disconnected it multiple times, used raspi-config, rebooted multiple times... still no luck. During the "apt-get upgrade" which took some time, I was looking at the PI and turning it in my hands when I involunarily popped the sd card out. Big mistake: the card was in the middle of being written to and apparently this destroyed the card. I couldn't boot on it anymore and it isnt recognized on my other PCs anymore.
Unfortunately, I have lots of regular size SD cards around, but no other micro sd, and the spare one I have ordered from Amazon will only arrive tomorrow (sunday). So this ends my PI experiments for the day and gives me the opportunity to write this account you are reading right now.
New sd card arrived (Sandisk 16Gb) - I'm back in business
Didn't have to format the card (already FAT32). Extracted NOOBS_v1_5_0.zip to the card and the PI booted into NOOBS right away. It took me about 20 minutes to get back to where I was yesterday.
However, still the camera does not work. A quick google search took me to an excellent site for camera troubleshooting, which allowed me to find my mistake in seconds.
Duh, I had connected the camera to the wrong connector, the Display Serial Interface (DSI) Instead of the Camera Serial Interface (CSI). The correct connector is the one near the HDMI connector. So I did a shutdown, power off, move camera ribbon to the right connector, power on et voila, now I can take pictures! My first picture (camera board handheld) is of my son Alex who was swinging by to see the setup:
I brainstormed a while about how to create a test system. I think I'll attach the PI, the swing/tilt servo, and a 7" monitor to a piece of 3/4" plywood. I'll also cut a small piece of wood (to which I'll glue the camera board) to fit in the pan/tilt attachment, so it can be popped in and out of it. In addition, I did some online shopping and selected these two items:
- Tontec 7" 1280*800 IPS monitor (amazon)
- Rii K12 slim wireless keyboard with touchpad, uses 1 USB (amazon)
This should allow me to have a full autonomous system that I can bring to the classroom where the students work on the robot. Just placed the order and they will be here on tuesday.
Now is the time to go down in the basement to see if I can find a piece of wood and some tiny screws to somehow mount the case and the servos to the board, and attach the camera to the servos. This is what I came up with:

As you can see, I left plenty of room to mount the monitor and GPIO interface board. I also was careful to not obstruct access to the PI ports. However, the camera module ribbon is not very long, and I was worried that it would restrict the range of motion of the servos, so I mounted the servos very close to the PI. So close indeed that the PI case does prevent the swing servo to rotate fully. But without the case it is not an issue. Who needs the case anyways? So I just took it off, as you can see in the picture below:
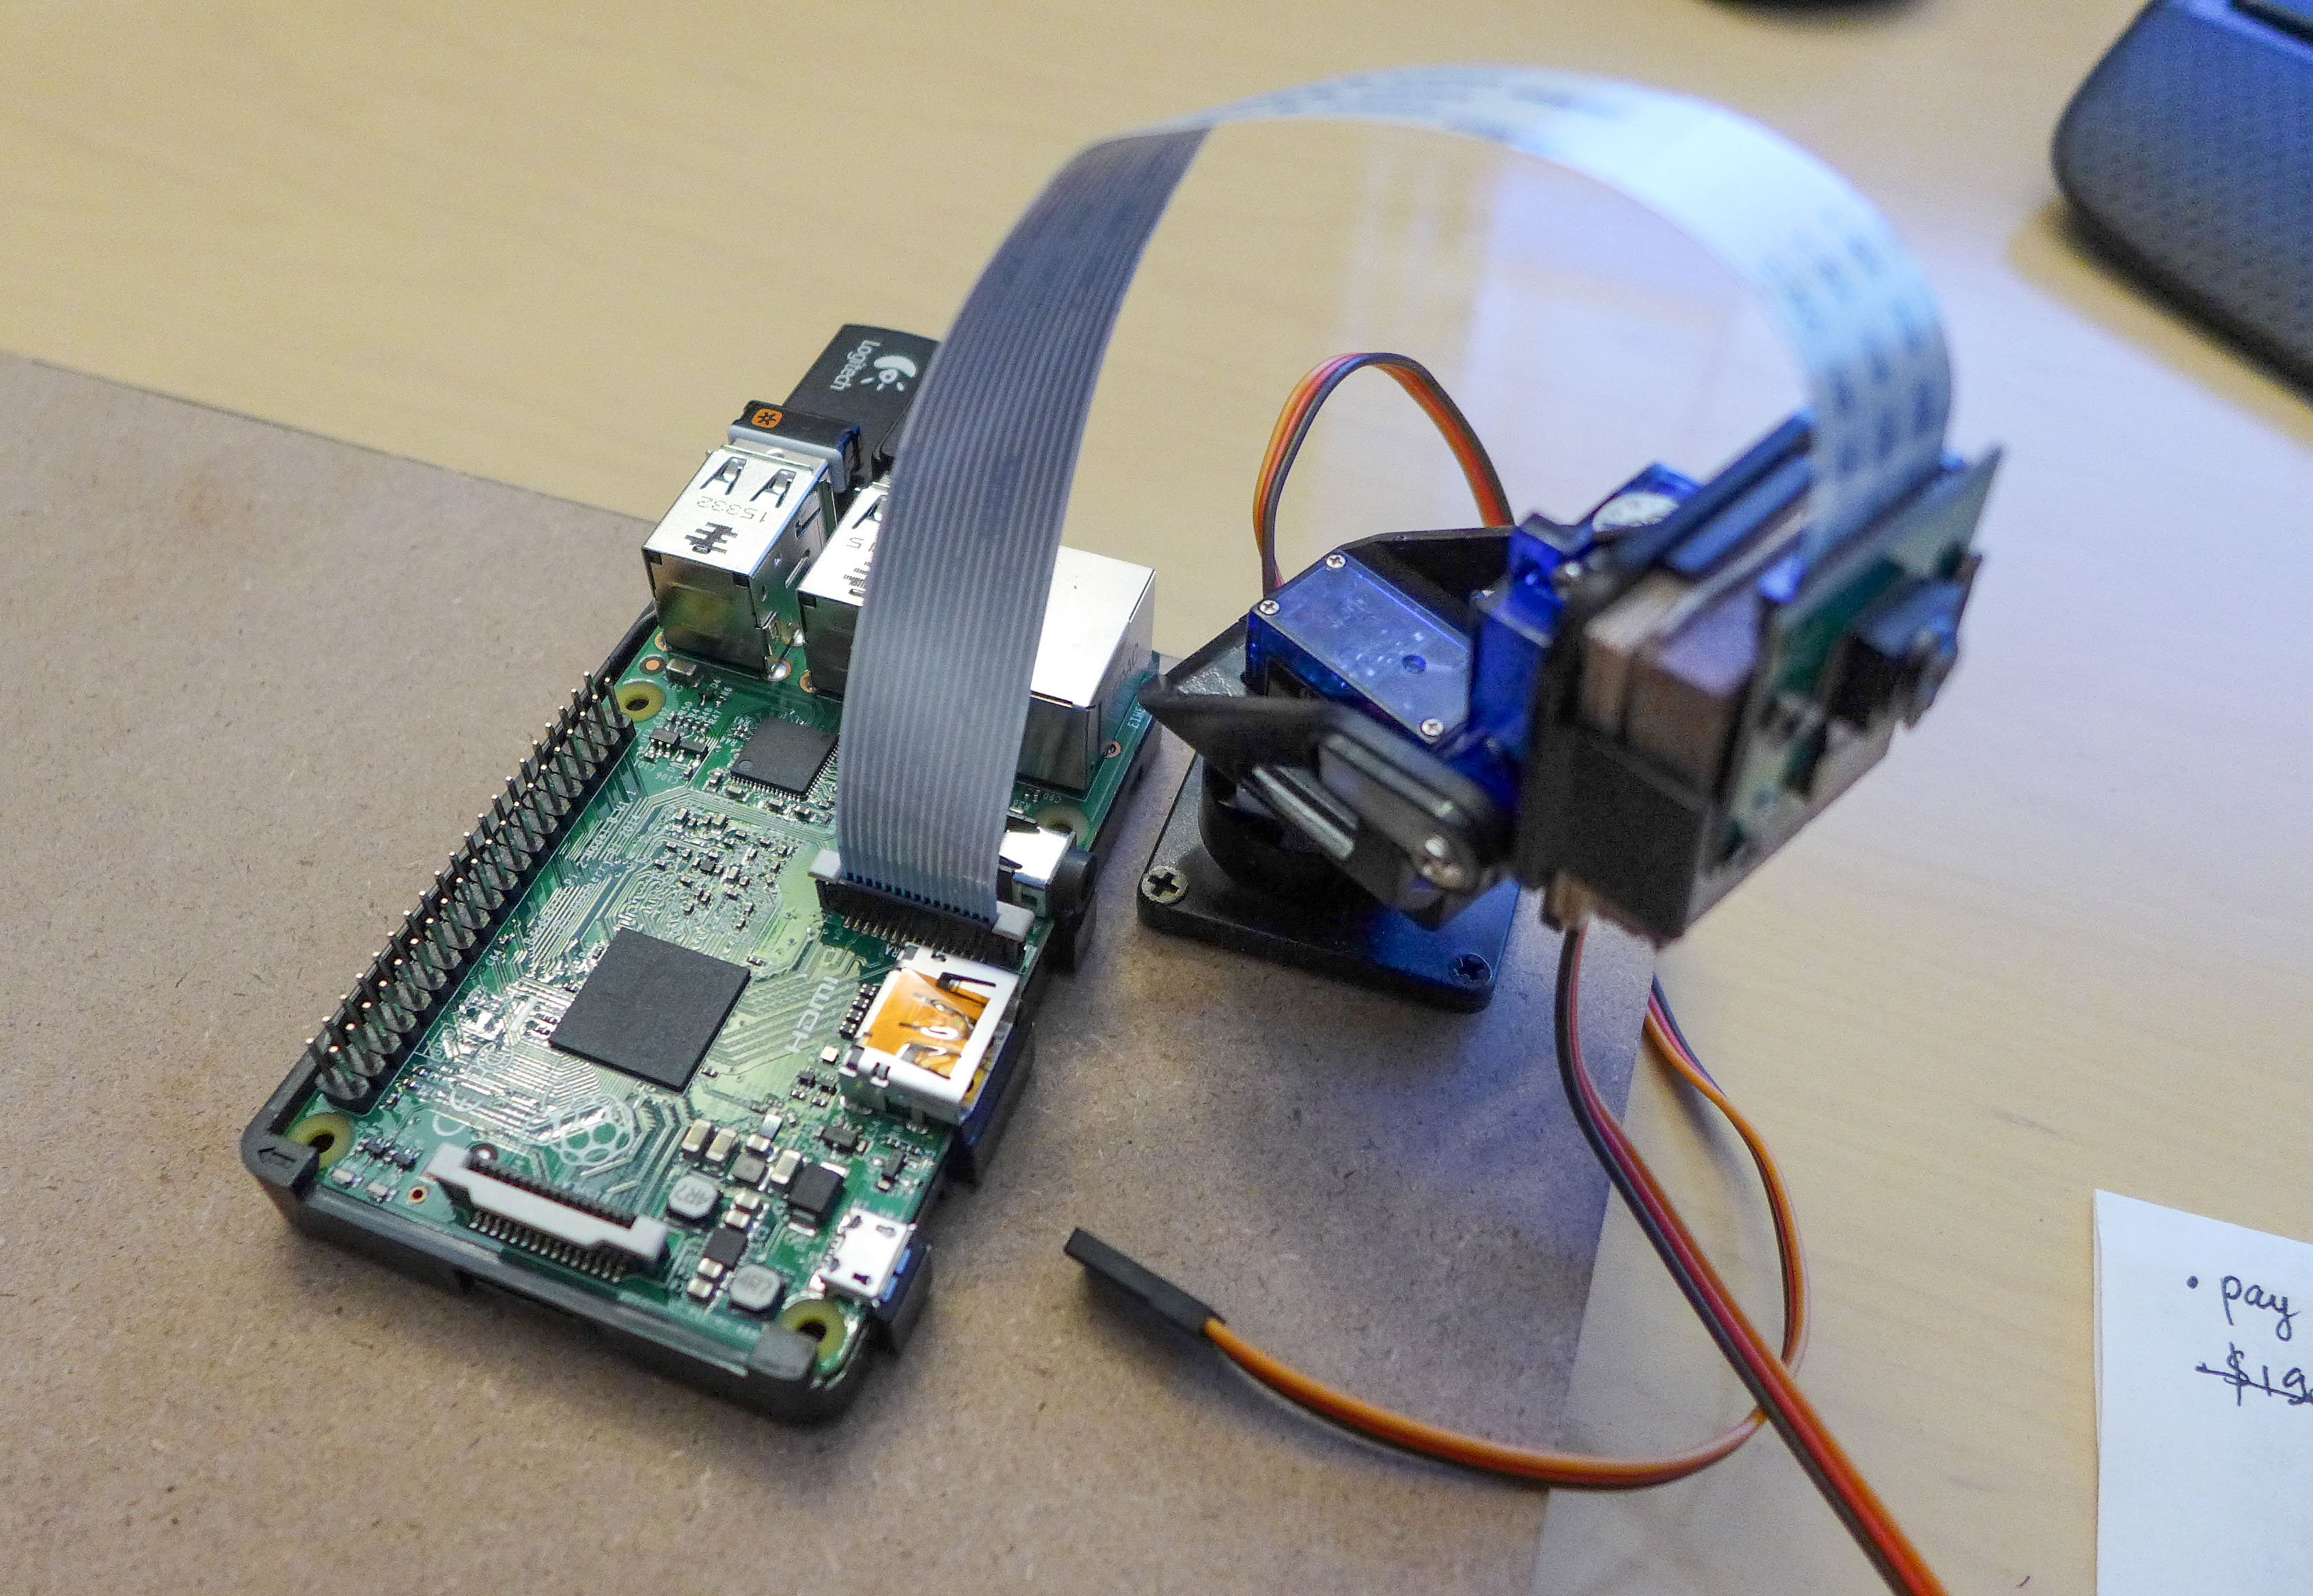
OK, now that things are not flopping around anymore, it is time to see how to connect the servos to the PI. Only problem is that I have no idea on how to do that. Time to google some more! Ah, I see, the GPIO breakout and the breadboard are just a way to extend the IO ports of the PI, so we can easily make connections with the jumper wires. The breadboard comes with double stick tape underneath, so it was easy to attach it to my piece of wood, and to connect it to the PI. Here is what I have now:

Time to install some additional software for image processing:
- sudo apt-get install build-essential git cmake pkg-config                      # dev tools
- sudo apt-get install libjpeg-dev libtiff5-dev libjasper-dev libpng12-dev       # png/jpeg/till image libraries
- sudo apt-get install libavcodec-dev libavformat-dev libswscale-dev libv4l-dev  # video codecs
- sudo apt-get install libxvidcore-dev libx264-dev                               # video codecs
- sudo apt-get install libgtk2.0-dev                                             # GTK for OpenCV GUI (highgui)
- sudo apt-get install libatlas-base-dev gfortran                                # good for OpenCV performance
- sudo apt-get install python2.7-dev python3-dev                                 # python bindings

- cd ~
- wget -O opencv.zip https://github.com/Itseez/opencv/archive/3.1.0.zip          # download OpenCV
- unzip opencv.zip                                                               # extract zip archive
- wget -O opencv_contrib.zip https://github.com/Itseez/opencv_contrib/archive/3.1.0.zip # and contribs
- unzip opencv_contrib.zip

- wget https://bootstrap.pypa.io/get-pip.py                                      # python
- sudo python get-pip.py
- cd /usr/bin
- sudo rm python
- sudo ln -s python3.4 python
- cd $HOME
- pip install numpy
- pip install imutils

- cd ~/opencv-3.1.0
- mkdir build
- cd build
- cmake -D CMAKE_BUILD_TYPE=RELEASE \
	-D CMAKE_INSTALL_PREFIX=/usr/local \
	-D INSTALL_C_EXAMPLES=ON \
	-D INSTALL_PYTHON_EXAMPLES=ON \
	-D OPENCV_EXTRA_MODULES_PATH=~/opencv_contrib-3.1.0/modules \
	-D BUILD_EXAMPLES=ON ..
- make -j4                                                                        # this takes a while... ~ 2 hours
- sudo make install
- sudo ldconfig
- cd /usr/local/lib/python3.4/dist-packages/                                      # fix bad library name
- sudo mv cv2.cpython-34m.so cv2.so                                               # with a rename

- cd ~
- python                                                                          verify the build
>>> import cv2
>>> cv2.__version__
'3.1.0'
At this point, after spending almost the whole day installing software, I decided it was time to backup the precious sd card. I found a nice software named Win32 Disk Imager which can create a full image of a sd card, and restore it if there is a problem (see instructions here. So I created my first backup which I named appropriately pi_jan_18.img. The backup took about 15 minutes (which makes sense as the read time shown for the 16GB micro sd card was 19 MB/s. Then I copied the image to another card and booted from it. Success!
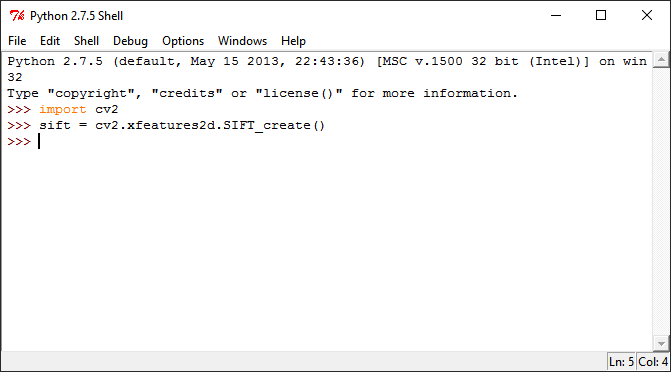
I also installed Python 2.7.5 and OpenCV 3.1 on my PC, as it is more convenient to develop on it than on the raspberry PI (the two large monitors help a lot). The instructions are here, however I couldn't do the install from prebuilt binaries because this doesn't include the OpenCV contrib directory which, starting in OpenCV 3.0, contains the patented object detection methods (SIFT and SURF for example).
So I mostly followed the instructions in "Building OpenCV from source", using the github repos of opencv and opencv-contrib, but in Cmake-gui I added the path to opencv-contrib/modules to the variable OPENCV_EXTRA_MODULES_PATH.
OK, time to try the camera from python. Adrian Rosebrock provides in the python imutils package a useful class which allows to access either the Paspberry PI camera or a USB webcam (see imutil doc here). He has a little python script that creates a video stream and displays it that you can request from this page, and it works well:

Note: The PI camera supports the following resolutions:
- 1080p30 (1920x1080)
- 720p60 (1280x720)
- VGA90 (640x480)
and you can specify which resolution to use when creating the videostream with an additional argument, for example:
vs = VideoStream(usePiCamera=args["picamera"] > 0, resolution=(1280,720)).start()
At this point I used scrot (already installed) to take a screen shot, and installed links2 (sudo apt-get install links2) to conveniently view images.
- Unifying picamera and cv2.VideoCapture into a single class with OpenCV
- Building a Raspberry Pi Pan/Tilt Face Tracker
- Multiple cameras with the Raspberry Pi and OpenCV
OK, time to do some image processing. I'm going to use the code from Phil Howard located here. Since I don't have the servos connected, I'll have to do a couple changes:
- replace the "from pantilt import *" with "from pantilt_stub import *"
- create a pantilt_stub.py file containing empty implementations of pan, tilt and _turn (only a "pass" statement)
- update the path to the classifier: '/usr/local/share/OpenCV/lbpcascades/lbpcascade_frontalface.xml' on my system
And it works! Running facetracker.py tracks my face.
OpenCV methods surf? haar?
- OpenCV 3.1 tutorial: Feature Detection and Description
- Detect and Track Objects With OpenCV
- Object tracking using meanshift
I noticed that the PI camera doesn't have a wide field of view (53.5 degrees horizontal). So I shopped for a wide-angle webcam that would work on PI USB power (see here), and I finally settled on a Logitech C905 - mostly because of the high-quality glass lens - purchased on eBay for $22. Eventually, I purchased two more c905 webcams for $10 to $15 each.
I got thinking about how to test the vision system. Because the competition robot is not ready (and also it will be pretty large and cumbersome), I thought it would be nice to have a small robot that I could keep at home, and on which I could mount a pan/tilt system with cameras (two cameras for distance computation) and maybe a flashlight.
So I ordered a DiddyBorg.

Also, I ordered a better battery system for the robot (using LiPo batteries):
- LiPo battery
- LiPo battery charger
- LiPo battery case
- LiPo battery checker
- UBEC for powering the servos. see Replacing power on DiddyBorg
To control the servos from the Pi, I ordered:
Detailed setup instructions for the Raspberry Pi are here.
Them install TightVNC on your PC or Mac and connect to: 192.168.1.24:5901 (replace 192.168.1.24 with your Pi's IP address)
