
A Python project to download, process and visualize event-based seismic waveform segments, specifically created to manage massive amounts of data.
The key aspects with respect to widely-used similar applications are:
-
A database storage (sqlite or postgres) for downloaded data and metadata. Downloading hundreds of thousand, if not millions, of waveform segments on your file system to inspect, select and process them accessing their metadata, is so unfeasible to be in most cases virtually impossible. For this kind of tasks a database is much more efficient, as it allows e.g., data consistency and integrity checks by design, a far more powerful and efficient data selection and accessibility (see below) and allows several users to work on the same database remotely, if needed. We suggest to use sqlite for small to medium downloads (as a rule of thumb: up to hundreds of thousands of segments), and postgres otherwise. For massive downloads, we also suggest to use the program with at least 16GB of RAM: if less, try to use postgres, although we experienced problems with any database, on machines with 8GB of RAM
-
An integrated processing environment to get any user-dependent output from the downloaded data. Write your own code in a processing module (following few simple instructions), run it with the
s2s processcommand, and Stream2segment takes care of executing the code on all selected segments, interacting with the database for you while displaying progress bars, estimated available time, and handling errors. Few templates (commands2s init) provide the user with editable examples for two typical scenarios: create tabular file outputs (e.g., CSV, HDF), or store on the local file system the processed waveform segments -
In any kind of custom code (processing module or Jupyter notebook), each segment is exposed to the user's code as a simple Python object with a list of easily accessible attributes denoting data, metadata and related objects (segment's station, channel, event, and so on), which also makes the selection of suitable segments to process incredibly unique, powerful and easy to use. The selection can be performed on all segments attributes, it exploits under the hood the efficiency of the Object-relational mapping library to issue SQL
selectcommands, but it does not require any specific database knowledge thanks to a simplified and custom syntax documented in any generated template and in the Usage section -
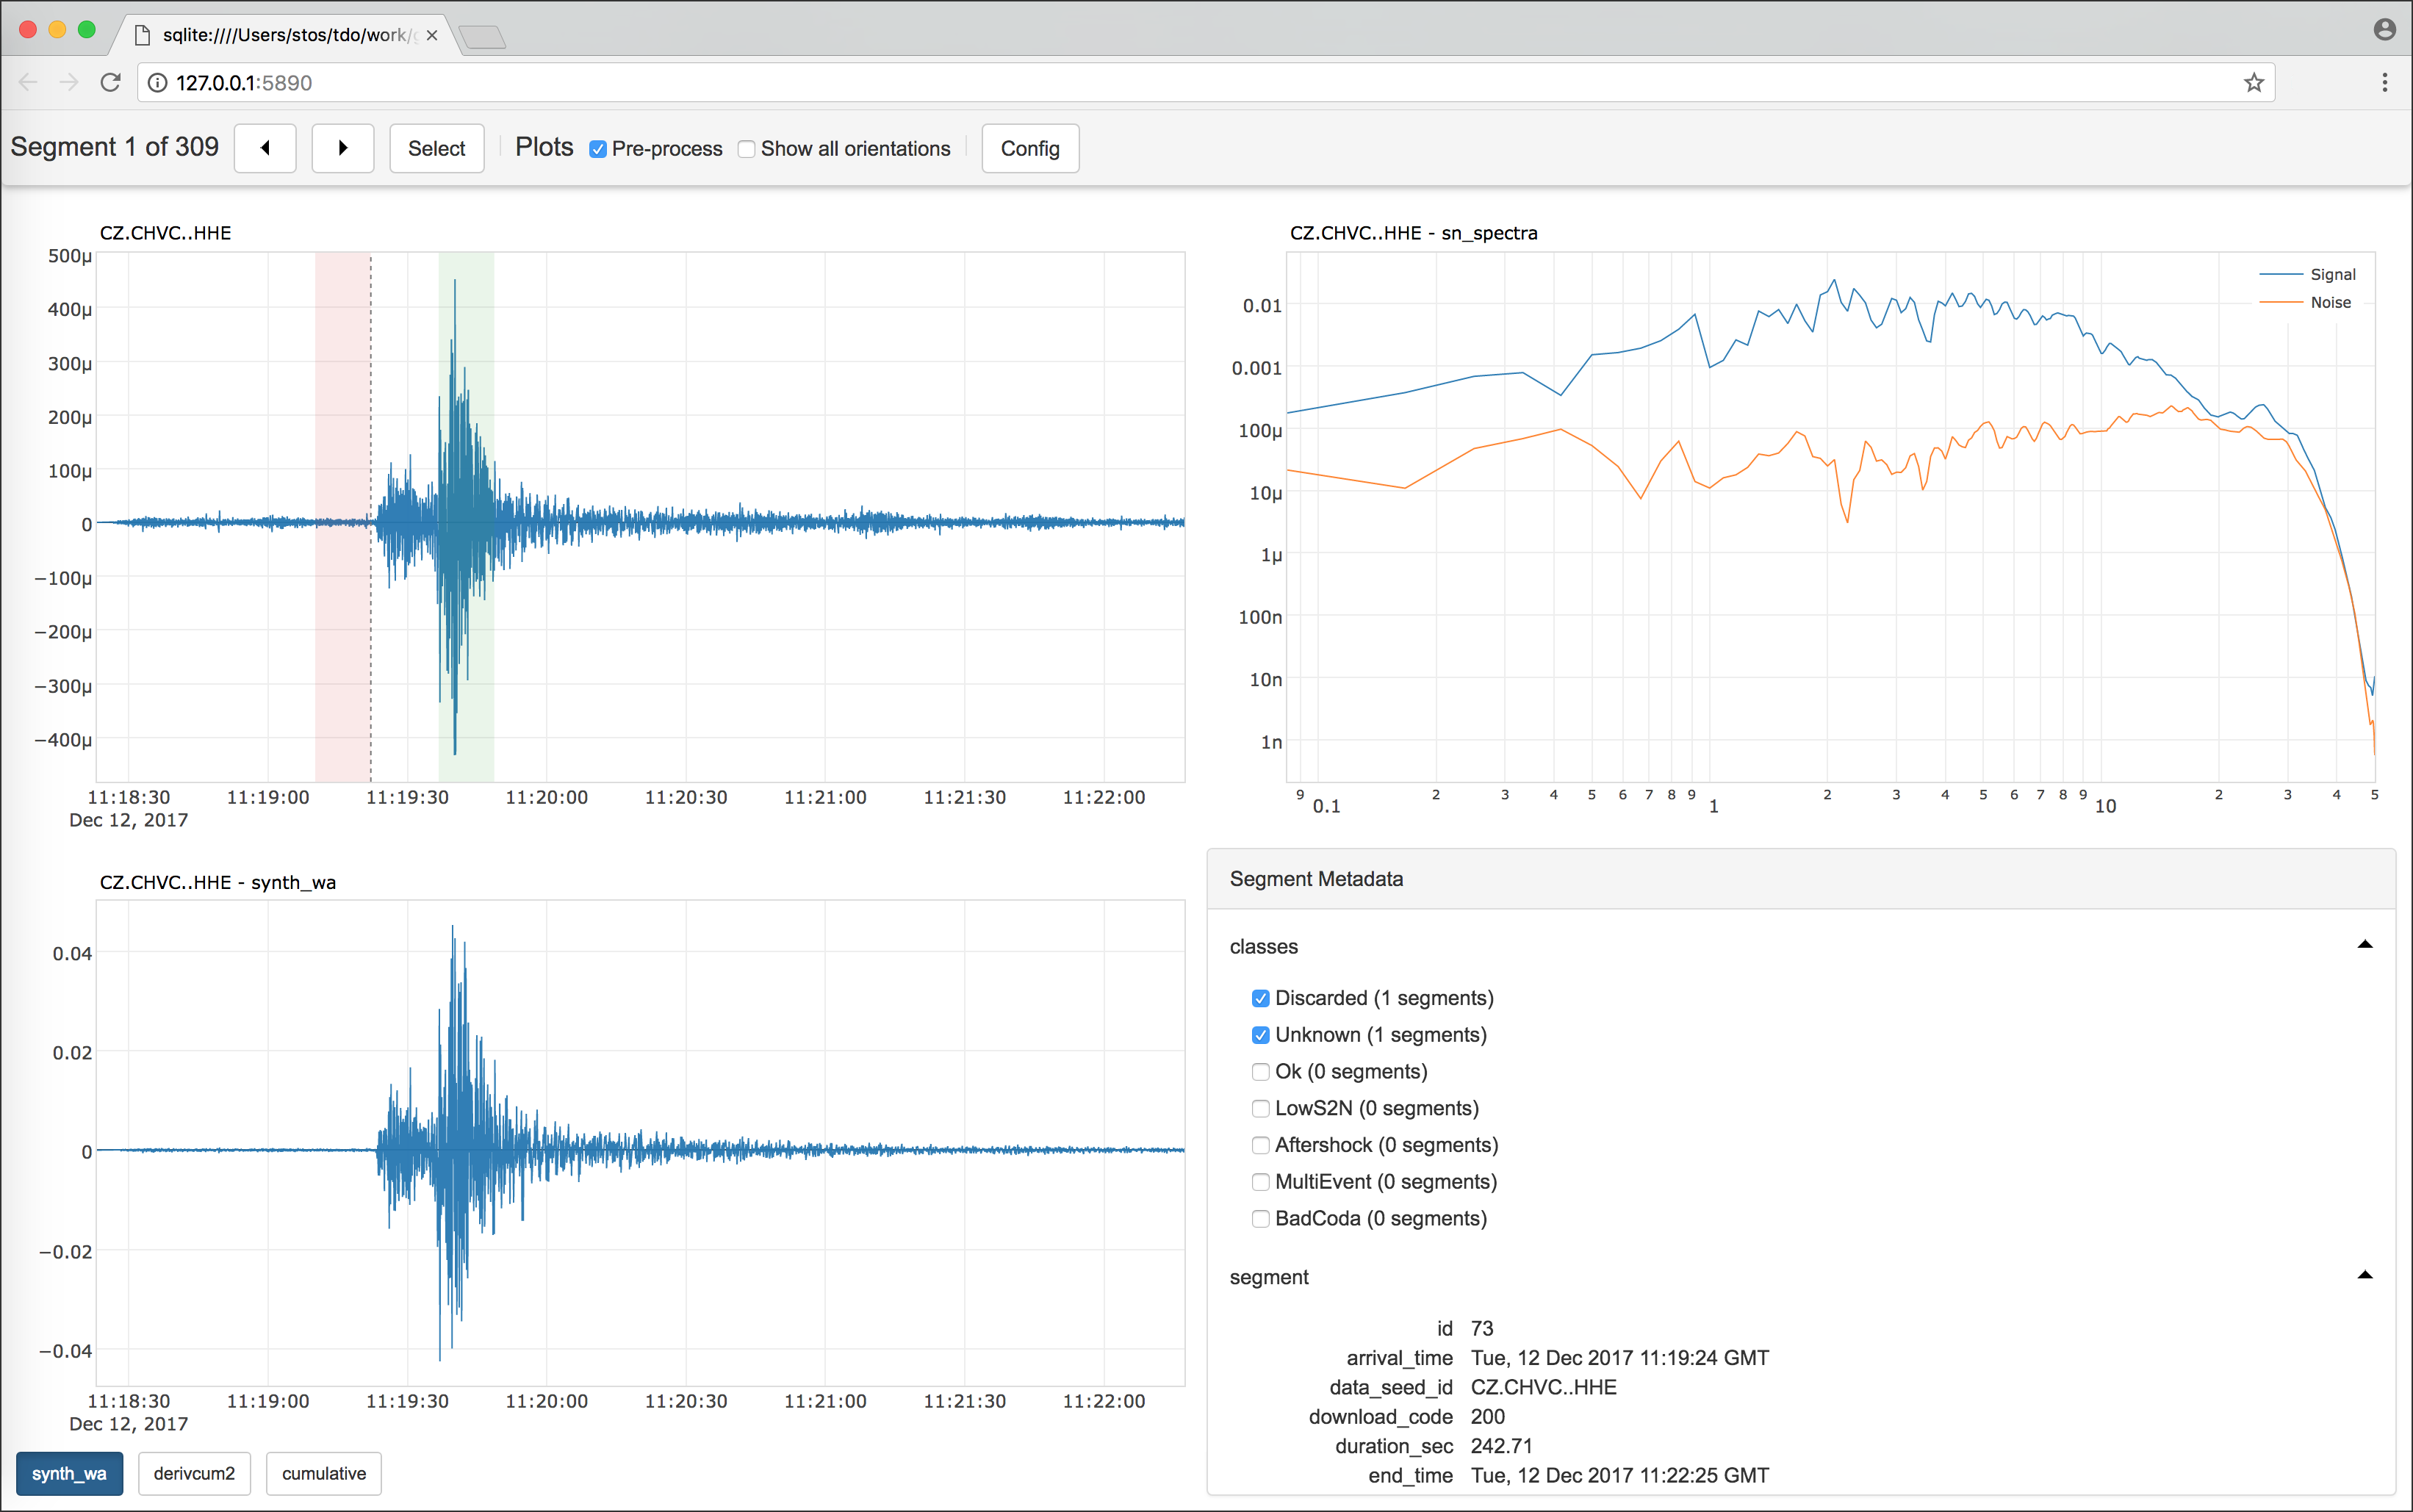
A visualization tool to show downloded and optionally customized processed segments in a web browser Graphical User Interface (GUI) by means of Python web framework and Javascript libraries. As for the processing module, write your own code (following few simple instructions) run it with the
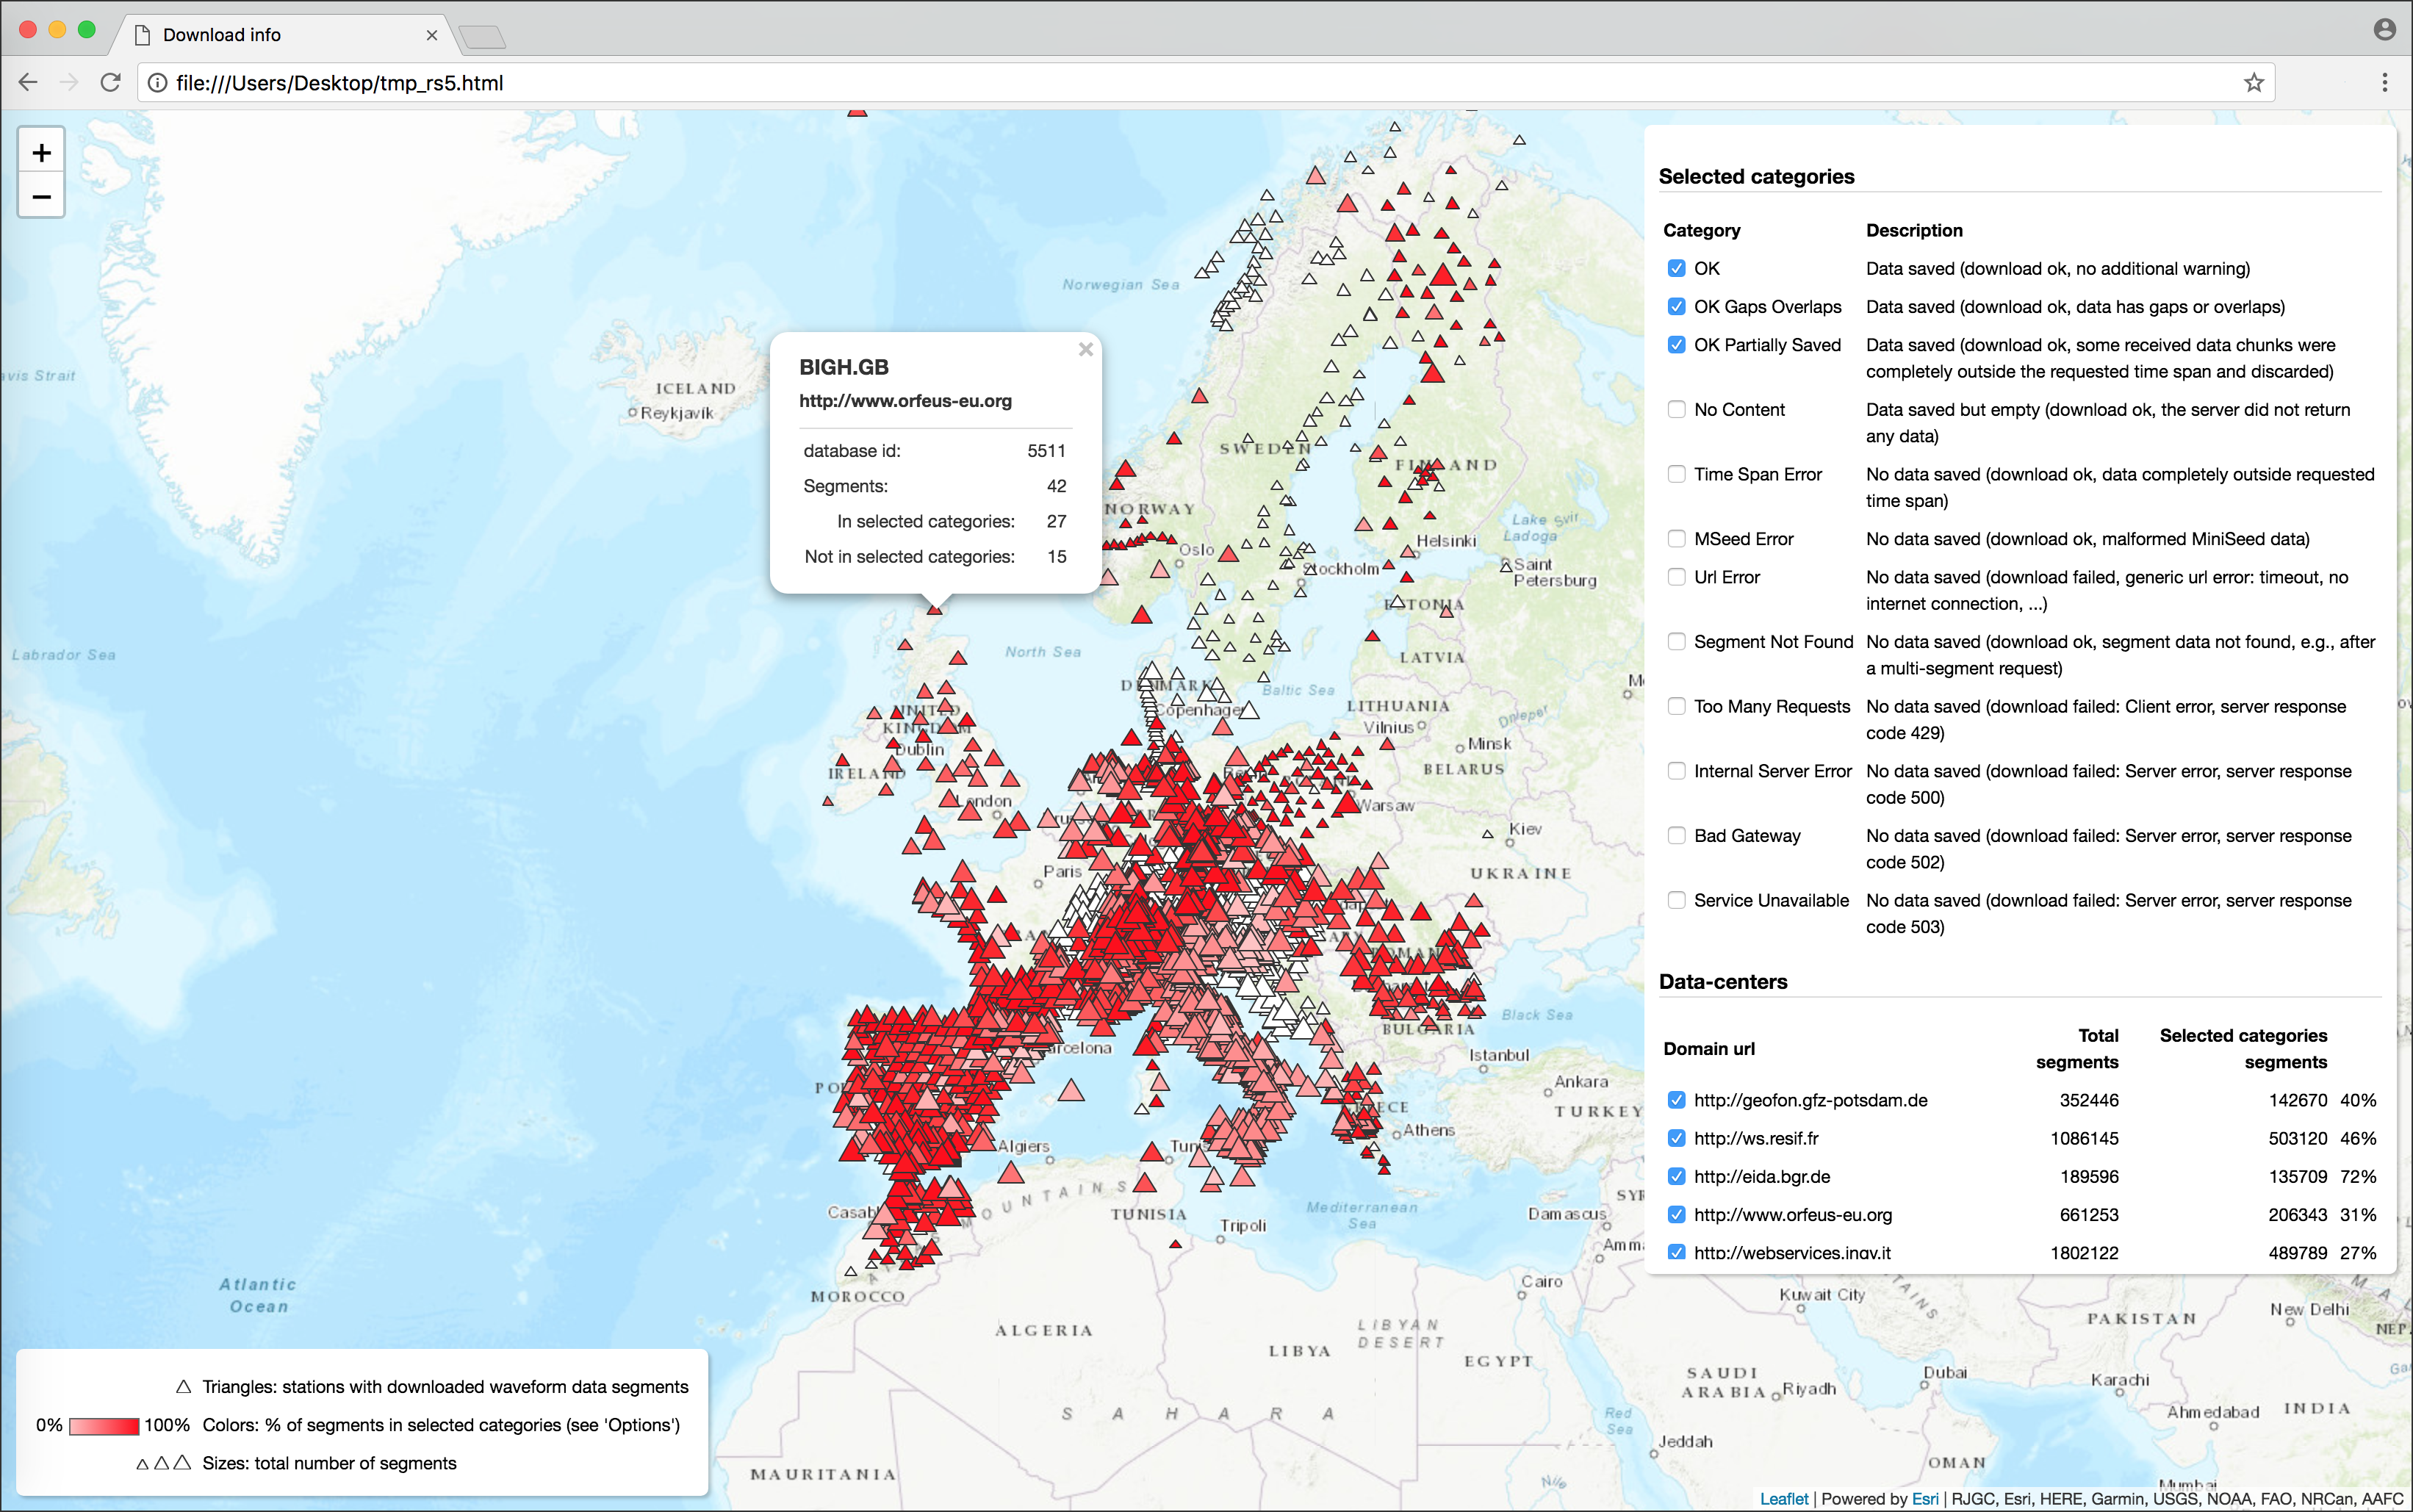
s2s showcommand, and Stream2segment takes care of showing the plots implemented therein. The user can also set class labels to make the GUI a hand-labelling tool for supervised classification problems, or to simply label special segments for easy selectionThe GUI produced with the showcommandThe dynamic HTML page produced with the utils dstatscommand(image linked from https://geofon.gfz-potsdam.de/software/stream2segment/) (image linked from https://geofon.gfz-potsdam.de/software/stream2segment/)
Citation (Software):
Zaccarelli, Riccardo (2018): Stream2segment: a tool to download, process and visualize event-based seismic waveform data. V. 2.7.3. GFZ Data Services.
http://doi.org/10.5880/GFZ.2.4.2019.002
Citation (Research article):
Riccardo Zaccarelli, Dino Bindi, Angelo Strollo, Javier Quinteros and Fabrice Cotton. Stream2segment: An Open‐Source Tool for Downloading, Processing, and Visualizing Massive Event‐Based Seismic Waveform Datasets. Seismological Research Letters (2019)
https://doi.org/10.1785/0220180314
Please refer to the github documentation
This program has been installed and tested on Ubuntu 14+ and macOS (El Capitan and Sierra). Please note that the database software installation is not covered here. If you plan saving data to a local database, depending on your database choice you will need also sqlite3 or postgres installed on your computer (sqlite3 is generally pre-installed on Ubuntu and macOS).
Follow the instructions below for Ubuntu, remembering to replace
apt-get with the OsX equivalent brew (be sure to have brew insalled).
NOTE: As of 2019, we strongly recommend to use Python3
sudo apt-get update
sudo apt-get install git python-pip python2.7-dev  # python 2
sudo apt-get install git python3-pip python3-dev  # python 3
Stream2segment needs also several programs (collected from several Ubuntu installations), which you can install beforehand by expanding the details below and have less chances of installation problems. You can also go to the next section and skip the step below: installation problems are more likely to happen (for details, see also the Installation Notes) but you can control what to install and avoid upgrading already installed packages unnecessarily.
Show additional software installation details
Upgrade gcc first:
sudo apt-get update
sudo apt-get upgrade gcc
Then:
sudo apt-get update
sudo apt-get install libpng-dev libfreetype6-dev \
	build-essential gfortran libatlas-base-dev libxml2-dev libxslt-dev python-tk
Git-clone (basically: download) this repository to a specific folder of your choice:
git clone https://github.com/rizac/stream2segment.git
and move into package folder:
cd stream2segment
We strongly recomend to use Python virtual environment, because by isolating all Python packages we are about to install, we won't create conflicts with already installed packages.
-
Installation (recommended, but works for Python 3.5+ only)
Python 3 (from version 5) has a built-in support for virtual environments - venv. Install it via:
sudo apt-get install python3-venvMake virtual environment in an stream2segment/env directory (env is a convention, but it's ignored by git commits so better keeping it)
python3 -m venv ./env -
Installation (all Python versions)
To install Python virtual environment either use Virtualenvwrapper or the more low-level approach
virtualenv:sudo pip install virtualenvMake virtual environment in an stream2segment/env directory (env is a convention, but it's ignored by git commits so better keep it)
virtualenv env(on ubuntu 16.04, we got the message 'virtualenv: Command not found.'. We just typed:
/usr/local/bin/virtualenv env)
To activate your virtual environment, type:
source env/bin/activate
or source env/bin/activate.csh (depending on your shell)
Activation needs to be done each time we will run the program. To check you are in the right env, type:
which pipand you should see it's pointing inside the env folder
Installation and activation with Anaconda (click to expand)
disclaimer: the lines below might be outdated. Please refer to the Conda documentation for details
Create a virtual environment for your project
- In the terminal client enter the following where yourenvname (like « env ») is the name you want to
call your environment, and replace x.x with the Python version you wish to use. (To see a list of
available Python versions first, type conda search "^python$" and press enter.)
Conda create –n yourenvname python=x.x anaconda - Press « y » to proceed
Activate your virtual environment
$source activate env- To deactivate this environment, use
$source deactivate
NOTE: From now on you are supposed to be in your activated Python virtualenv
Run pip freeze. If you get the message 'You are using pip version ..., however version ... is available.'
then execute:
pip install --upgrade pip
Run ./installme or ./installme-dev (the latter if you want to contribute and/or
run tests to check if the program will likely work in your system)
scripts details
The scripts above are a shorthand for the following commands, which you can always run by yourself to have more control on what is happening:
-
Install numpy first (this is an obspy requirement): open the file
requirements.txtand search for the line starting with "numpy". Copy it and pip-install numpy. For instance, supposing that the line isnumpy==1.15.4, then execute on the terminal:pip install numpy==1.15.4 -
Install via requirements file:
pip install -r ./requirements.txtAlternatively, if you want to run tests (recommended to check that everything works on your system):
pip install -r ./requirements.dev.txt -
Install the current package
pip install -e .(The
-eoptions installs this package as editable, meaning that after making a change - e.g. agit pullto fetch a new version - you don't need to reinstall it but the new version will be already available for use)
If you wish to use the program within Jupyter notebooks, jupyter is not included in the dependencies. Thus
pip install jupyter==1.0.0
The program is now installed. To double check the program functionalities, we suggest to run tests (see below) and report the problem in case of failure. In any case, before reporting a problem remember to check first the Installation Notes
Stream2segment has been highly tested (current test coverage is above 90%)
on Python version >= 3.5+ and >= 2.7. Note however that CI systems are not
in place: each release is tested only on the latest Python version (currently, 3.7).
Note also that, as of 2019, we discontinued running tests for Python 2.7.
The command to execute tests is pytest or, if 'pytest not found' message appears:
python -m pytest. Remember that tests are time consuming (some minutes currently).
Here some examples depending on your needs:
pytest -xvvv -W ignore ./tests/
pytest -xvvv -W ignore --cov=./stream2segment --cov-report=html ./tests/
pytest -xvvv -W ignore --dburl postgresql://<user>:<password>@localhost/<dbname> --cov=./stream2segment --cov-report=html ./tests/
Where the options denote:
-x: stop at first error-vvv: increase verbosity,-W ignore: do not print Python warnings issued during tests. You can omit the-Woption to turn warnings on and inspect them, but consider that a lot of redundant messages will be printed: in case of test failure, it is hard to spot the relevant error message. Alternatively, try-W once- warn once per process - and-W module-warn once per calling module.--cov: track code coverage, to know how much code has been executed during tests, and--cov-report: type of report (if html, you will have to opend 'index.html' in the project directory 'htmlcov')--dburl: Additional database to use. The default database is an in-memory sqlite database (e.g., no file will be created), thus this option is basically for testing the program also on postgres. In the example, the postgres is installed locally (localhost) but it does not need to. Remember that a database with name<dbname>must be created first in postgres, and that the data in any given postgres database will be overwritten if not empty
-
If you see (we experienced this while running tests, thus we can guess you should see it whenever accessing the program for the first time):
This system supports the C.UTF-8 locale which is recommended.
You might be able to resolve your issue by exporting the
following environment variables:

  export LC_ALL=C.UTF-8
  export LANG=C.UTF-8
Then edit your
~/.profile(or~/.bash_profileon Mac) and put the two lines starting with 'export', and executesource ~/.profile(source ~/.bash_profileon Mac) and re-execute the program. -
On Ubuntu 12.10, there might be problems with libxml (
version libxml2_2.9.0' not found). Move the file or create a link in the proper folder. The problem has been solved looking at http://phersung.blogspot.de/2013/06/how-to-compile-libxml2-for-lxml-python.html
All following issues should be solved by installing all dependencies as described in the section Prerequisites. If you did not install them, here the solutions to common problems you might have and that we collected from several Ubuntu installations:
-
For numpy installation problems (such as
Cannot compile 'Python.h') , the fix has been to update gcc and install python3-dev (python2.7-dev if you are using Python2.7, discouraged):sudo apt-get update sudo apt-get upgrade gcc sudo apt-get install python3-devFor details see here
-
For scipy problems,
build-essential gfortran libatlas-base-devare required for scipy. For details see here -
For lxml problems,
libxml2-dev libxslt-devare required. For details see here -
For matplotlib problems (matplotlib is not used by the program but from imported libraries),
libpng-dev libfreetype6-devare required. For details see here and here
- The program can be also installed via the usual way by ignoring
requirements.txtand just typing:The difference is that this way the newest version of all dependencies are downloaded, whereas withpip install -e .requirements.txt(see above) all dependencies are installed with the specific version on which tests passed successfully. Therefore, the latter approach is a lot safer. From times to times, it is neverthless necessary to update the dependencies, which would also makepip installmore likely to work (at least for some time). The procedure is:Run tests (see above) with warnings on: fix what might go wrong, and eventually you can replace the oldpip install -e . pip freeze > ./requirements.tmp pip install -e .[dev,test] pip freeze > ./requirements.dev.tmprequirements.txtandrequirements.dev.txtwith the.tmpfile created.