The object of this project is to create an eye controllable feeding robot for the disabled. Codename of the project is R(eye)bot which is Rebot, in short.
Code is designed to run on Raspberry PI 2 B with Raspbian operating system. In order to test the code, specialized hardware is required.
Two theses were released about the project. One for hardware and other for software.
Video from the actual prototype can be found here.
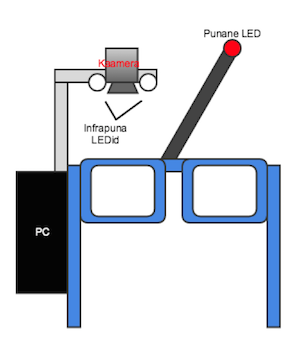
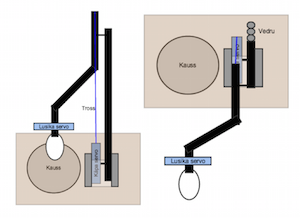
The hardware consists of two parts - glasses and robotic arm.
- Raspberry PI 2 B
- NOIR camera for the RPI
- At least 4gb micro SD card
- 2x IR LEDs (800-1000nm) (+2 resistors)
- 1x LED (+1 resistor)
- 2x servo motors (+2 1000 ohm resistors to protect GPIO pins) (note that the leg servo should be more powerful)
- AC/DC 5V adapters for the PI and the servo motors (servo adapter can be slightly more powerful to max out torque)
The camera has to be mounted about 5 centimeters away from the eye. PI does not have to go necessarily on the glasses, if you have a long ribbon cable for the camera handy.
The arm must be designed in such a way that it will mechanically maintain the horizontal position for the spoon.
Note that resistances must be calculated depending on the LEDs used.
- Patient sits at a 80-90 degree angle.
- Rebot is turned on.
- Rebot flashes the LED shortly, this means camera calibration will start in a second.
- Rebot flashes the LED for about 2 to 3 seconds, in that time, patient must look the LED. When the LED turns off, patient must look away.
- Rebot flashes the LED shortly, this means all systems are online and the next time patient looks at the LED, the robot will begin to feed.
- Rebot will scoop the first portion of food automatically.
- Patient must look at the LED for 2 seconds (the LED will illuminate). After this, the arm will move to feed the patient.
- After eating, the patient must look at the LED again to move the arm down and scoop for another portion.
- Steps 6-8 repeat.
System setup begins by installing Raspbian on the SD card. Can be done by using NOOBS or directly installing an image with dd.
After installation enable camera and SSH access via sudo raspi-config (after NOOBS installation this prompts automatically). If you have a WIFI dongle, startx and configure the network.
Upgrade the system:
sudo apt-get update
sudo apt-get upgrade
curl http://www.linux-projects.org/listing/uv4l_repo/lrkey.asc | sudo apt-key add -
sudo bash -c "echo 'deb http://www.linux-projects.org/listing/uv4l_repo/raspbian/ wheezy main' >> /etc/apt/sources.list"
sudo apt-get update
sudo apt-get install uv4l uv4l-raspicam uv4l-raspicam-extras
sudo nano /etc/uv4l/uv4l-raspicam.conf
Find the nopreview option and conigure it to be yes, make sure it's uncommented.
sudo service uv4l_raspicam restart
echo 'export LD_PRELOAD=/usr/lib/uv4l/uv4lext/armv6l/libuv4lext.so' >> ~/.bashrc
sudo bash -c "echo 'export LD_PRELOAD=/usr/lib/uv4l/uv4lext/armv6l/libuv4lext.so' >> /root/.bashrc"
source ~/.bashrc
Disable the LED on the camera board:
sudo bash -c "echo 'disable_camera_led=1' >> /boot/config.txt"
Currently OpenCV 2.4.1 and Python 2.7.3 are used, because at the time of writing OpenCV v3 (which brings Python 3 bindings) was still in RC. Also precompiled package is used because compiling would take couple of hours on PI.
sudo apt-get install python-opencv
mkdir ~/drivers
cd ~/drivers
wget https://github.com/mlensment/rebot/raw/master/drivers/servod
nano ~/init.sh
Add content:
#!/bin/bash
# This file is executed on boot as root via /etc/rc.local
echo "Loading servo driver..."
/home/pi/drivers/servod --step-size 2 --min 280
Load the driver on boot:
chmod +x ~/init.sh
sudo nano /etc/rc.local
Before the last line (exit 0) add:
/home/pi/init.sh &
Reboot the system:
sudo reboot
cd ~
git clone https://github.com/mlensment/rebot.git
cd rebot
The configuration is found in the config.py file (in root). Configuration file includes comments on how to configure Rebot and should be self explanatory.
There is one caveat though. When changing the SERVO_MIN_WIDTH make sure you reconfigure your servo driver with the same or lower --min value in init.sh in your home path. Do not go too low though, otherwise you may ruin your servo motors.
Rebot must be run as a root.
sudo ./rebot
To run Rebot in debug mode, pass -d (requires a display server). To see all the options, pass --help.


