EXPERIMENTAL AND UNTESTED CODE RESEARCH CODE! THAR BE DRAGONS AHEAD LADDY!
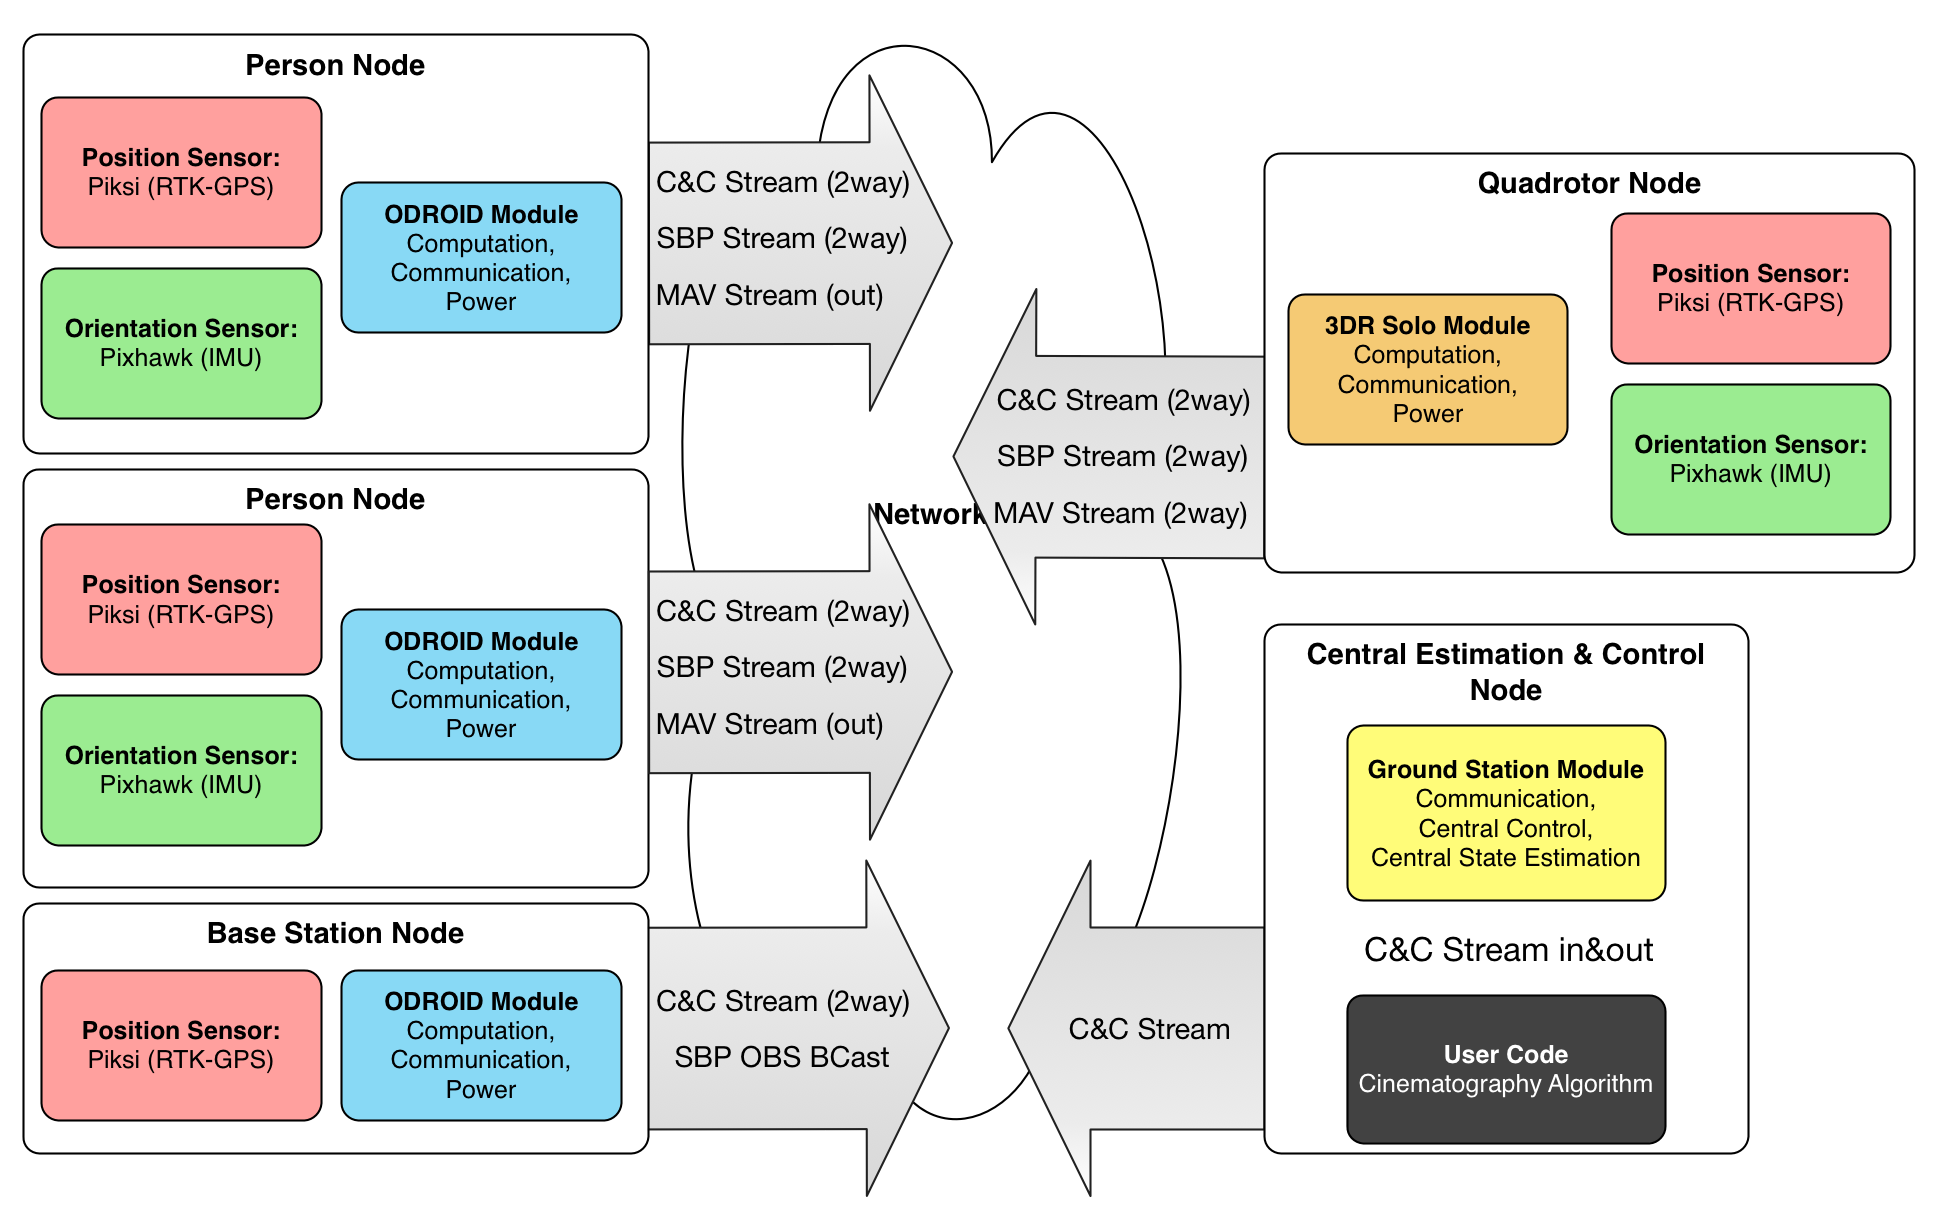
A Library and Toolkit for Wireless Distributed State Estimation and Control of Multiple Drones and Subjects. Named after the Quantum Entanglement phenomenon.
This code runs a wireless multi-node sensor networks, powering our wireless cinematography system. It currently assumes a python-compatible Linux computers at each node. (In our case, ODROID XU4 running Ubuntu and Python 2.7)
The tools does not make the master. A master chooses great tools for his craft. I am far from full mastery, but at this stage of my journey, here's the tools I choose for my craft:
- Macbook Pro, OS X 10.10 Yosemite
- Git and Github
- SourceTree for visualizing Git repositories.
- Markdown for documentation
- Sublime Text 3
- BASH
- Dropbox stores all my files.
- Divvy, with reasonable keyboard shortcuts to push windows around.
- Quicksilver app launcher
- Caffeine for power control
- f.lux for nighttime coding
groundstation(-local).sh: Launch an instance of the grounstation.groundstation(-local).sh: Launch an instance of the odroidperson.install.sh: For nodes: Installs "spooky" systemctl daemon to start odroidperson.sh on boot.update-and-restart.sh: For nodes: Pulls the latest git repo and relaunches daemon.
groundstation: Main controller, single instance on your Laptopodroidperson: Multiple Instances, One Per Odroid On Personreplay: Script to replay recorded data, as if live sensors are playingpiksibase: Helper executable, if you want to run only a ONLY a piksi SBP Broadcasterspooky: Underlying shared library used by both parts
What a great place to start! See all the available logfiles here!
./bin/replay logs/state0000356.pickle
Now, use your favorite port monitoring tool, or just run mine! In a different window:
python experiments/simple_udp_listener.py --port 19001
Check out ./bin/replay --help for more commands!
Fire up a local debug odroidperson instance:
./bin/odroidperson-local.sh
Fire up a local groundstation instance:
./bin/groundstation-local.sh
Fire up a UDP listener to check your output:
python experiments/simple_udp_listener.py --port 19000
Start playing with the CLI from groundstation:
>>> help
>>> status
Firing up remote Piksi consoles
For Solo's Piksi:
python piksi_tools/console/console.py -p 192.168.2.1:18002
For Person 1 and 2 Piksi:
python piksi_tools/console/console.py -p 192.168.2.1:19214
python piksi_tools/console/console.py -p 192.168.2.1:19224
Alt Compensation
We include a manual altitude compensation / calibration routine:
solo up <mm>
solo set_alt_comp <mm>
This project uses git submodules
After checkout:
git submodule init
git submodule update
These are the dependencies. You can install them directly, or just install 'em from the submodules and you'll have the same version I'm using!
git submodule init
git submodule update
cd lib/libsbp/python
sudo python setup.py install
cd ../../mavlink/pymavlink
sudo python setup.py install
cd ../../dronekit-python
sudo python setup.py install
-
python dev stuff
sudo apt-get install python-setuptools python-pip python-dev -
libsbp https://github.com/swift-nav/libsbp
git clone https://github.com/swift-nav/libsbp cd libsbp sudo python setup.py install -
pymavlink https://github.com/mavlink/mavlink
sudo apt-get install python-dev git clone https://github.com/mavlink/mavlink cd mavlink/pymavlink sudo python setup.py install -
dronekit https://github.com/dronekit/dronekit-python
sudo pip install dronekit
The Ground Station relays messages from Piksi Console to each individual Piksi in the field.
Point Piksi Console to listen for SBP messages on:
<GroundStation IP>:<sbp-relay-send-port>
Piksi Console can send SBP messages to:
<GroundStation IP>:<sbp-relay-recv-port>
The documentation and protocol spec lives here.
Your main reference is http://dev.3dr.com/
The Solo developer toolkit comes with a wonderful command line utility, solo.
So, you wanna flash your solo with an official release?
solo flash both latest --clean
So, you wanna build your own copy of the code and flash that? You can flash one of two firmwares. ardupilot-solo is the commercial, stock firmware. This is based off an older version of ArduCopter, but includes all the Solo-specific peripherals such as the ESC LEDs. ardupilot-solo-rebase is the (almost) current master of ArduPilot, rebased on top of solo-specific fixes. This includes the latest ArduCopter code, but does not include all the Solo-specific magic. For this project, we recommend flashing and developing on top of ardupilot-solo-rebase
git clone https://github.com/3drobotics/ardupilot-solo-rebase
cd ardupilot-solo-rebase
git submodule init
git submodule update
cd ArduCopter
make px4-v2
make pv4-v2-solo-upload
So, you wanna download logs?
There's the controller and drone logs. I have not investigates these closely.
Then there's the ArduPilot Dataflash logs. These are mint!
Currently, I believe you can only download through MAVProxy. Connect to SoloLink, then:
mavproxy --master=0.0.0.0:14550
>>> log list
>>> log download <XXX>
Solo creates a wireless network. The controller, Solo, and any connected devices are on the same network subnet. The network layout is:
10.1.1.1    - Controller
10.1.1.10   - Solo
10.1.1.100+ - Connected Devices
Connect to your solo's wifi: SSID = SoloLink_XXX and password = sololink.
Ping your device:
ping -c 3 10.1.1.1
ping -c 3 10.1.1.10
Install solo cli and check out docs:
pip install -UI git+https://github.com/3drobotics/solo-cli
Update and provision Solo: THE ORDER OF THESE STEPS ARE IMPORTANT
solo flash both latest --clean
solo wifi --name="wifi ssid" --password="wifi password"
solo install-smart
solo resize
solo info
solo provision
solo install-runit
solo install-pip
Confirming Partition Table Success:
The resulting partition table should look like:
root@3dr_solo:~# df -h
Filesystem                Size      Used Available Use% Mounted on
none                     85.2M     12.0K     85.2M   0% /dev
/dev/mmcblk0p2           95.8M     73.3M     22.5M  77% /mnt/boot
/dev/loop0               64.6M     64.6M         0 100% /mnt/rootfs.ro
/dev/mmcblk0p3          666.4M     63.4M    568.7M  10% /mnt/rootfs.rw
none                    666.4M     63.4M    568.7M  10% /
tmpfs                   249.9M    188.0K    249.8M   0% /run
tmpfs                   249.9M     16.0K    249.9M   0% /var/volatile
/dev/mmcblk0p4            6.3G     15.9M      6.0G   0% /log
Connecting Solo to a WiFi network with an annoying pop-up confirmation box
You can create an SSH tunnel from your laptop to Solo, so you can click
Debugging Help:
- Be sure your solo is connected to the internet successfully: SSH into solo and ping google
- The Smart package manager needs to work before resize can succeed. Check that you can run "smart install parted" from the solo shell first.
- If the solo command line calls fail, check out their source and try to run commands one at a time until you find the culprit
- Smart has a sticky cache that can get dirty. You can clean this removing all the files in "/var/lib/smart/channels", and running "smart update". There should be no errors.
Get started with dronekit from the ground station:
sudo pip install dronekit
Attempt to connect from your laptop in python:
from dronekit import connect
vehicle = connect('0.0.0.0:14550', wait_ready=True)
print "Vehicle state:"
print " Global Location: %s" % vehicle.location.global_frame
print " Global Location (relative altitude): %s" % vehicle.location.global_relative_frame
print " Local Location: %s" % vehicle.location.local_frame
print " Attitude: %s" % vehicle.attitude
print " Velocity: %s" % vehicle.velocity
print " Battery: %s" % vehicle.battery
print " Last Heartbeat: %s" % vehicle.last_heartbeat
print " Heading: %s" % vehicle.heading
print " Groundspeed: %s" % vehicle.groundspeed
print " Airspeed: %s" % vehicle.airspeed
print " Mode: %s" % vehicle.mode.name
print " Is Armable?: %s" % vehicle.is_armable
print " Armed: %s" % vehicle.armed
or
from pymavlink import mavutil
c = mavutil.mavlink_connection("10.1.1.10:14550")
Check out all the sweet examples!
This section of the Piksi integration enables Solo to fly using RTK and Piksi in Pseudo-Absolute mode.
This assumes you're using the 3DR Accessory Port
We're going to set up SERIAL2 (uartD) as GPS1, and SERIAL3 (uart?) as GPS2. SERIAL2 is on the Accessory Port, so we will plumb this to Piksi. SERIAL3 is wired to the internal ublox GPS, so we will leave that as is. uartE aka SERIAL4 is wired to the Gimbal.
Here's the mapping of serial ports on Pixhawk(2):
| HAL | System | Params | Pixhawk | Solo |
|---|---|---|---|---|
| px4io/sbus? | /dev/ttyS0 | |||
| uartA | /dev/ttyACM0 | USB | ||
| uartB | /dev/ttyS3 | SERIAL3 | GPS | Internal GPS |
| uartC | /dev/ttyS1 | SERIAL1 | Telem1 | |
| uartD | /dev/ttyS2 | SERIAL2 | Telem2 | Acc. Port |
| uartE | /dev/ttyS6 | SERIAL4 | Serial4 | Gimbal |
| nsh console | /dev/ttyS5 | Serial5 | Acc. Port |
Setup Piksi:
Choose which UART will connect to Solo. I used UARTA for it's position. Configure the following Piksi settings. Make sure you're producing solutions at 5Hz, not the default 10Hz!
| Section | Setting | Value |
|---|---|---|
| UART A | mode | SBP |
| UART A | sbp message mask | 65280 |
| UART A | conigure telemetry radio | False |
| UART A | baudrate | 115200 |
| Solution | soln freq | 5 |
Also set up a surveyed base station. The PIXHAWK driver requires pseudo-absolute positioning (POS_LLH messages with a flag indicating RTK lock). This can only be generated if the base station also transmits a BASE_POS message containing a surveyed location.
| Section | Setting | Value |
|---|---|---|
| surveyed lat | measure it | |
| surveyed lon | measure it | |
| surveyed alt | measure it |
On the base station, ensure that the OBS messages are small enough to fit into MAVLink:
| Section | Setting | Value |
|---|---|---|
| SBP | obs msg max size | 102 |
Connect Piksi to the Accessory Port as follows:
| Piksi | Accessory Port |
|---|---|
| GND | GND |
| RX | SER2_TX |
| TX | SER2_RX |
| VCC | ? |
Setup Pixhawk
Connect to the solo using mavproxy:
mavproxy.py --master udp:0.0.0.0:14550
Now, set up the necessary parameters:
param set GPS_TYPE 1
param set GPS_TYPE2 1
param set SERIAL2_BAUD 115
param set SERIAL2_PROTOCOL 5
param set SERIAL3_BAUD 38
param set SERIAL3_PROTOCOL 5
param set EKF_POSNE_NOISE 0.1
To enable GPS Altitude, set the following params. (Thanks to Paul Riseborough for this!) This enables the secondary EKF, and runs multiple instances for redundancy. NOTE: This only works if you are flying a version of Solo that has the EKF2 enabled. This might be the default by now, but as of this writing, I flashed the ArduCopter-rebased-onto-Solo version available here: https://github.com/3drobotics/ardupilot-solo-rebase
param set EKF_ENABLE  0
param set EK2_ENABLE  1
param set AHRS_EKF_TYPE  2
param set EK2_IMU_MASK  3
param set EK2_ALT_SOURCE 2
param set EK2_POSNE_NOISE 0.05
According to Paul Riseborough:
You can run EKF2 instances for as many IMU’s as your hardware can handle. With EKF_ENABLE = 0 (legacy EKF disabled), I have flown with three IMU’s on a Solo (EK2_IMU_BITMASK = 7), but was getting some frame overruns. My preference when using a PX2 with the three IMU’s is to set EK2_IMU_BITMASK = 5 so that is uses IMU1 and 3 (isolated and non-isolated MPU-6000), but if you are doing lots of high speed flight or have higher than average vibration levels, you may want to use IMU2 instead of IMU3 (EK2_IMU_BITMASK = 3) as although IMU2 tends to have larger offset, it has the benefit of being isolated. The other option if you want to preserve maximum processing resources for your own development is to just use IMU1 (EK2_IMU_BITMASK = 1)
When you set EK2_ALT_SOURCE = 2, it uses GPS as the primary, but maintains a baro to GPS offset, so it can switch across to BARO is GPS drops out. This is a feature I’m keen to get some user testing on (the fallback on loss of GPs has only been tested in SITL), so let me know if you run into any bugs, and i will try to address them quickly.
Turn on the Piksi's simulation mode, and in mavproxy, run:
status
You should see:
GPS_RAW_INT {time_usec : 642108000, fix_type : 5, lat : 374292190, lon : -1221738005, alt : 69740, eph : 160, epv : 65535, vel : 396, cog : 12748, satellites_visible : 9}
GPS2_RAW {time_usec : 0, fix_type : 1, lat : 373625480, lon : -1221125932, alt : -208190, eph : 9999, epv : 65535, vel : 0, cog : 0, satellites_visible : 0, dgps_numch : 0, dgps_age : 0}
For best trajectory following, you need a good estimation and control tune.
Parameters you need to tune for your EKF:
EK2_IMU_MASK
	3 - uses IMU2, better for high vibration
	5 - uses IMU1&3, Paul's ideal.

EK2_POSNE_NOISE

EK2_GPS_DELAY

GPS_CHECK
	-1 - does all checks
	0  - skips all GPS preflight checks
This section demonstrates how to create a bi-directional relay of SBP data from Piksi, via sololink to your ground staton.
Setup iMX6
Follow these directions to setup libsbp on Python. Mirrored here:
pip install -UI git+https://github.com/3drobotics/solo-cli
solo wifi --name=<ssid> --password=<password>
solo install-smart
solo install-runit
solo install-pip
solo resize
Download Logs
Do this periodically
cd spooky/logs
solo logs download
Connect the Piksi USB to the Solo USB
See this discussion.
Use an OTG USB cable, such as this or this one. Connect the host side (blue) to the iMX6 (that is, solo).
Put the iMX6 USB into host mode. By default it exposes a serial port. Use or make a jumper and connect GND to 3DRID.
SSH into solo, and check that Piksi is available on Solo:
ssh 10.1.1.10
cd /dev/serial/by-id
ls -lah
and you should see something like
drwxr-xr-x    2 root     root          60 Jan  2 09:05 ./
drwxr-xr-x    4 root     root          80 Jan  1  1970 ../
lrwxrwxrwx    1 root     root          13 Jan  1  1970 usb-FTDI_Single_RS232-HS-if00-port0 -> ../../ttyUSB0
Notice the FTDI driver - that's Piksi!
Install libsbp
Time to get busy! Install libsbp on Solo and check out the libsbp docs:
ssh 10.1.1.10
pip install sbp
mkdir /home/root/Code
Install solo sbp relay
Copy the src/solo/main.py file to your solo:
rsync -avz src/solo/main.py root@10.1.1.10:/home/root/Code
Create a service to auto-start main.py. Copy-paste this into the shell:
mkdir -p /etc/solo-services/spooky/ cat <<'EOF' | tee /etc/solo-services/spooky/run #!/bin/bash cd /home/root/Code && exec python main.py EOF chmod +x /etc/solo-services/spooky/run
First, set up Virtualbox and Vagrant
Then, to fire up the simulator:
vagrant up
vagrant ssh
./sitl.sh
param load ../Tools/autotest/copter_params.parm
param set ARMING_CHECK 0
This will start transmitting data on 0.0.0.0:14550
The Odroid XU-4 is (as of end-2015) the most popular companion computer for sUAS research [source: Niels' Urban Dictionary]. It comes equipped with a suite of features that makes it amazingly well-suited for high performace computing on a flying platform: an eight-core processor (Arm A15 and A9 processors), USB3.0, and GPIO pins.
Flash Odroids with Ubuntu 15.04 image onto MicroSD card using these instructions
I'm assuming you've got your ODROID plugged into an HDMI screen, mouse and keyboard. You just booted and you're staring at an Ubuntu desktop.
- Connect your odroid to a wired internet connection
- Double-click "ODROID Utility" on the desktop, and enter the SU password 'odroid' (things install...)
- Resize the root partition
- Set a better hostname
- reboot!
Now it's time to install things for us! See the section on dependencies and submodules!
sudo apt-get install python-setuptools python-pip python-dev
mkdir ~/Code
cd Code
git clone https://github.com/njoubert/spooky.git
cd spooky
From here on, look to the rest of this document :)
GUI Way:
Open System -> Preferences -> Network Connections Edit Wired Connection 1 IPv4 Settings:
Address: 192.168.2.xx Netmask: 255.255.255.0 Gateway: 192.168.2.1
username: odroid
password: odroid
Add the following to your local computer's .ssh/config file:
host odroid51 192.168.2.51
Hostname 192.168.2.51
Port 22
User odroid
StrictHostKeyChecking no
UserKnownHostsFile=/dev/null
IdentityFile ~/.ssh/id_rsa

host odroid52 192.168.2.52
    Hostname 192.168.2.52
    Port 22
    User odroid
    StrictHostKeyChecking no
    UserKnownHostsFile=/dev/null
    IdentityFile ~/.ssh/id_rsa

host odroid53 192.168.2.53
    Hostname 192.168.2.53
    Port 22
    User odroid
    StrictHostKeyChecking no
    UserKnownHostsFile=/dev/null
    IdentityFile ~/.ssh/id_rsa
Then, copy your public key to each odroid. If this fails, make sure the .ssh directory exists!
scp id_rsa.pub odroid@192.168.2.51:.ssh/authorized_keys
scp id_rsa.pub odroid@192.168.2.52:.ssh/authorized_keys
scp id_rsa.pub odroid@192.168.2.53:.ssh/authorized_keys
Now you can easily SSH in with:
ssh odroid51
ssh odroid52
ssh odroid53
Use the supplied odroid-utility
sudo odroid-utility.sh
We do a UNIX-style "many-independent-small-applications" approach, but wrapped behind a single python CLI (similar to MAVProxy)
- PRO: If something crashes, we can just restart that section
- PRO: Good way to think about problems!
- PRO: Can still restart individual chunks, etc
- CON: Have to do all that management myself.
Components are engineered to depend on as few other parts of the system as possible. Different components can be rebooted on-the-fly without crashing anything.
https://pylibftdi.readthedocs.org/en/latest/troubleshooting.html
sudo kextunload -bundle-id com.apple.driver.AppleUSBFTDI
I am not using, but am curious about:
- Twisted, "an event-driven networking engine written in Python"
- NodeJS, why why why didn't I do this in NodeJS??? Sigh, all the UAV libraries are in python...