This is the github repo for the sentrygun sensor component. For sentrygun-server, please see https://github.com/s0lst1c3/sentrygun-server
Sentrygun is an open source toolkit for detecting and responding to evil twin and karma attacks. It is capable of identifying evil twin attacks using whitelisting and listening for anomalies in signal strength. It is capable of detecting karma attacks by deliberately sending out probe requests for randomized ESSIDs then comparing the responses.
A sentrygun installation consists of an array of sensors arranged in a grid that communicate with a command and control server. The sensor units analyze wireless traffic to detect nearby evil twin and karma attacks, and report results back to the server. When an evil twin or karma attack is detected, an alert is displayed in sentrygun's web frontend. Network administrators can then take steps to locate the attack, or use sentrygun to launch counterattacks against the offending rogue AP.
Want to contribute to sentrygun? Make a pull request, or contact labs@gdssecurity.com.
- Capable of detecting karma attacks based on probe request/response patterns
- Capable of detecting evil twin attacks through the use of whitelist crossreferencing
- Capable of detecting evil twin attacks by identifying anomalies in signal strength
- Assists network administrators in determining physical location of rogue AP attack
- Capable of launching counterattacks against rogue access points
- machine learning based approach to evil twin detection
- identification of behaviors typically used by rogue APs to evade detection
- identification of rogue APs through the use of WiFi canaries
These are the full installation instructions for a rogue AP detection system using sentrygun and sentrygun-server. For instructions on how to use sentrygun after completing steps 1 through 5, please see the "Usage" section below.
A sentrygun sensor can be built using any device that meets the following requirements:
- supports a modern 64 bit Linux operating system
- has an ethernet adapter
- can power an external wireless adapter such as the TP-Link TL-WN722N.
A good candidate for building a sentrygun sensor is the Raspberry Pi microcomputer.
Additionally, each sentrygun sensor requires an external dual band wireless adapter capable of packet injection and monitor mode.
To build a sentrygun sensor unit:
-
install linux operating system on device
-
download sentrygun using the following command
-
in the newly created sentrygun directory, install python dependencies using pip
pip install -r pip.req
-
connect external wireless adapter to the device
The machine running sentrygun's server component can be anything from a laptop to a rackmount machine. Any machine can be used so long as it meets the following requirements:
- is provisioned with a modern 64 bit Linux operating system
- is capable of running sentrygun's software dependencies
- is capable of connecting to an ethernet network
To setup sentrygun-server on your machine of choice, first install the following software dependencies:
dnf install gcc redhat-rpm-config python-devel autossh redis
Then install the python dependencies enumerated in the pip.req file included with the project:
pip install -r pip.req
sentrygun sensors should be arranged in a grid across the area that they are responsible for protecting. For example, to add rogue AP protection to a warehouse:
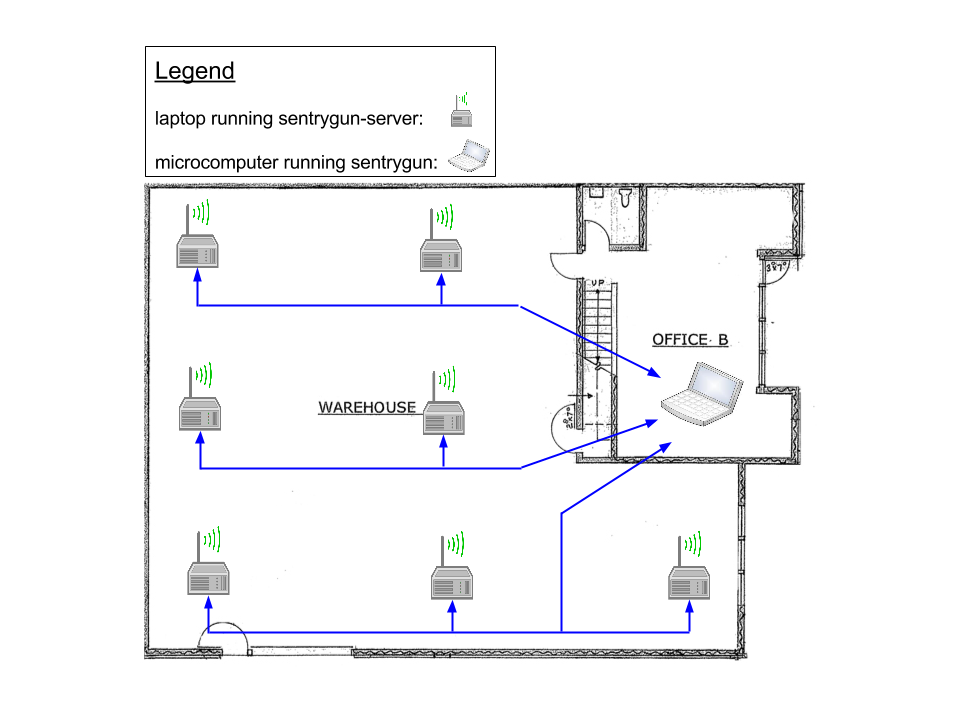
The sensors should be connected to the machine running sentrygun-server over a phsyical network connection. Preferably, this connection should occur over an ethernet connection only accessible to network administrators (i.e. management network).
sentrygun sensor devices must be calibrated against your wireless network if evil twin detection is to be enabled. To calibrate the clients, populate the whitelist.txt file on each of your sensor devices with the bssid and essid of each access point on your network. The access points should be listed in whitelist.txt using the following format.
# essid bssid
gdslabs ff:ff:ff:aa:aa:aa
gdslabs 00:11:22:33:44:00
gdslabs 00:11:22:33:44:55

# and so on and so forth
Next, run sentrygun's calibration routine using the provided sg-calibrator.py script. The syntax for using sg-calibrator.py is as follows:
python sg-calibrator.py -i IFACE
Substitute IFACE with the name of the device's external wireless interface. The specified wireless interface should be in monitor mode.
The sg-calibrator.py script will collect packets from your wireless access points over a period of time. It will then calculate the mean tx value across all packets collected. Finally, sg-calibrator.py will set a low and high bound equal to plus or minus N times the maximum deviation from the mean tx, where N is the value specified in configs.py.
It is imperative that sg-calibrator.py is run in a physically secure environment to prevent statistical poisoning attacks. Sentrygun's evil twin detection relies on detecting tx values that fall outside of an expected threshold. An attacker could render this functionality useless by broadcasting their own tx values during the calibration phase.
Once all devices have been calibrated, we can proceed to step 4 to initialize the system.
To run the sentrygun system, first start the sentrygun-server instance by issuing the following command on the CnC machine:
python run.py <options go here>
sentrygun-server accepts the following command line arguments.
- --port - specifies the port on which sentrygun-server should listen (defaults to 80)
- --host - specifies the address at which sentrygun-server should listen (defaults to 0.0.0.0 if --tunnels flag is not used. Defaults to 127.0.0.1 if --tunnels flag is used).
- --debug - Run in debug mode (not recommended for production environments)
- --expire - Sets the number of seconds that alerts should remain active before they are automatically dismissed. To disable alert expiration, set this to 0 (default).
- --tunnels - Creates ssh tunnels from localhost:PORT on sentrygun-server to localhost:PORT on a list of sentrygun clients, where PORT is the port at which sentrygun-server listens on. When this flag is used, sentrygun-server will always listen on localhost regardless of whether the --host is used. Use this option when running sentrygun on a hostle network (you should assume that you are). sentrysun clients should be specified with the format user@host:port.
Once the server is running, start up each of the sentrygun sensor instances using the following syntax:
python sentrygun.py <options go here>
sentrygun.py accepts the following command line arguments:
- -a SERVER_ADDRESS - connect to sentrygun-server CnC at address SERVER_ADDRESS
- -p SERVER_PORT - connect to sentrygun-server CnC on port SERVER_PORT
- --evil-twin - enable evil-twin detection
- --karma - enable karma attack detection
- -i IFACE - substitute IFACE with name of external wireless interface (should be in monitor mode)
For example, to enable evil-twin and karma detection with server located at example.com:4444 use the following command:
python sentrygun.py -i wlan1 -p 4444 -a example.com --evil-twin --karma
In the above example, the wireless interface is named wlan1.
Once the system is up and running, navigate to the address and port at which the sentrygun-server instance is running. For example, if we started sentrygun-server at 192.168.1.39:4444 in step 4 of the setup instructions, we would navigate to the following address in our browser:
http://192.168.1.39:4444
You should be presented with a blank screen labeled "SentryGun Dashboard". There will also be an expandable toolbar on the left with links to features that have not been implemented yet.

When a rogue access point attack is detected by one or more sentrygun sensor devices, an alert will appear instantly on the dashboard as shown below.

Each alert corresponds to an active Rogue AP attack against your network. Clicking an alert will reveal a list of all devices currently detecting the attack, as shown below.
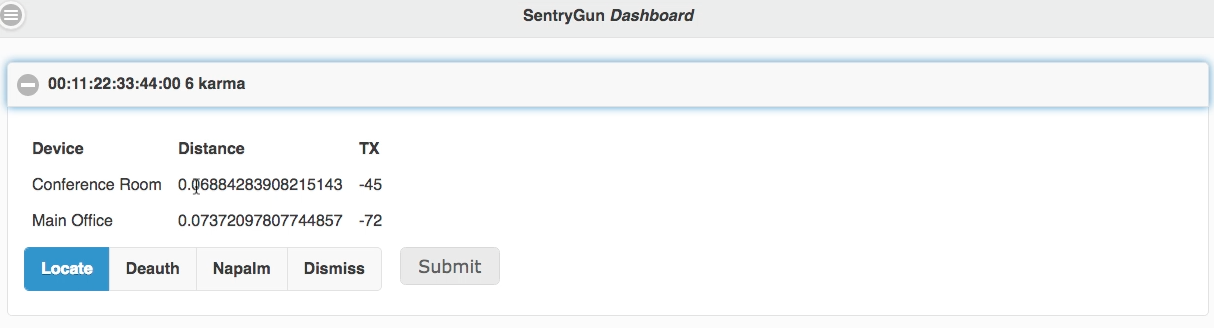
The list of alerting devices is sorted by distance and signal strength. This allows you to begin locating the source of the attack, as the rogue AP is closest to the sensor displayed at the top of the list.
Located at the bottom of each alert list is a toolbar that can be used to dismiss alerts as well as launch counterattacks against the rogue access points. The available actions shown in the toolbar are as follows:
- Locate - Displays a heat map to help locate the source of the attack (not implemented yet)
- Deauth - Causes all sensor devices to flood the offending rogue AP with deauth packets
- Napalm - Physically degrade offending rogue AP using flooding attack (not implemented yet)
- Dismiss - Manually dismiss the alert and cease all counterattacks against offending rogue AP.
To perform one of these actions:
- click the action by name in the toolbar
- click submit