This module implements the DCC protocol for controlling model trains using a Raspberry Pi.
It is able to output direction and speed DCC-encoded packets on one of the GPIO pins (see example below).
It is based on the:
You wanted a banana but what you got was a gorilla holding the banana and the entire jungle.
Joe Armstrong
dccpi is a minimal implementation which aims to offer the minimal support to control some trains and be easy to integrate in other projects. It is not a support-all, complex, multi-protocol, ui-included, buy-my-hardware solution. For this, there are better solutions like RocRail, JMRI, SPROG, GertBot etc.
- Easy to install and use (pip module, minimal setup, no big framework)
- Easy to integrate as building block
- Should works on multiple RPi operating systems
- Control DCC locomotives using plain Python!
- Set speed (14, 28, 128 speed steps) and direction
- Set FL (lights), F1-F4 functions
Note dccpi does not yet implement any advanced features like decoder registry operations (i.e. set address). I will work to extend it to my needs, which are not too fancy.
- A Raspberry Pi (developed/tested on model B+)
- DCC-decoder-equipped locomotives and tracks.
- The Raspberry Pi needs an additional booster circuit to actually provide the signal to the tracks which you can build yourself. Here is an example booster using LMD18200 H-Bridge from TI:
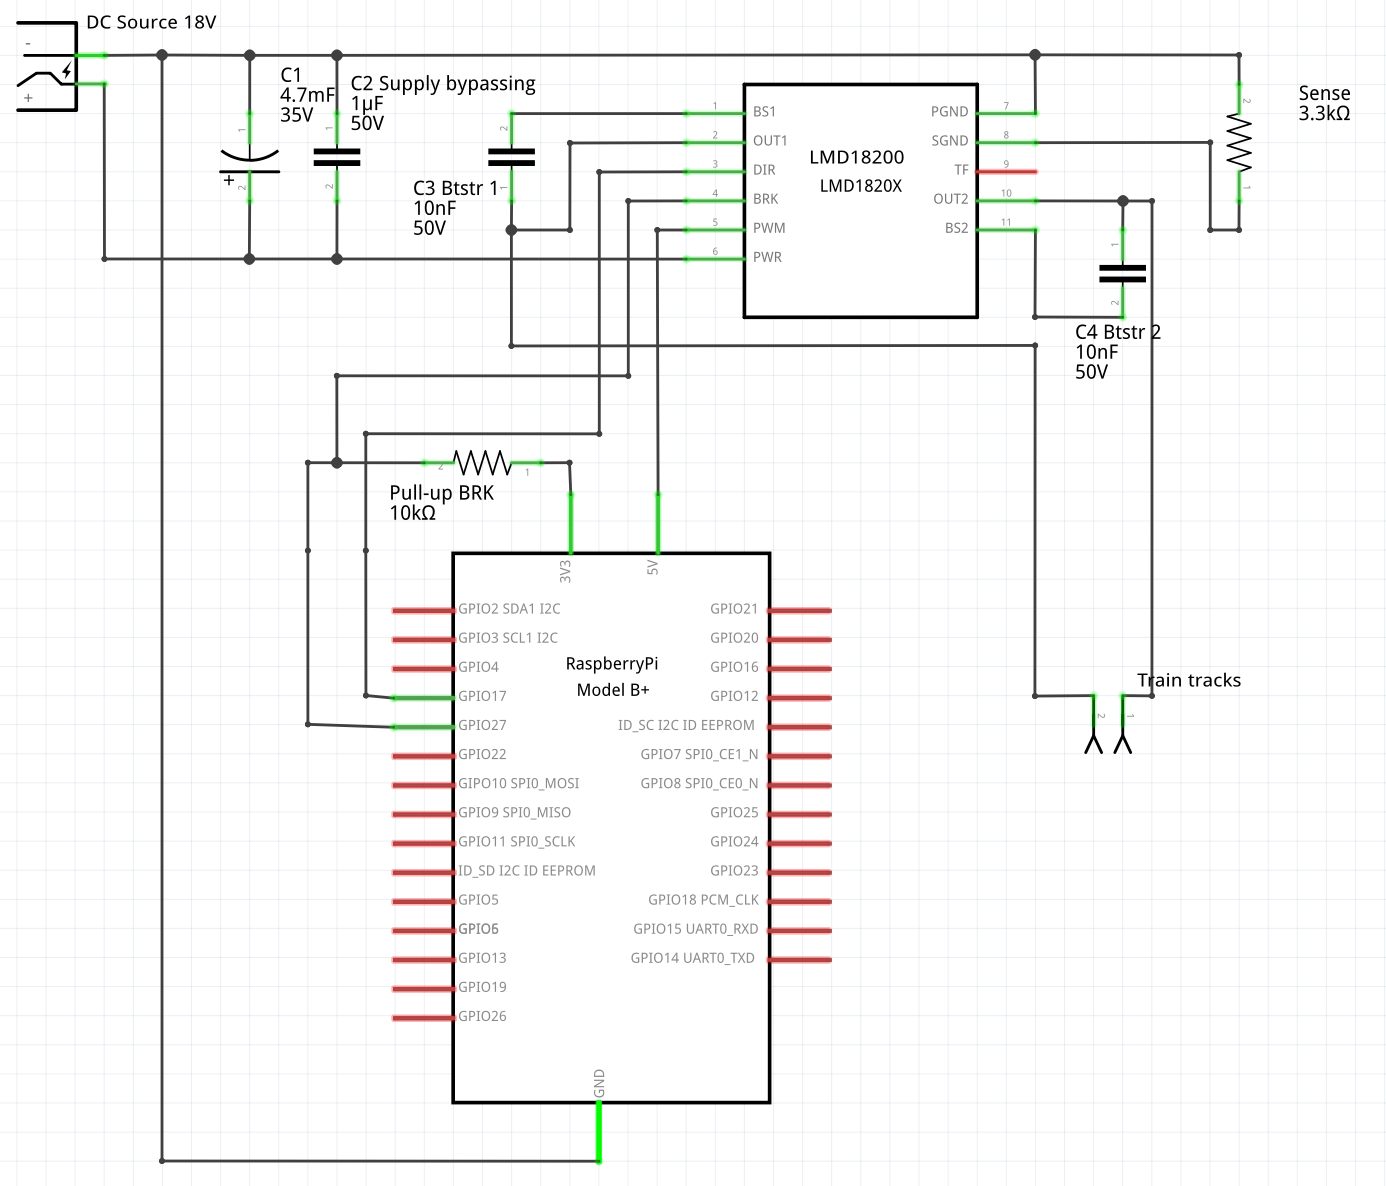
For a list of parts and some more info about this, see booster_part_list.txt.
dccpi should work on any common scale. DCC decoders take a wide range of voltage outputs (up to 24v). This has been tested on N-scale with a 18v booster circuit.
- Python 2.7 (Python 3 not yet supported, Raspian does not include -dev version, must be installed to use Python.h)
- Python Bitstring details. Should be auto-fetched when installing with pip.
- wiringPi: download and install wiringPi
- Since wiringPi uses low-level mechanisms to access pins, dccpi programs must be run as root
From PyPI:
sudo pip install dccpi
From Source:
sudo python setup.py install
There are 3 main componenents:
DCCLocomotive: represents a locomotive (device equipped with a DCC decoder). We can set speed, status of lights etc.DCCController: represents the command station, that can be turned on/off. When it's on, it sends packets using a DCCEncoder.DCCRPiEncoder: it implements methods to actually send packets. The RPi encoder uses a c-extension based on WiringPi to do it. It should be easy to add other encoders (for example for different platforms than the RPi or based on other extensions).
The Raspberry Pi will output the signal (which goes from 0v-Low to 3.3v-High) on BCM GPIO pin 17, which is Physical Pin 11 (Model B+), which is wiringPi pin 0. The booster is in charge of converting this signal into the DCC signal ranges (i.e. 18v to -18v).
The Raspberry Pi will also output a brake signal (HIGH) when the controller is stopped on BCM GPIO pin 27, which is Pysical Pin 13 (Model B+), which is wiringPi pin 2 (so next to the one above). This can be used to stop signal on the tracks if your booster supports it (see booster schematics). Otherwise locos will receive DC current directly, and either burn or turn into DC mode (at full speed).
See example below and read the code for more info.
>>> from dccpi import *
>>> e = DCCRPiEncoder()
>>> controller = DCCController(e)  # Create the DCC controller with the RPi encoder
>>> l1 = DCCLocomotive("DCC6", 6)  # Create locos, args: Name, DCC Address (see DCCLocomotive class)
>>> l2 = DCCLocomotive("DCC7", 7)
>>> l3 = DCCLocomotive("DCC8", 8)
>>> controller.register(l1)        # Register locos on the controller
DCC6 registered on address #6
>>> controller.register(l2)
DCC7 registered on address #7
>>> controller.register(l3)
DCC8 registered on address #8
>>> controller.start()             # Start 'c' controller. Remove brake signal
Starting DCC Controller            # and starts sending bits to the booster
>>> l1.reverse()                   # Change direction bit
>>> l2.fl = True                   # Change fl function bit
>>> l3.fl = True
>>> l1.speed = 10                  # Change speed
>>> l2.speed = 18
>>> l3.speed = 23
>>> l3.slower()                    # Reduce 1 speed step
>>> l3.faster()                    # Increase 1 speed step
>>> l1                             # Print loco information

DCC locomotive
Name:               my
Address:            6
Speed:              10
Speed steps:        28
Direction:          0
FL, F1, F2, F3, F4: [0 0 0 0 0]

>>> controller              # Print info from all locos registered
DCC Controller:
-----------------------------
DCC locomotive
Name:               my8
Address:            8
Speed:              23
Speed steps:        28
Direction:          1
FL, F1, F2, F3, F4: [1 0 0 0 0]
-----------------------------
DCC locomotive
Name:               my2
Address:            7
Speed:              18
Speed steps:        28
Direction:          1
FL, F1, F2, F3, F4: [1 0 0 0 0]
-----------------------------
DCC locomotive
Name:               my
Address:            6
Speed:              10
Speed steps:        28
Direction:          0
FL, F1, F2, F3, F4: [0 0 0 0 0]
-----------------------------

>>> controller.stop()           # IMPORTANT! Stop controller always. Emergency-stops
DCC Controller stopped          # all locos and enables brake signal on tracks
Same as above but pass DCCDummyEncoder() to the controller. The Dummy Encoder will print information to the screen every 10 seconds on what packages are sent and to who, but leave GPIO outputs alone.
GPLv3. See LICENSE.