This XBlock implements a friendly drag-and-drop style question, where the student has to drag items on zones on a target image.
The editor is fully guided. Features include:
- custom target image
- free target zone positioning and sizing
- custom size items
- image items
- decoy items that don't have a zone
- feedback popups for both correct and incorrect attempts
- introductory and final feedback
It supports progressive grading and keeps progress across refreshes. All checking and record keeping is done on the server side.
The screenshot shows the Drag and Drop XBlock rendered inside the edX LMS before starting before the user starts solving the problem:

This screenshot shows the XBlock after the student successfully completed the drag and drop problem:

Install the requirements into the python virtual environment of your
edx-platform installation by running the following command from the
root folder:
$ pip install -e .You can enable the Drag and Drop XBlock in studio through the advanced settings.
- From the main page of a specific course, navigate to
Settings -> Advanced Settingsfrom the top menu. - Check for the
advanced_modulespolicy key, and add"drag-and-drop-v2"to the policy value list. - Click the "Save changes" button.
The Drag and Drop XBlock features an interactive editor. Add the Drag and Drop component to a lesson, then click the 'Edit' button.
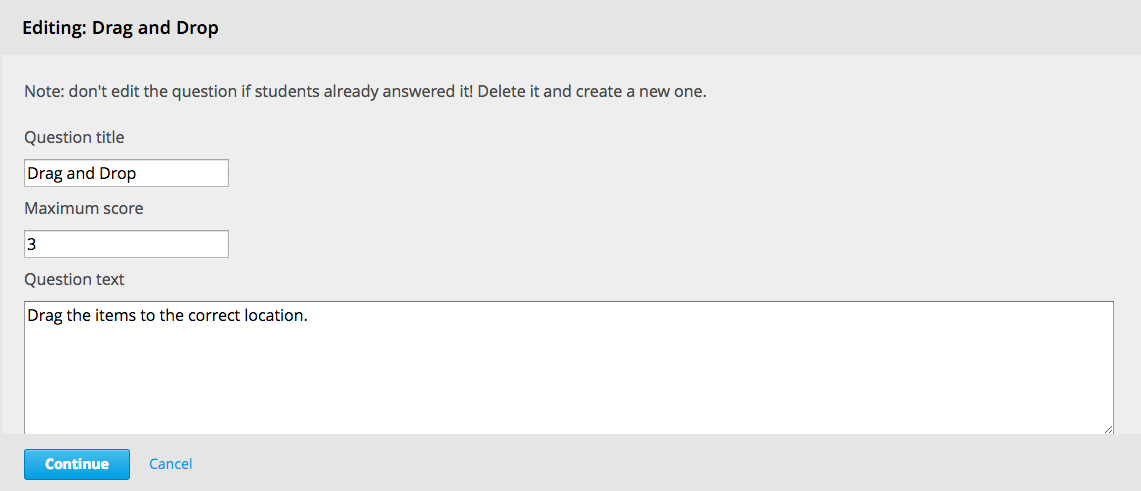
In the first step, you can set some basic properties of the component, such as the title, question text that rendered above the background image, the introduction feedback (shown initially) and the final feedback (shown after the student successfully completes the drag and drop problem).
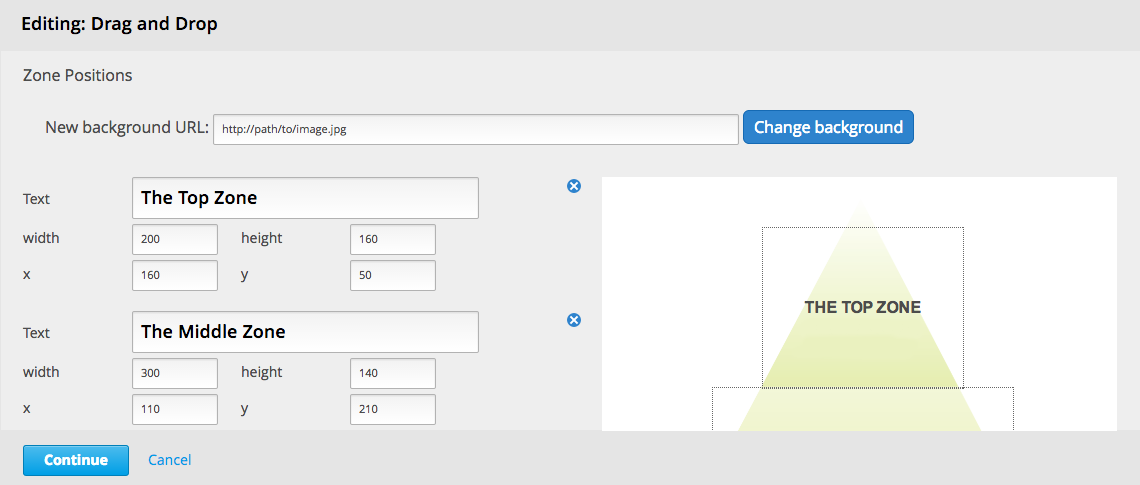
In the next step, you set the background image URL and define the properties of the drop zones. The properties include the title/text rendered in the drop zone, the zone's dimensions and position coordinates. You can define an arbitrary number of drop zones as long as their titles are unique.

In the final step, you define the drag items. A drag item can contain either text or an image. You can define the success and error feedback texts. The feedback text is displayed in a popup after the student drops the item into a zone - the success feedback is shown if the item is dropped into the correct zone, while the error feedback is shown when dropping the item into a wrong drop zone.

The zone that the item belongs is selected from a dropdown that
includes all drop zones defined in the previous step and a none
option that can be used for "decoy" items - items that don't belong to
any zone.
You can define an arbitrary number of drag items.
- In a virtualenv, run
$ (cd .../xblock-sdk/; pip install -r requirements.txt)
$ (cd .../xblock-drag-and-drop-v2/; pip install -r tests/requirements.txt)- In the xblock-sdk repository, create the following configuration
file in
workbench/settings_drag_and_drop_v2.py
from settings import *

INSTALLED_APPS += ('drag_and_drop_v2',)
DATABASES['default']['NAME'] = 'workbench.db'- Run this to sync the database before starting the workbench (answering no to the superuser question is ok):
$ .../xblock-sdk/manage.py syncdb --settings=workbench.settings_drag_and_drop_v2- To run the tests, from the xblock-drag-and-drop-v2 repository root:
$ DJANGO_SETTINGS_MODULE="workbench.settings_drag_and_drop_v2" nosetests --rednose --verbose --with-cover --cover-package=drag_and_drop_v2