The purpose of this guide is to walk through the process of creating a simple Python web app that retrieves messages in Office 365 or Outlook.com. The source code in this repository is what you should end up with if you follow the steps outlined here.
This guide assumes:
- That you already have Python and Django installed and working on your development machine. This sample was created using Python version 3.4.2 and Django 1.7.1.
- That you have an Office 365 tenant, with access to an account in that tenant OR an Outlook.com developer preview account.
Let's dive right in! Open a command prompt and set the current directory to a location where you want to store your code. Run the following command to create a new Django project.
django-admin.py startproject python_tutorial
This creates a new subdirectory called python_tutorial. Change your command prompt's current directory to this new subdirectory and run the following command to verify that everything is working.
python manage.py runserver
Once the server starts, open a web browser and browse to http://localhost:8000/. You should see a success message.

As the success message suggests, let's add an app to our new project. On the command prompt, run the following command.
python manage.py startapp tutorial
This creates a new subdirectory under the python_tutorial directory and a number of files.
Open the .\python_tutorial\settings.py file and add the new tutorial app to the INSTALLED_APPS setting.
INSTALLED_APPS = (
    'django.contrib.admin',
    'django.contrib.auth',
    'django.contrib.contenttypes',
    'django.contrib.sessions',
    'django.contrib.messages',
    'django.contrib.staticfiles',
    'tutorial',
)
Save your changes. From the command line, run the following command to initialize the database for the app.
python manage.py migrate
Let's add a bit of code to the app just to make sure that it is working. Open the .\tutorial\views.py file and add the following function.
from django.http import HttpResponse, HttpResponseRedirect

def home(request):
  return HttpResponse("Welcome to the tutorial.")
Create a new file in the tutorial directory called urls.py. Add the following code to this file.
from django.conf.urls import patterns, url
from tutorial import views

urlpatterns = patterns('',
  # The home view ('/tutorial/')
  url(r'^$', views.home, name='home'),
  # Explicit home ('/tutorial/home/')
  url(r'^home/$', views.home, name='home'),
)
Finally, open the .\python_tutorial\urls.py file and add the following lines above the url(r'^admin/', include(admin.site.urls)), line.
# Invoke the home view in the tutorial app by default
url(r'^$', 'tutorial.views.home', name='home'),
# Defer any URLS to the /tutorial directory to the tutorial app
url(r'^tutorial/', include('tutorial.urls', namespace='tutorial')),
If you're familiar with Django development, this isn't anything new for you. If not, all we've done here is tell Django how to route requests to the tutorial app. Django looks first in the .\python_tutorial\urls.py file. The new lines we added there tell it to redirect requests to the root to the home view in the tutorial app, and also tells it to send any requests to /tutorial/* to the tutorial app.
The entries in the .\tutorial\urls.py file tell Django to send requests to either /tutorial or /tutorial/home to the home view. Finally, the home function in .\tutorial\views.py returns a simple HTTP response.
If you save all of your changes and navigate to http://localhost:8000 you should see "Welcome to the tutorial." Now that we've confirmed that the app is working, we're ready to do some real work.
Our app will be very simple. When a user visits the site, they will see a link to log in and view their email. Clicking that link will take them to the Azure login page where they can login with their Office 365 or Outlook.com account and grant access to our app. Finally, they will be redirected back to our app, which will display a list of the most recent email in the user's inbox.
Let's begin by replacing the static message with a signon link. To do that, we'll modify the home function in .\tutorial\views.py. Update the home function to match the following.
def home(request):
  sign_in_url = '#'
  return HttpResponse('<a href="' + sign_in_url +'">Click here to sign in and view your mail</a>')
As you can see, our home page will be very simple. For now, the link doesn't do anything, but we'll fix that soon.
Our goal in this section is to make the link on our home page initiate the OAuth2 Authorization Code Grant flow with Azure AD. To make things easier, we'll use the Requests: HTTP for Humans library to handle all of our HTTP requests. At your command prompt, enter the following command.
pip install requests
Now the library is installed and ready to use. Create a new file in the tutorial directory called authhelper.py. We'll start here by defining a function to generate the login URL.
from urllib.parse import quote, urlencode

# Client ID and secret
client_id = 'YOUR APP ID HERE'
client_secret = 'YOUR APP PASSWORD HERE'

# Constant strings for OAuth2 flow
# The OAuth authority
authority = 'https://login.microsoftonline.com'

# The authorize URL that initiates the OAuth2 client credential flow for admin consent
authorize_url = '{0}{1}'.format(authority, '/common/oauth2/v2.0/authorize?{0}')

# The token issuing endpoint
token_url = '{0}{1}'.format(authority, '/common/oauth2/v2.0/token')

# The scopes required by the app
scopes = [ 'openid',
           'https://outlook.office.com/mail.read' ]

def get_signin_url(redirect_uri):
  # Build the query parameters for the signin url
  params = { 'client_id': client_id,
             'redirect_uri': redirect_uri,
             'response_type': 'code',
             'scope': ' '.join(str(i) for i in scopes)
           }

  signin_url = authorize_url.format(urlencode(params))

  return signin_url
The first thing we do here is define our client ID and secret. The values of clientId and clientSecret are just placeholders, so we need to generate valid values.
Head over to https://apps.dev.microsoft.com to quickly get a client ID and secret. Using the sign in buttons, sign in with either your Microsoft account (Outlook.com), or your work or school account (Office 365).

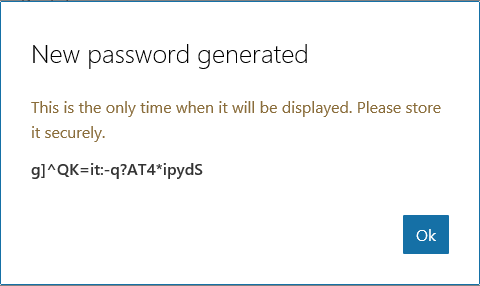
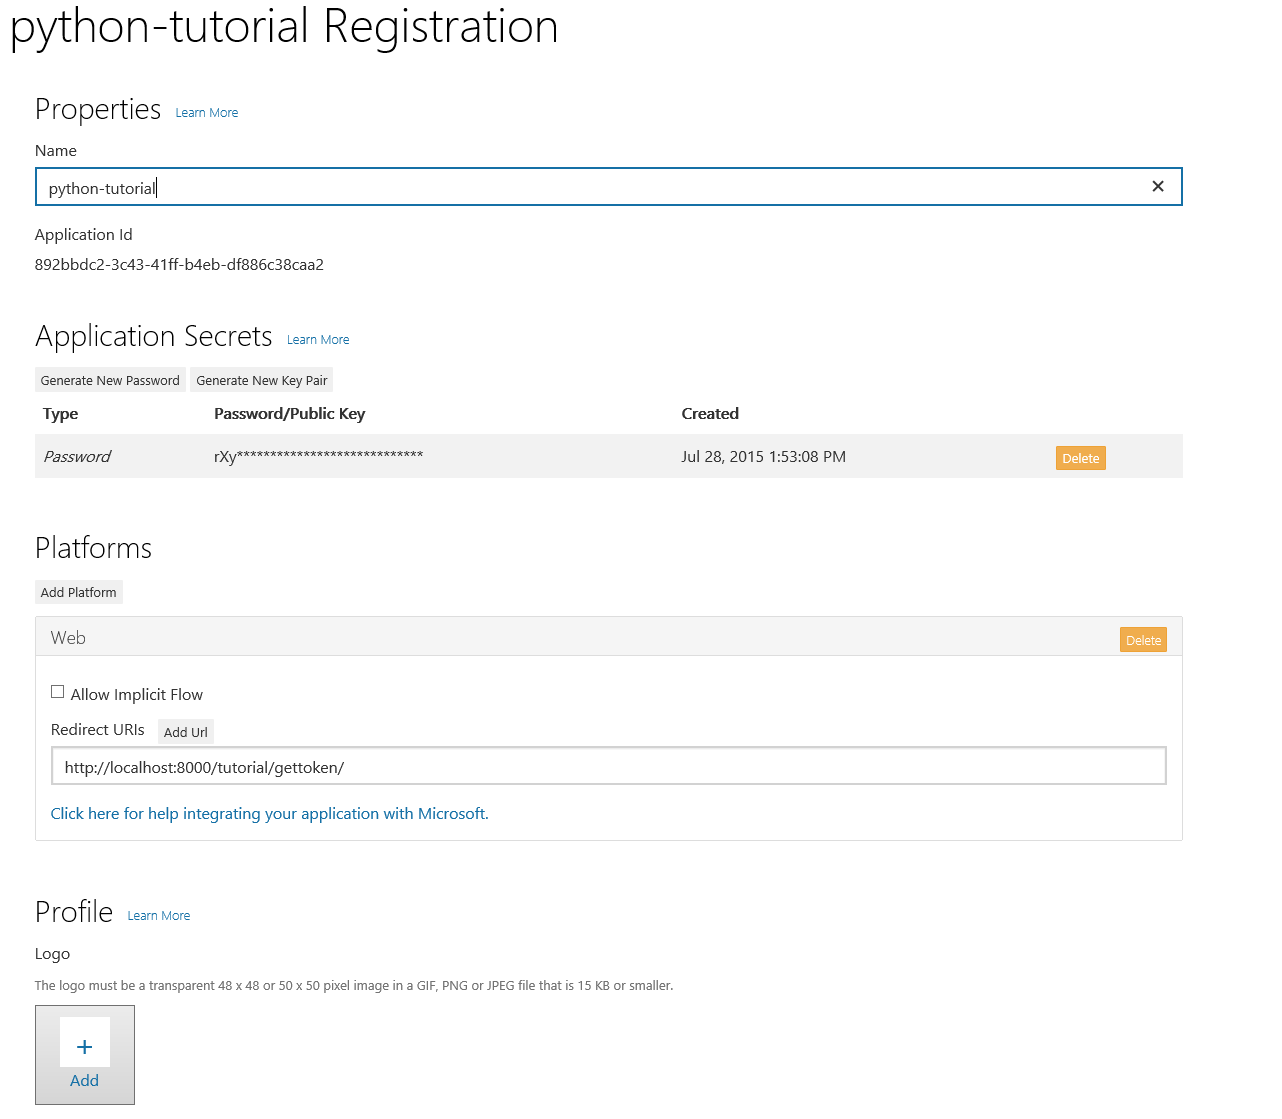
Once you're signed in, click the Add an app button. Enter python-tutorial for the name and click Create application. After the app is created, locate the Application Secrets section, and click the Generate New Password button. Copy the password now and save it to a safe place. Once you've copied the password, click Ok.
Locate the Platforms section, and click Add Platform. Choose Web, then enter http://localhost:8000/tutorial/gettoken/ under Redirect URIs. Click Save to complete the registration. Copy the Application Id and save it along with the password you copied earlier. We'll need those values soon.
Here's what the details of your app registration should look like when you are done.
Replace the YOUR APP ID HERE and YOUR APP PASSWORD HERE placeholders in the .\tutorial\authhelper.py file with the values you generated and save your changes.
Now that we have actual values for the client ID and secret, let's put our new function to work. Modify the home function in the .\tutorial\views.py file to use the get_signin_url function to fill in the link. That function takes a parameter, redirect_uri. This value is used to set the URL in our app where Azure will redirect after signin is complete. Let's go ahead and create a placeholder view to act as our redirect target called gettoken.
from django.shortcuts import render
from django.http import HttpResponse, HttpResponseRedirect
from django.core.urlresolvers import reverse
from tutorial.authhelper import get_signin_url

# Create your views here.

def home(request):
  redirect_uri = request.build_absolute_uri(reverse('tutorial:gettoken'))
  sign_in_url = get_signin_url(redirect_uri)
  return HttpResponse('<a href="' + sign_in_url +'">Click here to sign in and view your mail</a>')

def gettoken(request):
  return HttpResponse('gettoken view')
The view doesn't do much now, but we'll change that soon. Add this new view to the .\tutorials\urls.py file.
from django.conf.urls import patterns, url
from tutorial import views

urlpatterns = patterns('',
  # The home view ('/tutorial/')
  url(r'^$', views.home, name='home'),
  # Explicit home ('/tutorial/home/')
  url(r'^home/$', views.home, name='home'),
  # Redirect to get token ('/tutorial/gettoken/')
  url(r'^gettoken/$', views.gettoken, name='gettoken'),
)
Save your changes and browse to http://localhost:8000. If you hover over the link, it should look like:
https://login.microsoftonline.com/common/oauth2/v2.0/authorize?scope=openid+https%3A%2F%2Foutlook.office.com%2Fmail.read&response_type=code&client_id=<SOME GUID>&redirect_uri=http%3A%2F%2Flocalhost%3A8000%2Ftutorial%2Fgettoken%2F
The <SOME GUID> portion should match your client ID. Click on the link and you should be presented with a sign in page. Sign in with your Office 365 or Outlook.com account. Your browser should redirect to back to the gettoken view. The view doesn't do anything yet, so let's fix that now.
The first thing we need to do is extract the authorization code from the request. When Azure redirects to our gettoken function, it includes a code query parameter, which contains the authorization code. Update the gettoken function to get this parameter's value and display it.
def gettoken(request):
  auth_code = request.GET['code']
  return HttpResponse('Authorization code: {0}'.format(auth_code))
Save your changes and repeat the signin process in the app. Now instead of a static message, you should see the value of the authorization code printed on the screen. We're getting closer, but that's still not very useful. Let's actually do something with that code.
First import the requests library by adding the following line to the top of .\tutorial\authhelper.py.
import requests
Now add another helper function to authhelper.py called get_token_from_code.
def get_token_from_code(auth_code, redirect_uri):
  # Build the post form for the token request
  post_data = { 'grant_type': 'authorization_code',
                'code': auth_code,
                'redirect_uri': redirect_uri,
                'scope': ' '.join(str(i) for i in scopes),
                'client_id': client_id,
                'client_secret': client_secret
              }

  r = requests.post(token_url, data = post_data)

  try:
    return r.json()
  except:
    return 'Error retrieving token: {0} - {1}'.format(r.status_code, r.text)
The JSON array returned from get_token_from_code doesn't just include the access token. It also includes an ID token. We can use this token to find out a few pieces of information about the logged on user. In this case, we want to get the user's email address. You'll see why we want this soon.
Add a new function get_user_email_from_id_token to authhelper.py.
import base64
import json

def get_user_email_from_id_token(id_token):
  # JWT is in three parts, header, token, and signature
  # separated by '.'
  token_parts = id_token.split('.')
  encoded_token = token_parts[1]

  # base64 strings should have a length divisible by 4
  # If this one doesn't, add the '=' padding to fix it
  leftovers = len(encoded_token) % 4
  if leftovers == 2:
      encoded_token += '=='
  elif leftovers == 3:
      encoded_token += '='

  # URL-safe base64 decode the token parts
  decoded = base64.urlsafe_b64decode(encoded_token).decode('utf-8')

  # Load decoded token into a JSON object
  jwt = json.loads(decoded)

  return jwt['preferred_username']
Let's make sure that works. Modify the gettoken function in views.py to use these helper functions and display the return values.
# Update import statement to include new function
from tutorial.authhelper import get_signin_url, get_token_from_code

def gettoken(request):
  auth_code = request.GET['code']
  redirect_uri = request.build_absolute_uri(reverse('tutorial:gettoken'))
  token = get_token_from_code(auth_code, redirect_uri)
  access_token = token['access_token']
  user_email = get_user_email_from_id_token(token['id_token'])

  # Save the token in the session
  request.session['access_token'] = access_token
  request.session['user_email'] = user_email
  return HttpResponse('User Email: {0}, Access token: {1}'.format(user_email, access_token))
If you save your changes, restart the server, and go through the sign-in process again, you should now see a long string of seemingly nonsensical characters. If everything's gone according to plan, that should be an access token.
Now we're ready to call the Mail API.
Now that we can get an access token, we're in a good position to do something with the Mail API. Let's start by creating a mail view in views.py.
def mail(request):
  access_token = request.session['access_token']
  user_email = request.session['user_email']
  # If there is no token in the session, redirect to home
  if not access_token:
    return HttpResponseRedirect(reverse('tutorial:home'))
  else:
    return HttpResponse('Access token found in session: {0}'.format(access_token))
Update the urls.py file to include an entry for the new view.
from django.conf.urls import patterns, url
from tutorial import views

urlpatterns = patterns('',
  # The home view ('/tutorial/')
  url(r'^$', views.home, name='home'),
  # Explicit home ('/tutorial/home/')
  url(r'^home/$', views.home, name='home'),
  # Redirect to get token ('/tutorial/gettoken/')
  url(r'^gettoken/$', views.gettoken, name='gettoken'),
  # Mail view ('/tutorial/mail/')
  url(r'^mail/$', views.mail, name='mail'),
)
Update the gettoken function to redirect to the mail view after saving the token in the session.
def gettoken(request):
  auth_code = request.GET['code']
  redirect_uri = request.build_absolute_uri(reverse('tutorial:gettoken'))
  token = get_token_from_code(auth_code, redirect_uri)
  access_token = token['access_token']
  user_email = get_user_email_from_id_token(token['id_token'])

  # Save the token in the session
  request.session['access_token'] = access_token
  request.session['user_email'] = user_email
  return HttpResponseRedirect(reverse('tutorial:mail'))
For now all this does is read the token back from the cookie and display it. Save your changes, restart the server, and go through the signon process again. You should see the token displayed. Now that we know we have access to the token in the mail function, we're ready to call the Mail API.
Create a new file in the tutorial directory called outlookservice.py. We'll implement all of our Mail API functions in this file. We'll start by creating a generic method for sending API requests called make_api_call.
import requests
import uuid

outlook_api_endpoint = 'https://outlook.office.com/api/v1.0{0}'

# Generic API Sending
def make_api_call(method, url, token, user_email, payload = None, parameters = None):
    # Send these headers with all API calls
    headers = { 'User-Agent' : 'python_tutorial/1.0',
                'Authorization' : 'Bearer {0}'.format(token),
                'Accept' : 'application/json',
            	'X-AnchorMailbox' : user_email }

    # Use these headers to instrument calls. Makes it easier
    # to correlate requests and responses in case of problems
    # and is a recommended best practice.
    request_id = str(uuid.uuid4())
    instrumentation = { 'client-request-id' : request_id,
                        'return-client-request-id' : 'true' }

    headers.update(instrumentation)

    response = None

    if (method.upper() == 'GET'):
        response = requests.get(url, headers = headers, params = parameters)
    elif (method.upper() == 'DELETE'):
        response = requests.delete(url, headers = headers, params = parameters)
    elif (method.upper() == 'PATCH'):
        headers.update({ 'Content-Type' : 'application/json' })
        response = requests.patch(url, headers = headers, data = payload, params = parameters)
    elif (method.upper() == 'POST'):
        headers.update({ 'Content-Type' : 'application/json' })
        response = requests.post(url, headers = headers, data = payload, params = parameters)

    return response
This function uses the requests library to send API requests. It sets a standard set of headers on each requests, including client instrumentation.
It also uses the email address we retrieved from the ID token to set the X-AnchorMailbox header. By setting this header, we enable the API endpoint to route API calls to the correct backend mailbox server more efficiently.
Now let's add a function that will use this function to implement a request to retrieve messages from the inbox. Create a new function in outlookservice.py called get_my_messages.
def get_my_messages(access_token, user_email):
  get_messages_url = outlook_api_endpoint.format('/Me/Messages')

  # Use OData query parameters to control the results
  #  - Only first 10 results returned
  #  - Only return the DateTimeReceived, Subject, and From fields
  #  - Sort the results by the DateTimeReceived field in descending order
  query_parameters = {'$top': '10',
                      '$select': 'DateTimeReceived,Subject,From',
                      '$orderby': 'DateTimeReceived DESC'}

  r = make_api_call('GET', get_messages_url, token, user_email, parameters = query_parameters)

  if (r.status_code == requests.codes.ok):
    return r.json()
  else:
    return "{0}: {1}".format(r.status_code, r.text)
Now we can modify the mail function to call this function and retrieve email. First, import the get_my_messages function by adding the following line to the top of views.py.
from tutorial.outlookservice import get_my_messages
Then update the mail function to call the new function.
def mail(request):
  access_token = request.session['access_token']
  user_email = request.session['user_email']
  # If there is no token in the session, redirect to home
  if not access_token:
    return HttpResponseRedirect(reverse('tutorial:home'))
  else:
    messages = get_my_messages(access_token, user_email)
    return HttpResponse('Messages: {0}'.format(messages))
If you save the changes and sign into the app, you should now see a raw listing of the JSON response.
While the current listing of messages confirms that the API calls are working, we can use Django templates to display the results in a more user-friendly fashion.
Start by creating a new subdirectory in the tutorial directory called templates. In the templates directory, create a new subdirectory called tutorial. Finally, create a new file in this directory called mail.html, and add the following code.
<html>
  <body>
    <h1>Your Email</h1>
    <table width="100%" border="1">
      <tr>
        <th>From</th>
        <th>Subject</th>
        <th>Received</th>
      </tr>

      {% for message in messages %}
        <tr>
          <td>{{ message.From.EmailAddress.Name }}</td>
          <td>{{ message.Subject }}</td>
          <td>{{ message.DateTimeReceived }}</td>
        </tr>
      {% endfor %}
    </table>
  </body>
</html>
Update the mail function in views.py to use this new template.
def mail(request):
  access_token = request.session['access_token']
  user_email = request.session['user_email']
  # If there is no token in the session, redirect to home
  if not access_token:
    return HttpResponseRedirect(reverse('tutorial:home'))
  else:
    messages = get_my_messages(access_token, user_email)
    context = { 'messages': messages['value'] }
    return render(request, 'tutorial/mail.html', context)
Save the changes and sign in to the app. You should now see a simple table of messages in your inbox.

Now that you've created a working sample, you may want to learn more about the capabilities of the Mail API. If your sample isn't working, and you want to compare, you can download the end result of this tutorial from GitHub.
Copyright (c) Microsoft. All rights reserved.
Connect with me on Twitter @JasonJohMSFT
Follow the Exchange Dev Blog