This repo contains implementation of pruning ResNet and DenseNet for the efficient person re-ID problem. Code adapted from
- Basic ReID - https://github.com/layumi/Person_reID_baseline_pytorch
- Channel Pruning - https://github.com/Eric-mingjie/network-slimming
- Quantization - https://github.com/aaron-xichen/pytorch-playground
Download re-ID datasets and run ./prep_dataset.py with the following line changed to your download path. Naming rule: must include "market" if it is the Market dataset, "duke" if DukeMTMC dataset, exclusive.
# YOU ONLY NEED TO CHANGE THIS LINE TO YOUR DATASET DOWNLOAD PATH
download_path = './Market-1501-v15.09.15'
Download links:
DukeMTMC-reID https://github.com/layumi/DukeMTMC-reID_evaluation/wiki/DukeMTMC-reID#download-dataset\
Market-1501-v15.09.15 http://www.liangzheng.org/Project/project_reid.html.
Read more on the dataset organization: https://github.com/layumi/Person_reID_baseline_pytorch#dataset--preparation
We start with ResNet and DenseNet architectures. This step is to train a identity classification model, which can be later used as a feature extractor, on the gallery pool. To train a model, simply run the following in your terminal,
python train.py \
	--gpu_ids 1,2,3 \
	--archit MaskDenseNet121 \
	--batchsize 32 \
	--data_dir Market-1501-v15.09.15/pytorch/ \
	--epochs 160 \
	--train_all
Configurations explained:
-
--gpu_ids 1,2,3 Which device(s) to use; parallel training enabled.
-
--archit MaskDenseNet121 Model architecture specification. Naming rule: must inclulde "dense" if the model to be trained is a densenet, "res" if resnet, exclusive. In addition, you can add descriptive information, like "Mask" and "121" in this example. This string will become the prefix of checkpoint folder name.
-
--batchsize 32 Batch size.
-
--data_dir Market-1501-v15.09.15/pytorch/ Data directory.
-
--epochs 160 Number of epochs.
-
--train_all Whether to use all training samples. For final test or deliverables, you will want to include this.
After the training finishes, find the model with the highest validation accuracy at ./checkpoint/MaskDenseNet121-market-bs+32-lr+0.1-ds+40/ckpt.pth, dependent on your configurations. Model dir naming format: <ARCHIT_PREFIX>-<WHICH_DATA>-bs+<BATCH_SIZE>-lr+<LEARNING_RATE>-ds+<LEARNING_RATE_DECAY_STEP>.
Example output:
...
Epoch 86/160
----------
100%|█████████████████| 405/405 [01:24<00:00, 2.03s/it]
train Loss: 0.4809 Acc: 0.8736
val Loss: 0.2416 Acc: 0.9361
Epoch 87/160
----------
100%|█████████████████| 405/405 [01:06<00:00, 6.04it/s]
train Loss: 0.5138 Acc: 0.8635
val Loss: 0.1806 Acc: 0.9467
Epoch 88/19
...
Note: accuracies reported above during training are identity classification accuracies. It is different from the re-ID accuracy.
To test a saved model, run ./test.py followed by ./evaluate.py. This is to test the features extracted by the model, and to compute distance, re-identify, and finally evaluate the re-ID performance.
python test.py \
	--gpu_ids 0 \
	--model_name MaskDenseNet121-market-bs+32-lr+0.1-ds+40 \
	--file_name ckpt-prune-sp+0.5000.pth \
	--mat_name pytorch_result-0.5000.mat \
	--rerun

python evaluate.py
-
--model_name MaskDenseNet121-market-bs+32-lr+0.1-ds+40 Checkpoint folder name of the model to be tested.
-
--file_name ckpt-prune-sp+0.5000.pth Checkpoint file name of the model to be tested.
-
--mat_name pytorch_result-0.5000.mat The file name to which intermedite results (by the identity classifier) are to be saved. If this file exists, by default the script will load from it and save some the computing time.
-
--rerun Include to recompute the intermediate result regardless of the existing one.
Example output:
-------test-----------
100%|█████████████████| 617/617 [01:25<00:00, 5.65it/s]
100%|█████████████████| 106/106 [00:12<00:00, 8.79it/s]
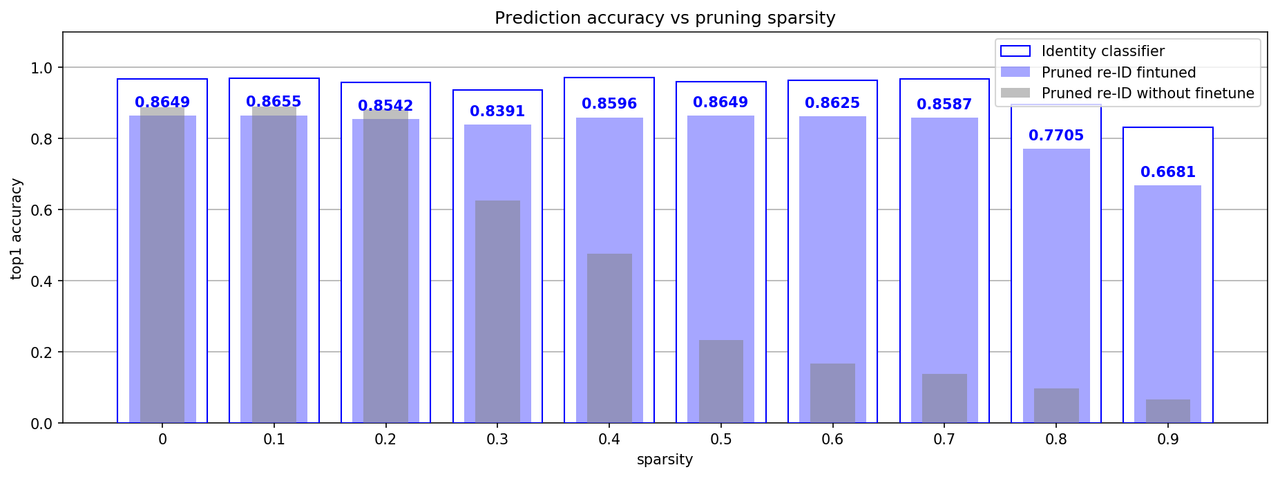
Rank@1:0.864905 Rank@5:0.943290 Rank@10:0.966449 mAP:0.670159
Note: at this step, performance metrics printed out are re-ID performance.
Now we have a base model, we can start compressing it! In this section we try masked channel pruning. Run the following script, and the designated model will be pruned with the given sparsity and saved to the same directory.
python prune.py \
	--sparsity 0.5 \
	--model_name MaskDenseNet121-market-bs+32-lr+0.1-ds+40
Two arguments to give the script are
-
--sparsity 0.5 Target sparsity, float in (0,1).
-
--model_name MaskDenseNet121-market-bs+32-lr+0.1-ds+40 Direct it to the base model.
-
--check_mode Enable this argument to evaluate an already pruned and saved model.
After pruning, the model will be saved as ./checkpoint/MaskDenseNet121-market-bs+32-lr+0.1-ds+40/ckpt-prune-sp+0.5000-init.pth. Naming format: ckpt-prune-sp+<SPARSITY>-init.pth. Note that "-init" indicates that the pruned model has not been retrained.
Example output:
* PRUNING - Sparsity = 0.5 *
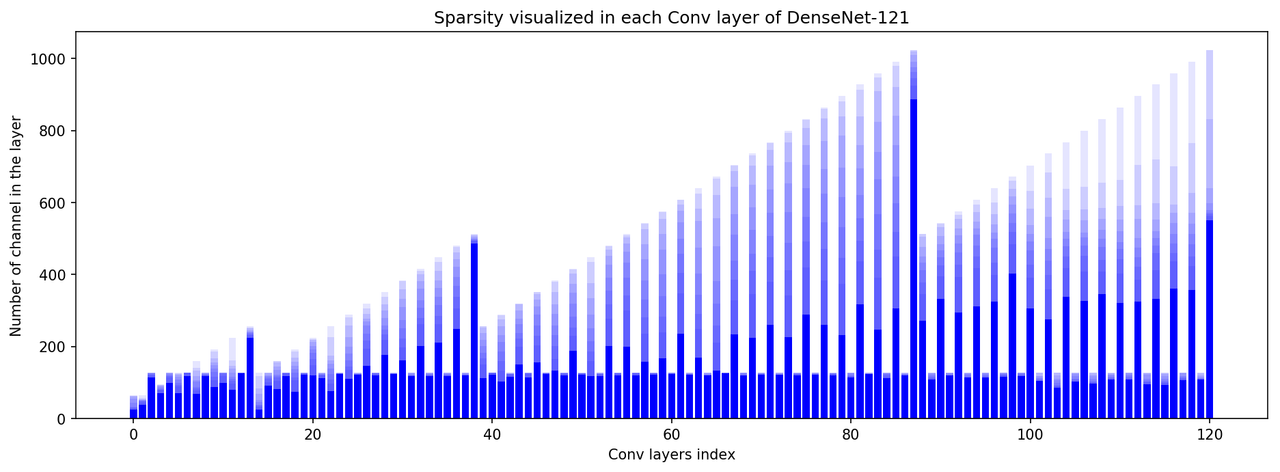
Cfg: [25, 'M', 39, 114, 71, 98, 71, 118, 68, 118, 87, 98, 79, 126, 224, 24, 91, 81, 118, 75, 121, 119, 112, 77, 124, 110, 122, 147, 120, 177, 123, 161, 118, 202, 117, 211, 117, 249, 120, 486, 113, 121, 102, 116, 151, 115, 156, 123, 134, 120, 188, 121, 117, 117, 201, 119, 199, 120, 157, 122, 168, 123, 235, 121, 169, 120, 133, 125, 234, 119, 225, 121, 261, 121, 226, 120, 288, 121, 260, 119, 231, 115, 317, 123, 247, 112, 306, 120, 886, 272, 108, 333, 119, 294, 114, 312, 114, 324, 116, 403, 118, 305, 104, 275, 86, 338, 102, 327, 97, 345, 109, 322, 108, 325, 95, 333, 94, 360, 107, 357, 108, 551]
Rank@1:0.232779 Rank@5:0.376188 Rank@10:0.446556 mAP:0.080831
Saving to ./checkpoint/MaskDenseNet121-market-bs+32-lr+0.1-ds+40/ckpt-prune-sp+0.5000-init.pth ...
Pruning usually destroys the inference performance in the first place (See rank@1 accuracy from the output above). However, we can retain the performance by retraining (finetuning)! Run ./train.py again, but this time with an additional argument:
- --customized_name ckpt-prune-sp+0.5000 This should be the leading part (before "-init.pth") of the pruned model filename. Basically, it tells the script to load the parameters of this particular model before starting back-propagation.
Note: remeber to keep the prefix, batch size, learning rate, decay steps arguments same as the initial baseline training. The finetuned model with highest validation accuracy will be saved as ./checkpoint/MaskDenseNet121-market-bs+32-lr+0.1-ds+40/ckpt-prune-sp+0.5000.pth. (Note: without "-init" in the name)
Example output:
Pretrained model loaded from ./checkpoint/MaskDenseNet121-market-bs+32-lr+0.1-ds+40/ckpt-prune-sp+0.5000-init.pth
...
Epoch 18/19
----------
100%|█████████████████| 405/405 [01:26<00:00, 1.98s/it]
train Loss: 0.4271 Acc: 0.8891
val Loss: 0.2390 Acc: 0.9361
Epoch 19/19
----------
100%|█████████████████| 405/405 [01:08<00:00, 6.05it/s]
train Loss: 0.5097 Acc: 0.8704
val Loss: 0.1534 Acc: 0.9587
Training complete in 2m 49s
Best val Acc: 0.960053
With 20 epochs (far less than 160 which we did for the initial training), we have recovered the rank@1 accuracy of the compressed identity classification algorithm from 0.23 back to 0.96!
- Visualizing sparsity in each convolutional layer (DenseNet-121)
2. Prediction accuracy vs pruning sparsity (DenseNet-121, Market Dataset)