Tensorflow object detection example to count relief valves on P&IDs by retraining the final layer of the Google SSD Inception V2 model
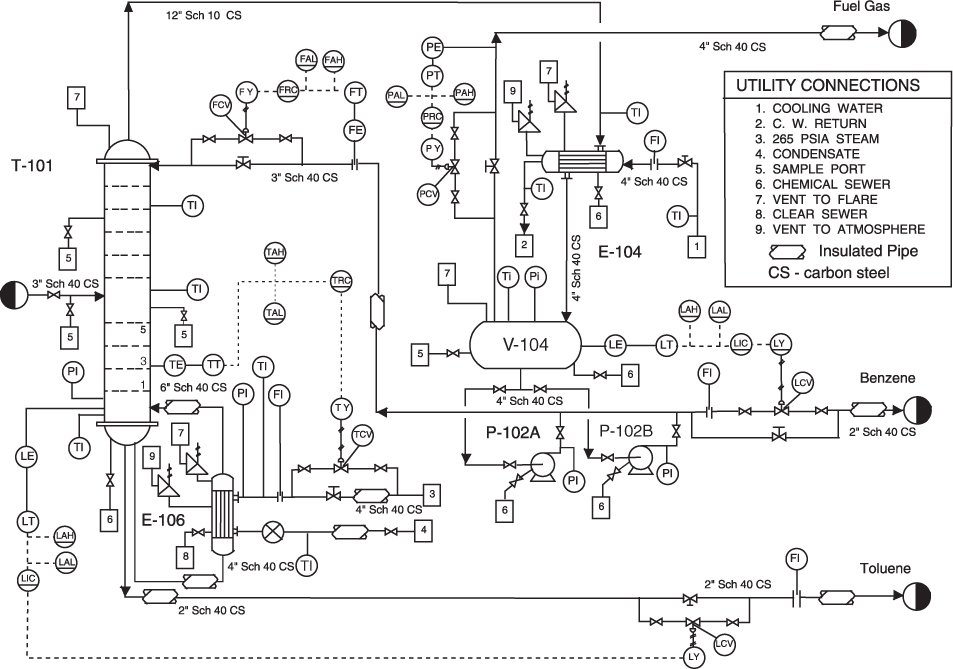
Examples of relatively small symbols showing the relieve valves symbols to be detected in this example.


on large drawings like this
Thanks to Dat Tran for the excellent medium article on applying transfer learning on pre-trained object detection models
Optional Additional Software:
- labelImg for bounding box annotation on training and test data
For my use case, the images to be processed were 11 x 17 size pages in a PDF. I extracted and converted each page from the PDF into an invidual jpg file. Segmentation of the file was done using code similar to the segmentation block in detection application script.
The Google SSD Inception V2 model is trained on images of size 299 by 299 so I had to segment the images into smaller sections that were 122 by 129. This size gave me a good ratio of segment image dimensions to target object bounding box dimension. In other words, the bounding box for the object to be detected was not too small or too large compared to the overall segment image dimensions. To handle situations where the target object to be detected might be split between two different segments, I overlapped the segments by 20 pixels on each side.
After saving the image segments, I used labelImg to draw bounding boxes.
lableImg saves the bounding box annotation data in COCO format as XML. I then used a modified version of the conversion script from Guanghan to convert the individual annotation file for each trainiing image into a single CSV master file that had one line per training image containing the image file name and data on the class(es) and bounding box(es). The data folder in my repo contains the image files, the xml annotation from labelIMG and the combined csv text file describing annotations for the all the images used for training and testing. The script for combined and convert xml annotation is xml_to_csv.py. It should be run in the same directory as where all the xml files from labelIMG are stored. Line 31 should be modified to change the file name for the csv file for your own project.
After the python script generated the csv file, I then used a spreadsheet to split the records into two files - "train_labels.csv" and "test_labels.csv". It was pure cut and paste operation. No data was edited in generating the two files. I aimed for about 10% of the records for testing. There is probably a way to automate this in Tensorflow to have random splits for each training step but I did not implement this for my project. Modifying the code in this example for random split of test and train would deliver better results and reduce the over-fitting. In this case, over-fitting and a high number of false positives was not a concern in the production and actual use environment.
A simple json file is also needed to tell the class names for the bounding boxes in the training data. So I created the label_map.pbtxt file containing the following text.
{
  id: 1
  name: 'psv'
}
The id for the first object class in the map must start at 1 and not 0.
The generate_tfrecord.py script was used to convert the images and the csv files into tf record expected for tensorflow. On Linux, the following commands were run from the data directory:
python3.6 generate_tfrecord.py --csv_input=train_labels.csv  --output_path=train.record

python3.6 generate_tfrecord.py --csv_input=test_labels.csv  --output_path=test.record
The files train.record and test.record are created from the two commands above.
The next step is to download the pre-trained model from the Tensorflow detection model zoo. In this case, I used the model ssd_inception_v2_coco_11_06_2017 model. The tarball should be moved into the models directory and exracted with the following command.
tar -xvf ssd_inception_v2_coco_11_06_2017.tar.gzFinally, the training pipeline configuration file is customized. There are four customizations needed in this file:
- Update the number of clases on line 9
- Update the file location path to the train and test record files in lines 171 and 185 respectively
- Update the file location path to the class label map created earlier in line 173 and 187.
- Update the file location path to the pre-trained model in line 152.
python3.6 pip -m setup.py install
``` can

Installing the scripts as well as tensorflow on the Ubuntu machine that I used gave some unique installation errors and headaches that I had to research and resolve. You will likely face some errors and may have to do the same. If you get an error about "no module named 'depolyment'". Execute the following command from the models subirectory in the repo you downloaded above.

```shell
export PYTHONPATH=$PYTHONPATH:`pwd`:`pwd`/slim
The script to train the model is trainer.py and it should be executed using python from the models directory.
python3.6 object_detection/train.py --logtostderr --pipeline_config_path=<INSERT YOUR PATH TO ssd_inception_v2_coco.config> --train_dir=<INSERT YOUR PATH TO DATA FOLDER CONTAINING THE TRAINING DATA>Once the training script starts, you will see the training time per step as well as the loss. The loss should decrease overall but could go up a little between adjacent training iterations. The configuration file is set to train for 500 steps but you can stop the training at anytime using the interrupt key combinations.
When the training stops after reaching the training iteration limits or interrupted manually, the network model up to the last saved checkpoint can be obtained using the export_inference_graph.py script as follows:python3.6 object_detection/export_inference_graph.py --input_type image_tensor --pipeline_config_path <INSERT YOUR PATH TO ssd_inception_v2_coco.config> --trained_checkpoint_prefix <INSERT YOUR PATH TO THE SAVED MODEL CHECKPOINT DIRECTORY> --output_directory output_inference_graph.pbThe command above will generat an output_inference_grap.pb file with the neural network model weights using the last available checkpoint saved data from training. The output_inference_grap.pb file is used in the actual object detection.
I modified the simple object detection script by Dat Tran to add loading and segmenation of large jpeg images before feeding into the tensor_flow model. My modified script is found here.