Welcome to Kenan's Cook Book. For my third milestone project I have decided to make a cook book website with the goal of selling a fictional range of kitchen utensils. The site is based on the flask framwork to generate content from a database and present it to the user. I have made sure to include CRUD functionality as well as make use of a login/register/logout system which is authenticated and all passwords are protected by a hash for security.
A live preview of the website can be found Here
The goal of Kenan's Kitchen is to provide cooking enthusiasts a place to discover new recipes as well as create and edit their own which will then be available to all other users. The site will offer a range of premium utensils for sale to users to ensure they can easily make their selected recipe as well as generate revenue for the site.
- I want to quickly find recipes for dinner.
- I want to be able to easily sort and search for a specific recipe.
- I want to be able to login to the site.
- I want to be able to create a profile.
- I want to be able to Add my own recipes.
- I want to be able to Edit and Delete my recipes.
- I want the recipes I have created publically available to all other active people on the site.
- I want a page with all my recipes I have created that I can easily access once logged in.
- I want to be able to purchase any kitchen equipment I may need.
- I want the process of displaying content to be fast and seamless.
- I want to dynamically generate content based on collections in MongoDB.
- I want the site to be eye catching and engaging.
- I want the site to be easy to use and intuitive with clear stylistic choices.
- I want the site to be as bug free as possible.
- I want the site to be responsive to a large number of devices and screen sizes.
To see all wireframes created in the UX stage Click Here!
For this project I have used MongoDB which is a non-relational database.
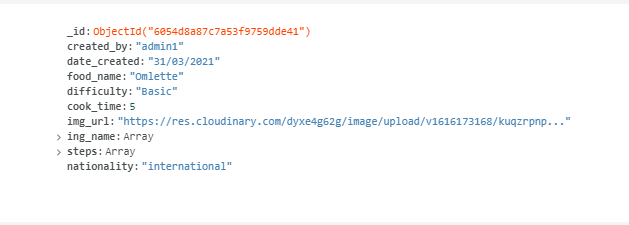
The recipes collection takes input data from the add and edit recipe forms. They are then served via jinja templates to the recipe page as well as the edit and add recipe pages.
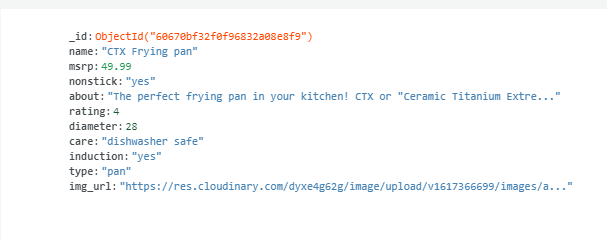
The product collection serves content to the premium utensils page. Currently there is no way for users to add products as this would be a seperate feature that admins will be able to add in future versions of this site.
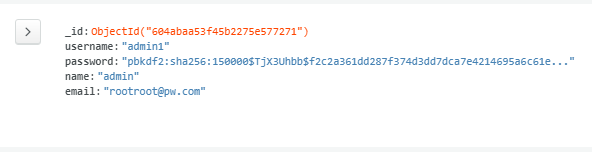
The Users collection stores the registration information of users as well as stores the hashed passwords to allow login and add/edit funtioinailty.
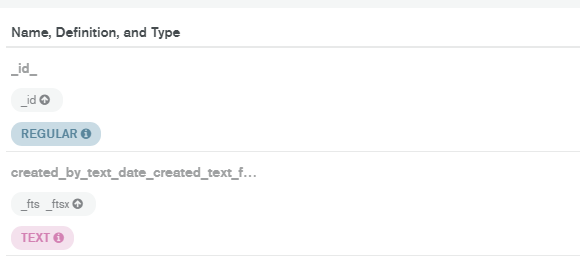
Search functionality for the recipes collection uses an index which queries text for the various attributes.
- Recipes are dynamically generated from the MongoDB collection and displayed on this page using Jinja templating language.
- Pagination is used to allow the user to sort through the pages of results.
- Recipes are displayed paginated in groups of 3 as they are quite large and more than that would require too much scrolling.
- The search bar allows users to search for recipe names, and difficulty etc and returns paginated results based on an index in the mongodb collection.
- The filter area allows users to click on a preset button which will display results based on their selection eg. Nationality or cook time.
 Page")
- Products are dynamically generated from the MongoDB collection and displayed on this page using Jinja templating language.
- Pagination is used to allow the user to sort through the pages of results.
- Products are displayed paginated in groups of 3 as they are quite large and more than that would require too much scrolling.
- The filter area allows users to click on a preset button which will display results based on their selection eg. User rating or pots/pans etc.
- Users have the option to buy a product from one of our fictional retail partners eg. Amazon, Ebay or Buy n Large.

- This page allows users to create a profile and login credentials to fully utilize the website.
- The user is preseted with a registration form in which they will need to provide a Username, Name Email address and password. The password is hashed so that when its stored in the DB it will not be visible.
- The backend python will check weather the desired username is taken or not and prompt the user accordingly.
- All input fields are required as well as having min/max values. All input fields have the required attribute and will promp the user if something was inputed incorrectly.
- Once all criteria have been filled in and submited the backend python will add the details to a new entry within the database as well as putting the user into the session cookie then redirect them to their user profile page.

- This page Shows the user all recipes they have created.
- Pagination is used to allow the user to sort through the pages of results.
- Recipes created by the user will be displayed here with the option to edit and delete recipes.
- Clicking edit will take the user to the edit recipe page.
- clicking delete will trigger a confirmation modal which asks the user to confirm they would like to delete the recipe.

- This page takes the recipe id of the recipe the user wants to edit and returns a form that is mostly prefilled out with the existing recipe details.
- The user has the option of changing any of the input fields as well as uploading a new image via the Cloudinary upload widget.
- When the user clicks submit the backend python will update the DB as neccesary with all new inputed data.

- The add a recipe page has a form where users can input data for the recipe as well as upload an image and add more ingredients and steps.
- Images are handled by the Cloudinary Upload widget and API.
- When a user uploads an image using the upload widget Cloudinary returns an object with the details of the image. I have used Javascript to append the URL of the uploaded image to a hidden image URL input field which then saves the URL of the image in the DB under the img_url attribute.
- I have used Jquery to append extra fields if needed by clicking the green + button which will add another input. I have a variable which increases when the plus button is clicked and decreases when the - button is clicked. This ensures that the label will be correct eg. Ingredient 1, ingredient 2, Step 1, Step 2 etc.
- If a user does not upload an image a placeholder image will be displayed in its place.
- Once the submit button is clicked the backend python will insert all the information into an entry within the DB.

- When the user clicks logout the user is removed from the session cookie using the .pop() function.
- The browser is then redirected to the login page.
- A Flash message will appear saying that the user has successfully been logged out.

- The login page presents the user with a form that takes the username and password field.
- The backend python will check if the username exists and if the password is valid and promt the user accordingly via Flash messages.
- If all login conditions are met the user will be redirected to the User profile page.

- Login - Allows users to login to their account.
- Register - allows users to create a profile which will allow them to create, edit and delete their own recipes.
- Create Recipe - allows users to create their own recipes and upload an image to be shared with the whole site.
- Edit Recipe - allows users to edit recipes they have already created.
- Delete - allows users to delete recipes they have already created.

- Search - allows users to search for recipes based on Name, cooking time, difficulty or nationality.

- Pagination - returns results in groups of 3 and allows users to click through pages instead of having to scroll all the way down the page.

- Filter buttons(Recipes) - Allows users to select predefined results based on cooking time or nationality.
")
- Filter buttons(Products) - Allows users to select predefined results based on product rating or pots/pans etc.
")
- Reccomend utensils from the product range on each recipe.
- Recommend other recipes that go well with the current recipe.
- Ingredient quantity selection and miligrams, liters etc.
- Print function that prints an easily readable recipe.
- Share recipe to social media sites like Facebook, Instagram etc.
- Admin account functionality that can add products and see all recipes and users as well as edit and delete them.
- Flask-Paginate - Flask paginate was used to paginate returned database queries.
- MongoDB - MongoDB was used to store and access database items.
- Flask - Used as web app framework to make creating the app faster and easier.
- Heroku - Heroku was used to host the live version of this app.
- Github - Github was used for storing my code and version control.
- Gitpod - I used Gitpod to code the site as well as push updates to Github.
- Python - Python 3 was used for the backend code to run the app and logic.
- Prettier Code - I used Beautify to keep my code properly indented and easily readable.
- HTML5 - The core of the site was built with HTML version 5.
- CSS - CSS was used to style the website and define fonts and layout.
- Materialize CSS - Materialize was used for layout and alignment with the grid system, forms and inputs as well as pagination.
- JavaScript - JavaScript was used to provide logic and funtionality to certain elements such as the Cloudinary upload widget.
- Jquery - Jquery was used to write the click functions that append extra inputs to the forms as well as to enable Materialize selectors and sidenav.
- Font Awesome - Social Media icons from Font Awesome.
- Google Chrome - The website was built and tested in google Chrome.
- Google Fonts - Bitter, Akaya and Cormorant from Google.
- Auto close tag - self explanitory.
- HTML hint - for faster coding.
- Cloudinary - Hosting images to make the site load faster as well as the API for image uploads and the upload widget.
- Apple Safari - Used for testing.
- Mozilla Firefox - Used for testing.
- Opera - Used for testing.
The testing section of the README can be found Here
Kenan's Cook Book was deployed to Heroku
- Create a Github account or login here
- On GitHub, go to Kdoggg666/MS3
- Look for the fork button, top right under your profile picture and click it
- Create a Github account or login here
- Fork the project as detailed in the steps above
- Click the code button
- Select to clone with HTTPS/SSH/GithubCli and click the copy icon on the right
- In your editor software eg. GitBash, GitPod, VSCode open the terminal
- Navigate to the destination which you want to be the destination for the clone
- Type gitclone if you selected HTTPS or SSH and paste the copied code. If you used GithubCLi just paste the code you copied
- Press Enter to create your clone
- In your code editor with the project open type
touch env.py - Open the newly created
env.pyfile - On the first line type "import OS"
- After that you will add the following Configuration Variables(Take note as these will need to be added to your Heroku app later)
os.environ.setdefault("IP", "0.0.0.0")
os.environ.setdefault("PORT", "5000")
os.environ.setdefault("SECRET_KEY", "A secret Key of your choice goes here")
os.environ.setdefault(
"MONGO_URI", "The MONGO_URI that you copied when creating your collection goes here")
os.environ.setdefault("MONGO_DBNAME", "The name of your MongoDB collection goes here")
- Save the file
- Create an account at MongoDB and login
- Click "Create a New Cluster"
- Select your Cluster Tier, Provider and Region
- Click "Cluster Name" and give your DB a name
- Click "Create Cluster"
- Under the "Clusters" section click "Connect"
- Click "Connect Your Application"
- In the "Driver" dropdown select "Python" and in the "Version" dropdown select "Version 3.6 or later"
- Copy the text in the textbox as this is your MONGO_URI which you will need later for deployment to Heroku
- Dont forget to replace "password" with the password for your MongoDB account. Replace "myFirstDatabase" with the name of the database that connections will use by default
- Click "Close"
- Your MongoDB collection is now ready
- Create a Github account or login here
- Clone or fork Kenan's Cook Book using the steps above
- Run the command
pip3 freeze --local > requirements.txtin your VSCode/Gitpod/Code Editor terminal to create a requirements file - To create a procfile for Heroku run
echo web: python run.py > Procfilefrom the terminal in your VSCode/Gitpod/Code Editor - Create a new account on Heroku
- Login to your account and click new then "Create New App"
- Give your app a unique name and select the region closest to you then click create app
- On the "Deployment" section click on the github icon to connect your repository to the new app you have created
- On the "Deployment Method" section look for "Connect to GitHub" and enter your gitHub name and search for the repository
- Click "Connect"
- Click "Settings"
- Click "Reveal Config Vars"
- Enter the variables PORT, IP, MONGO_URI, MONGODB_NAME and SECRET_KEY and their corresponding values from your
env.pyfile and your MONGO Database - Go back to the "Deployment" section and in the "Manual deploy" section select the master branch and click "Deploy Branch"
- In the "Automatic deploys" section click "Enable Automatic Deploy"
- Your app should now be live on Heroku
- Centering Materialize nav code from https://stackoverflow.com/questions/38964113/how-can-i-create-a-navbar-with-center-aligned-links-using-materialize
- Piping between nav links code from https://stackoverflow.com/questions/25247072/how-to-separate-link-items-with-pipeline
- Turn off Nav shadow code from https://stackoverflow.com/questions/51750706/how-to-turn-off-materializes-default-shadows-for-navbar/51751637
- Change dropdown text color code from https://stackoverflow.com/questions/38996019/how-to-change-the-text-color-in-a-materializecss-select-dropdown
- Code to change Chromes autocomplete field background color to black. code from https://dev.to/atndesign/a-trick-to-change-the-autocomplete-background-color-21ll
- Python backend app logic ideas and structure taken from the Code Institute Task Manager project and customised to suite my needs.
- Cloudinary Upload widget JS code from Cloudinary documentation.
- Add and remove input fields code taken but modified from https://www.sanwebe.com/2013/03/addremove-input-fields-dynamically-with-jquery
- Pagination code taken and modified to suit this project from https://gist.github.com/mozillazg/69fb40067ae6d80386e10e105e6803c9
- Center a form input element code from https://stackoverflow.com/questions/54728464/how-to-center-text-inputs-using-materialize-css
I have credited all the photos that I have used however as users can upload their own images I can not ensure that they own the rights to those images as well as I can not credit them here.
- Favicon: https://www.pinterest.com/pin/39688040450475892/
- Website Background: https://eu.goerie.com/story/lifestyle/home-garden/2020/11/14/fresh-kitchen-backsplash-ideas-stylish-and-functional-backsplash-can-breathe-new-life-into-your-kitc/6190279002/
- Omlette: https://hips.hearstapps.com/hmg-prod.s3.amazonaws.com/images/delish-how-to-make-an-omelette-horizontal-1542310072.png
- Jam: https://foodgawker.com/post/2017/08/21/675744/
- Boiled egg: https://thestayathomechef.com/how-to-boil-eggs/
- Carbonara: https://www.bbcgoodfood.com/recipes/ultimate-spaghetti-carbonara-recipe
- American pancakes: https://www.bbc.co.uk/food/recipes/fluffyamericanpancak_74828
- Scotch egg: https://www.bbc.co.uk/food/recipes/scotcheggs_85851
- Bunuelos: https://www.bbc.co.uk/food/recipes/buuelos_with_spiced_15500
- Kofta: https://recipesjourney.com/en/turkish-kofte-recipe-lamb-meat/
- Salmon roll: https://www.indoindians.com/how-to-make-salmon-sushi-2/
- Indian scrambled eggs: https://www.bbc.co.uk/food/recipes/indianscrambledeggs_86454
- African eggs: https://www.bbc.co.uk/food/recipes/spiced_north-african_82972
- Herring with dill: https://www.bbc.co.uk/food/recipes/herringwithdillandmu_88218
- Frying pan: https://images-na.ssl-images-amazon.com/images/I/61ato0rDpjL_SX425_.jpg
- Wok: https://www.amazon.se/Craft-Wok-Traditionell-handhamrad-st%C3%A5lhj%C3%A4lphandtag/dp/B00PUZT9MU
- Cast iron pot: https://www.amazon.com/AmazonBasics-Pre-Seasoned-Dutch-Handles-2-Quart/dp/B074DFMR8K
- Japanese knives: https://toroscookware.com/products/handmade-japanese-complete-set-of-3-knives-aus10-steel-chef-knife-santoku-nakiri
- Pot spoon: https://royaldesign.com/us/pot-spoon-526-30-cm
- Brass cuttlery set: https://www.no1brands4you.co.uk/kitchen-cutlery/combo-3092-salter-combo-3092-32-piece-gold-cutlery-set-stainless-steel.html
I received inspiration for this project from
This project is for educational purposes only and will not be used for commercial use. All media has been credited and any similarities to other companies/websites/applications are purely unintentional.