![]()
![]()
PyGrad is a NumPy-based pure Python mini automatic differentiation library. Adopting a define-by-run approach, PyGrad provides a clear, intuitive interface for constructing computational graphs, calculating gradients, and solving optimization problems. Building on top of these strengths as an autograd library, PyGrad also offers a minimal neural network API, inspired heavily by PyTorch.
PyGrad is available on PyPI.
pip install pygrad
To build and develop from source, clone this repository via
git clone https://github.com/jaketae/pygrad.git
Full documentation is available at PyGrad docs.
PyGrad's main data class is Variable, through which computational graphs can be created.
>>> from pygrad import Variable
>>> a = Variable(5)
>>> b = Variable(3)
>>> a + b
Variable(8)
PyGrad can, of course, also deal with arrays and tensors.
>>> m1 = Variable([[1, 2], [3, 4]])
>>> m2 = Variable([[1, 1], [1, 1]])
>>> m1 + m2
Variable([[2 3]
          [4 5]])
Since PyGrad uses NumPy as its backend, it supports broadcasting as well as other matrix operations including transpose, reshape, and matrix multiplication.
>>> m1.T
Variable([[1 3]
          [2 4]])
>>> m1.reshape(1, 4)
Variable([[1 2 3 4]])Under the hood, PyGrad creates computational graphs on the fly when operations are performed on a Variable instance. To obtain gradient values, simply call the backward() method on a leaf variable.
>>> x = Variable(3)
>>> y = x * x
>>> y.backward()
>>> x.grad
Variable(6)
By default, PyGrad deletes gradients for intermediary variables to efficiently utilize available memory. To keep the gradient values for all variables involved in the computation graph, set retain_grad=True in the backward() call. In the example below, we calculate , where
is an intermediary variable.
>>> x = Variable(3)
>>> y = x * x
>>> z = y + y
>>> z.backward(retain_grad=True)
>>> z.grad
Variable(1)
>>> y.grad
Variable(2)
>>> x.grad
Variable(12)PyGrad offers an intuitive interface for building and training neural networks. Specifically, ANN-related components live in the pygrad.nn module. For those who are already familiar with PyTorch will immediately see that PyGrad's API is no different from that of PyTorch. We hope to add more flavor to PyGrad's API in the days to come.
Below is a simple example of how to declare a neural network in PyGrad.
from pygrad import nn
from pygrad import functions as F

class NeuralNet(nn.Module):
    def __init__(
        self, num_input, num_hidden, num_class, dropout
    ):
        super(NeuralNet, self).__init__()
        self.fc1 = nn.Linear(num_input, num_hidden)
        self.fc2 = nn.Linear(num_hidden, num_class)
        self.dropout = nn.Dropout(dropout)

    def forward(self, x):
        x = self.fc1(x)
        x = F.relu(x)
        x = self.fc2(x)
        x = self.dropout(x)
        return x
pygrad.nn includes layers and the Module class through which neural networks can be initialized. Also noteworthy is pygrad.functions, which includes activation functions, trigonometric functions, as well as a host of other basic functions operations, such as reshape and transpose.
PyGrad offers an easy way of saving and loading model weights.
PATH = "my/model/save/path/filename.npy"

# save model
model.save(PATH)

# load model
model.load(PATH)
If the specified PATH is not appended with the .npy file extension, it will be added automatically. Note that save() will create a .npy NumPy binary save file that stores the model weights in the specified PATH.
Under the hood, PyGrad builds a weight_dict which is then serialized via NumPy's binary file save and load backend. When loading the model weights, PyGrad calls model.load_weight_dict(). To see the weight_dict that is created and loaded under the hood, simply call model.weight_dict().
>>> model.weight_dict()
{'fc2': {'W': array([[-0.0102793 , -0.43645453],
         [-0.5613075 , -0.40495454],
         [-2.06899522,  0.37147184],
         [ 2.74661644,  0.01093937],
         [ 1.43978999,  2.94304868],
         [ 0.11040433, -0.43386061],
         [ 0.31942078,  0.11889225],
         [ 2.18743003,  0.50037902],
         [-0.52810431, -0.11654514],
         [ 1.23020603,  1.06316066]]),
  'b': array([-0.19479341,  0.07610959])},
 'dropout': {'dropout': array(0.5)},
 'fc1': {'W': array([[ 0.21692255, -0.50617893, -1.36799705, -1.11569594, -0.25307236,
           0.60018887,  1.36053799, -0.63192337,  2.06461438,  0.5593571 ],
         [ 0.8679015 ,  1.1622997 ,  0.40791915,  0.90237478, -0.09208171,
           0.55416128,  0.52464201, -0.04155436, -0.23106663,  0.00484401]]),
  'b': array([-0.0241028 , -0.00574922, -0.14536121,  0.05873388, -0.20492597,
-0.17550233, -0.16079421, -0.0762437 , 0.05676356, -0.03754628])}}PyGrad's DataLoader class allows basic batching and shuffling functionality to be applied to pygrad.data.Dataset instances. Here, we assume a custom Dataset instance, called CatDogDataset.
from pygrad.data import DataLoader, ratio_split

BATCH_SIZE = 8

dataset = CatDogDataset()
train_ds, test_ds = ratio_split(dataset, 0.8, 0.2)
train_loader = DataLoader(train_ds, BATCH_SIZE)
test_loader = DataLoader(test_ds, BATCH_SIZE)
DataLoader instances can be iterated as follows:
for data, labels in train_loader:
# training logic herePyGrad offers a number of different optimizers. These include
pygrad.nn.optim.SGDpygrad.nn.optim.AdaGradpygrad.nn.optim.AdaDeltapygrad.nn.optim.Adam
Training a model with optimizers can be done by instantiating an nn.optim.Optimizer object with some model's parameters. After calling backward() on a loss value, simply call step() on the optimizer to update the target model's parameters.
# imports assumed

optimizer = nn.optim.Adam(model.params())

for data, labels in train_loader:
    pred = model(data)
    loss = F.softmax_cross_entropy(pred, labels)
    loss.backward()
    optimizer.step()
    optimizer.zero_grad()
The optimizer will update the model's weights according to the gradient values of each parameter.
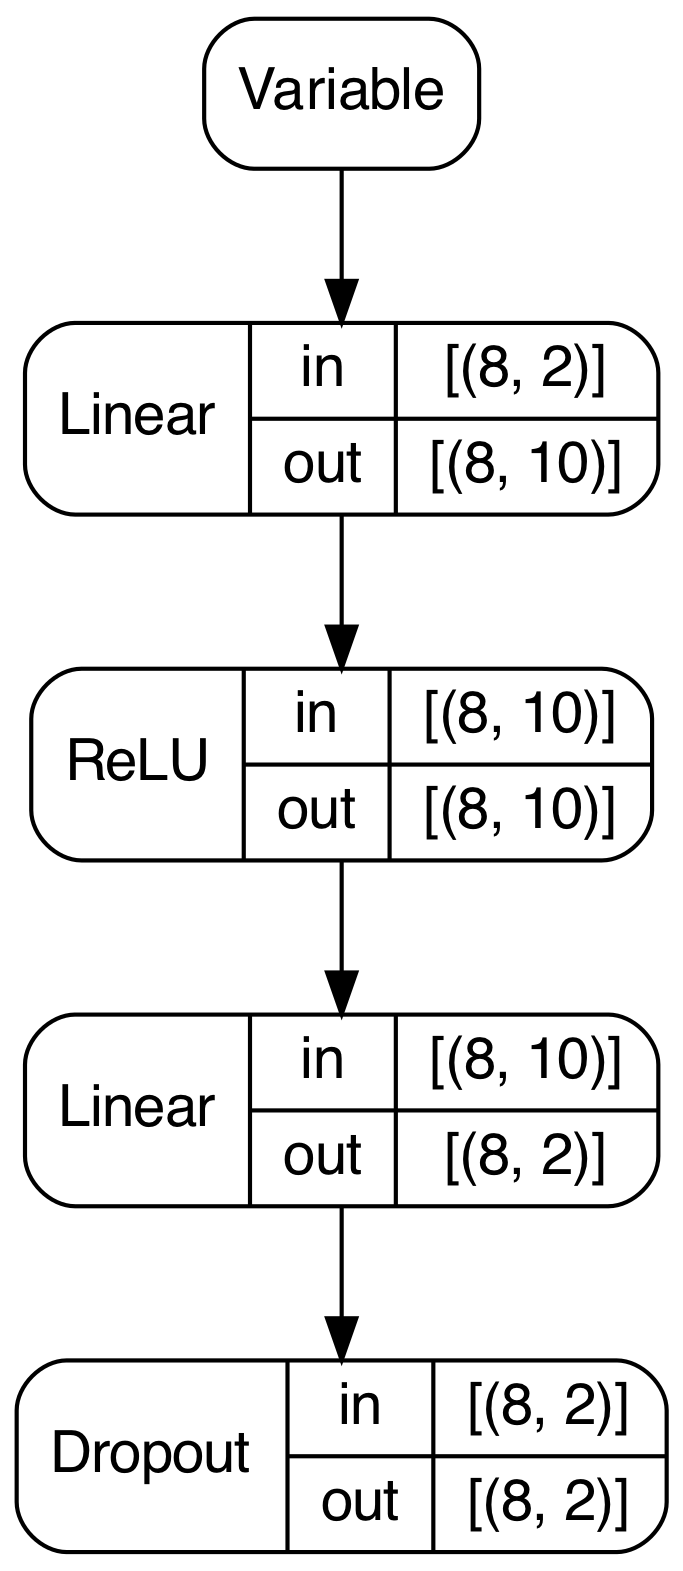
PyGrad also provides useful model visualization using Graphviz. After a forward pass, PyGrad can traverse the computation graph to draw a summary of network's structure, as well as the shape of the input and output for each layer.
model.plot()
In this instance, calling plot() on the model yields the following image.
Please refer to CONTRIBUTING.
PyGrad started off as a refinement of DeZero, an educational library introduced in Deep Learning from Scratch 3, the Korean translation of which I had the honor and pleasure of reviewing as a beta reader. Much of PyGrad's initial code base was adapted from DeZero. The design language of PyGrad's neural network API was inspired by and borrowed from PyTorch. Chainer is also worthy of mention as well, as DeZero itself also adapted many features from Chainer. Last but not least, PyGrad would not have been made possible without NumPy. Our acknowledgement goes to all the developers who put their time and effort into developing the aforementioned libraries.
Released under the MIT License.