- To measure the soil moisture of a plant, display the value in Domoticz, in a Tinkerforge Segment Display 4x7 and a Tinkerforge RGB LED indicator.
- To learn how to write generic Python plugin(s) for the Domoticz Home Automation system communicating with Tinkerforge Building Blocks.

Abbreviations: IAQ=Indoor Air Quality, GUI=Domoticz Web UI.
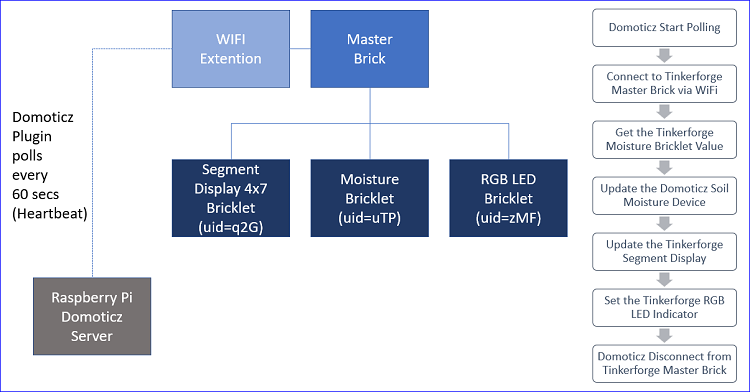
A Domoticz Python plugin "Soil Moisture Monitor" with a soil moisture monitor device obtaining the moisture value from a Tinkerforge Moisture Bricklet. The Tinkerforge Moisture Bricklet is connected to a Tinkerforge Master Brick with WiFi extension. The moisture value is converted to a range 0 (dry) - 100 (saturated) and displayed in a Tinkerforge Segment Display 4x7 Bricklet. In addition, a Tinkerforge RGB LED Bricklet indicates the state red (dry), yellow (irrigation advice), green (saturated).
See also file domoticz-tinkerforge-soilmoisturemonitor-plugin.pdf.
- Raspberry Pi 3B+ (Info) Tinkerforge
- Master Brick 1.1 (Info)
- WiFi Master Extention 2.0 (Info)
- Moisture Bricklet 1.1 (Info)
- Segment Display 4X7 Bricklet 1.0 (Info)
- RGB LED Bricklet 1.0 (Info)
-
In 2018 Tinkerforge stated: The Moisture Bricklet is discontinued and is no longer sold. An alternate solution could be a Tinkerforge Analog In Bricklet and a 3rd party Soil Moisture sensor.
-
The Tinkerforge Moisture Bricklet Documentation describes the higher the value the more wet (with range 0 - 4095), but ... field tests show the other way around in a range 2200 (wet) - 3400 (dry) - this range depends probably on the device,it is used for this solution.
Versions for developing & using this plugin.
- Raspberry Pi Raspian 4.14
- Domoticz Home Automation System V4.1
- Tinkerforge Python Binding v2.1.22
- Python 3.5.3
- Thonny 3.1.2 (Python IDE)
For implementing the Plugin on the Domoticz Server running on the Raspberry Pi. See also Appendix Python Plugin Code (well documented).
Build the prototype by connecting the Tinkerforge Building Blocks (see hardware). Connect the Master Brick to a device running the Brick Deamon and Viewer. Just in a nutshell the actions taken to setup the Tinkerforge building blocks using the Tinkerforge Brick Viewer.
- Update the devices firmware
- Set the WiFi master extension fixed IP address in client mode
- Obtain the UID's of the Tinkerforge bricklets as required by the Python plugin
After setting up the Tinkerforge building blocks, reset the master brick and check if the master brick canbe reached via WLAN: ping tf-wifi-ext-ip-address
Open windows GUI Setup > Hardware, GUI Setup > Log, GUI Setup > Devices This is required to add the new hardware with its device and monitor if the plugin code is running without errors.
cd /home/pi/domoticz/plugins/soilmoisturemonitor
The plugin has a mandatory filename plugin.py located in the newly created plugin folder For Python development Thonny, running on a Windows 10 device, is used.
Domoticz Python Plugin Source Code: see file plugin.py.
There are two options:
Advantage: in case of binding updates, only a single folder must be updated. Check if a subfolder tinkerforge is created in folder /usr/lib/python3/dist-packages. If not the case, unzip the Tinkerforge Python Binding into the folder /usr/lib/python3/dist-packages. Example Create subfolder Tinkerforge holding the Tinkerforge Python Library
cd /home/pi/tinkerforge
Unpack the latest python bindings into folder /home/pi/tinkerforge
  Copy /home/pi/tinkerforge to the Python3 dist-packges
  sudo cp -r /home/pi/tinkerforge /usr/lib/python3/dist-packages/
In the Python Plugin code amend the import path to enable using the Tinkerforge libraries
from os import path
import sys
sys.path
sys.path.append('/usr/lib/python3/dist-packages')
2) Install the Tinkerforge Python Bindings in a subfolder of the plugin and copy the binding content.
Disadvantage: Every Python plugin using the Tinkerforge bindings must have a subfolder tinkerforge. In case of binding updates,each of the tinkerforge plugin folders must be updated. /home/pi/domoticz/plugins/soilmoisturemonitor/tinkerforge
There is no need to amend the path as for option 1.
For either ways, the bindings are used like:
import tinkerforge
from tinkerforge.ip_connection import IPConnection
from tinkerforge.bricklet_moisture import BrickletMoisture
from tinkerforge.bricklet_segment_display_4x7 import BrickletSegmentDisplay4x7
from tinkerforge.bricklet_rgb_led import BrickletRGBLED
add more depending Tinkerforge brick/bricklet used.
Ensure to update the files in case of newer Tinkerforge Python Bindings.
cd /home/pi/domoticz/plugins/soilmoisturemonitor
chmod +x plugin.py
Restart Domoticz to find the plugin:
sudo systemctl restart domoticz.service
Note When making changes to the Python plugin code, ensure to restart Domoticz and refresh any of the Domoticz Web UI's.
IMPORTANT Prior adding, set GUI Stup > Settings > Hardware the option to allow new hardware. If this option is not enabled, no new soilmoisture device is created. Check in the Domoticz log as error message Python script at the line where the new device is used (i.e. Domoticz.Debug("Device created: "+Devices[1].Name))
In the GUI Setup > Hardware add the new hardware Soil Moisture Monitor. The initial check interval is set at 60 seconds. This is a good value for testing, but for finalversion set tohigher value like once per hour (3600 seconds).
After adding,ensure to check the Domoticz Log (GUI Setup > Log)

Example:
2019-05-29 08:51:45.983 Status: (Soil Moisture Monitor) Started.
2019-05-29 08:51:46.489 (Soil Moisture Monitor) Debug logging mask set to: PYTHON PLUGIN QUEUE IMAGE DEVICE CONNECTION MESSAGE ALL
2019-05-29 08:51:46.489 (Soil Moisture Monitor) 'Mode6':'Debug'
2019-05-29 08:51:46.489 (Soil Moisture Monitor) 'Name':'Soil Moisture Monitor'
2019-05-29 08:51:46.489 (Soil Moisture Monitor) 'DomoticzBuildTime':'2019-05-28 13:05:24'
2019-05-29 08:51:46.489 (Soil Moisture Monitor) 'Version':'1.1.0'
2019-05-29 08:51:46.489 (Soil Moisture Monitor) 'Author':'rwbL'
2019-05-29 08:51:46.489 (Soil Moisture Monitor) 'HomeFolder':'/home/pi/domoticz/plugins/SoilMoistureMonitor/'
2019-05-29 08:51:46.489 (Soil Moisture Monitor) 'DomoticzVersion':'4.10841'
2019-05-29 08:51:46.489 (Soil Moisture Monitor) 'Mode5':'60'
2019-05-29 08:51:46.489 (Soil Moisture Monitor) 'Database':'/home/pi/domoticz/domoticz.db'
2019-05-29 08:51:46.489 (Soil Moisture Monitor) 'UserDataFolder':'/home/pi/domoticz/'
2019-05-29 08:51:46.489 (Soil Moisture Monitor) 'Mode1':'uTP,q2G,zMF'
2019-05-29 08:51:46.489 (Soil Moisture Monitor) 'Port':'4223'
2019-05-29 08:51:46.489 (Soil Moisture Monitor) 'Address':'192.168.1.112'
2019-05-29 08:51:46.489 (Soil Moisture Monitor) 'HardwareID':'8'
2019-05-29 08:51:46.489 (Soil Moisture Monitor) 'StartupFolder':'/home/pi/domoticz/'
2019-05-29 08:51:46.489 (Soil Moisture Monitor) 'Mode4':'100'
2019-05-29 08:51:46.489 (Soil Moisture Monitor) 'Language':'en'
2019-05-29 08:51:46.489 (Soil Moisture Monitor) 'Key':'SoilMoistureMonitor'
2019-05-29 08:51:46.489 (Soil Moisture Monitor) 'DomoticzHash':'5afd0eb96'
2019-05-29 08:51:46.489 (Soil Moisture Monitor) Device count: 0
2019-05-29 08:51:46.489 (Soil Moisture Monitor) Creating new Devices
2019-05-29 08:51:46.490 (Soil Moisture Monitor) Creating device 'Soil Moisture'.
2019-05-29 08:51:46.491 (Soil Moisture Monitor) Device created: Soil Moisture Monitor - Soil Moisture
2019-05-29 08:51:46.491 (Soil Moisture Monitor) Creating device 'Status'.
2019-05-29 08:51:46.492 (Soil Moisture Monitor) Device created: Soil Moisture Monitor - Status
2019-05-29 08:51:46.492 (Soil Moisture Monitor) Heartbeat set: 60
2019-05-29 08:51:46.492 (Soil Moisture Monitor) Pushing 'PollIntervalDirective' on to queue
2019-05-29 08:51:46.492 (Soil Moisture Monitor) Processing 'PollIntervalDirective' message
2019-05-29 08:51:46.492 (Soil Moisture Monitor) Heartbeat interval set to: 60.
2019-05-29 08:51:46.486 Status: (Soil Moisture Monitor) Entering work loop.
2019-05-29 08:51:46.487 Status: (Soil Moisture Monitor) Initialized version 1.1.0, author 'rwbL'
The Soil Moisture Monitor (SMM) runs every 60 seconds (Heartbeat interval) which is shown in the Domoticz log.
2019-05-28 19:36:51.236 (Soil Moisture Monitor) Pushing 'onHeartbeatCallback' on to queue
2019-05-28 19:36:51.240 (Soil Moisture Monitor) Processing 'onHeartbeatCallback' message
2019-05-28 19:36:51.240 (Soil Moisture Monitor) Calling message handler 'onHeartbeat'.
2019-05-28 19:36:51.240 (Soil Moisture Monitor) onHeartbeat called. Counter=840 (Heartbeat=60)
2019-05-28 19:36:51.241 (Soil Moisture Monitor) UIDs:uTP,q2G,zMF
2019-05-28 19:36:51.253 (Soil Moisture Monitor) IP Connection - OK
2019-05-28 19:36:51.258 (Soil Moisture Monitor) Tinkerforge value:2918
2019-05-28 19:36:51.258 (Soil Moisture Monitor) Domoticz value:59
2019-05-28 19:36:51.258 (Soil Moisture Monitor - Soil Moisture) Updating device from 59:'0' to have values 59:'0'.
2019-05-28 19:36:51.266 (Soil Moisture Monitor) Segment Display updated
2019-05-28 19:36:51.266 (Soil Moisture Monitor) RGB LED updated. Brightness=100
2019-05-28 19:36:51.369 (Soil Moisture Monitor - Status) Updating device from 0:'Polling OK: TF=2918, Dom=59, LED=41' to have values 0:'Polling OK: TF=2918, Dom=59, LED=41'.
2019-05-28 19:36:51.378 (Soil Moisture Monitor) Polling OK: TF=2918, Dom=59, LED=41
Exception handling for communicating with the Master Brick & WiFi extension.
Consider to replace the Tinkerforge Moisture Bricklet as not produced anymore by an alternate solution using the Tinkerforge Analog In Bricklet and a 3rd party Soil Moisture sensor.
v1.1.0 (Build 20190529)