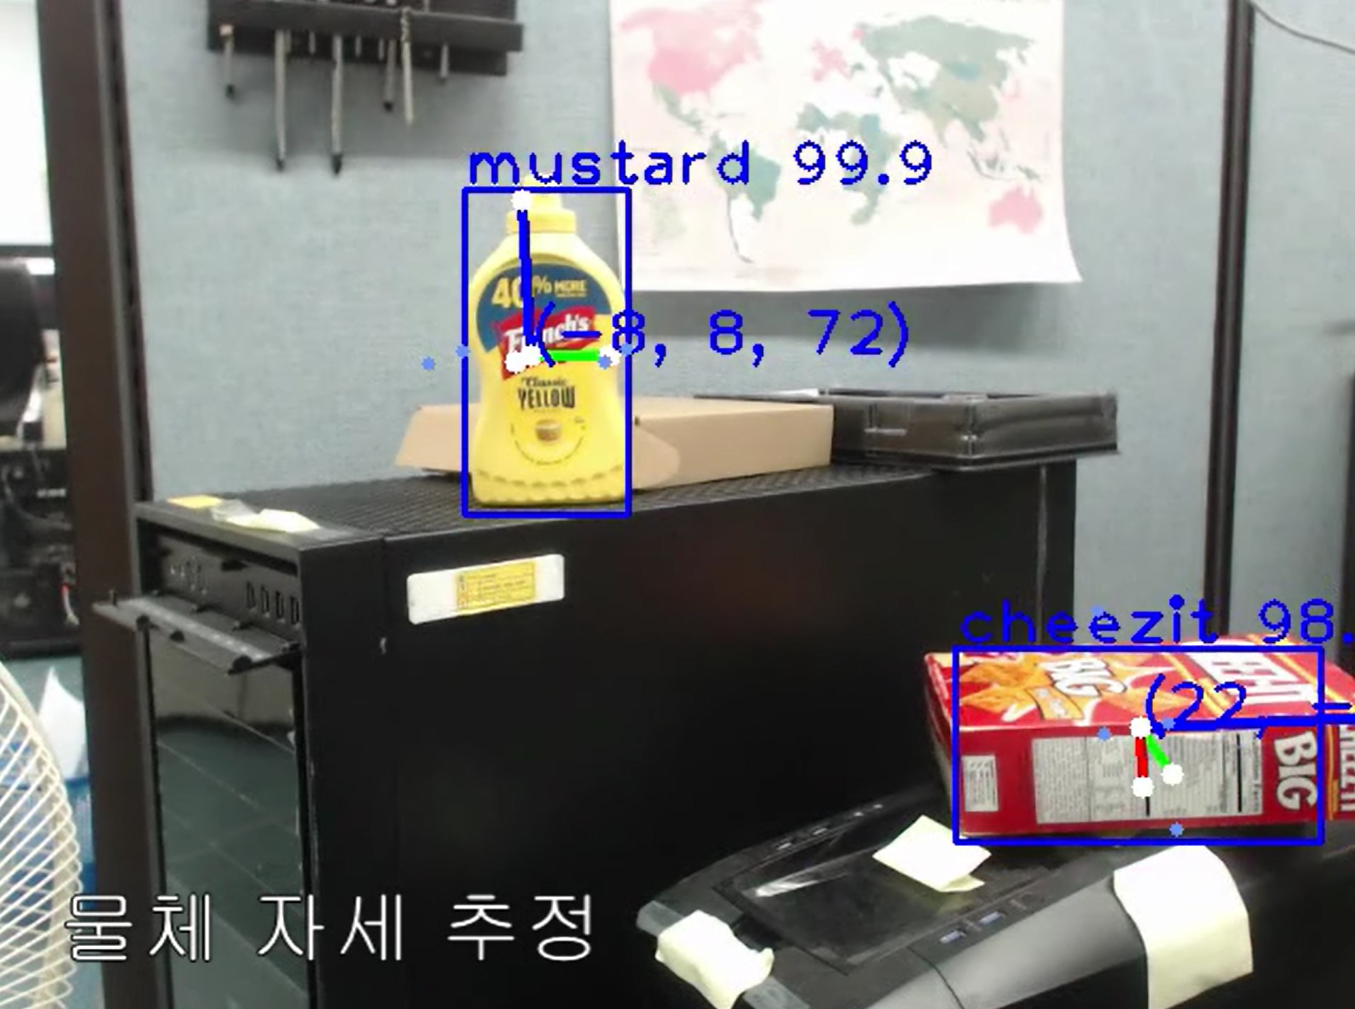
This is an object detection and pose estimation module in Modular Manipulation Project.
The object detection part is mainly based on the Faster-RCNN_TF that refers to the paper Faster R-CNN: Towards Real-Time Object Detection with Region Proposal Networks by Shaoqing Ren, Kaiming He, Ross Girshick, Jian Sun. Pose estimation part is composed of SURF-based feature matching and PnPSolver using OpenCV.
Additional parts such as various input modules (web camera, Intel realsense, images and videos) and communication modules are added to the main code.
For running the recognition module, GPU memory is needed.
-
Install Ubuntu 16.04.xx
-
Install NVIDIA driver, CUDA 8.0, cudnn 5.1.
2.1. Nvidia driver
sudo apt-get purge nvidia*
sudo add-apt-repository ppa:graphics-drivers
sudo apt-get update

sudo apt-get install nvidia-375

lsmod | grep nvidia
2.2. CUDA 8.0
Access https://developer.nvidia.com/cuda-downloads
Download Legacy Releases->CUDA Toolkit 8.0 GA1 (Sept 2016)->Linux->x86_64->Ubuntu0>16.04->deb(local)->download
sudo dpkg -i cuda-repo-ubuntu1604-8-0-local_8.0.44-1_amd64.deb
sudo apt-get update
sudo apt-get install cuda

ls /usr/local/cuda/lib64
If you find the file names "~~~.so.8.0", the installation is completed.
2.3. CUDNN 5.1
Access https://developer.nvidia.com/cudnn
Download Download -> Log in -> Survey (pass) -> Download cuDNN v5.1 for CUDA 8.0 -> cuDNN v5.1 Library for Linux or Download from here.
tar -zxvf cudnn-8.0-linux-x64-v6.0.tgz
sudo cp ./cuda/include/* /usr/local/cuda-8.0/include/
sudo cp ./cuda/lib64/* /usr/local/cuda-8.0/lib64/

ls /usr/local/cuda/lib64/libcudnn*
If you find the file names "~~~.so.5.1.x", the installation is completed.
-
Anaconda installation and import conda environment
Download Anaconda at https://www.anaconda.com/download/#linux with Python 2.7 version. Install Anaconda.
Download the conda env file. Import ModMan conda env.
conda env create -f ModMan_env.yml
source activate ModMan conda install -c anaconda cython pip install pyyaml conda install -c auto easydict conda install -c auto scipy conda install -c conda-forge hdf5 conda install -c auto matplotlib conda install -c anaconda h5py -
Download and compile Faster-RCNN_TF based ModMan recognition module
git clone https://github.com/yochin/smallcorgi_Faster-RCNN_TF_yochin.git
source activate ModMan
cd $FRCN/lib        // Let $FRCN as the downloaded folder name.
make
If you meet an error while compiling, then see the below solutions.
-
error: roi_pooling_op.cu.o: No such file or directory
First, check the version of CUDA and cudnn. Then, add to your path(or you can also add the path in ~/.bashrc.).
export PATH="/usr/local/cuda-8.0/bin:$PATH"
-
error: fatal error: math_functions.hpp: No such file or directory
[Ref: tensorflow/tensorflow#15389]
Make a softlink from /usr/local/cuda-9.1/include/crt/math_functions.hpp to /usr/local/cuda-9.1/include/math_functions.hpp
cd /usr/local/cuda-9.1/include ln -s ./crt/math_functions.hpp ./math_functions.hpp -
error: #error Do not use this file, it is the result of a failed Cython compilation.
[Ref: rbgirshick/py-faster-rcnn#647]
Install cython, then make again.
source activate ModMan
conda install -c anaconda cython
-
-
Download trained model
Download DBv1.
Move DBv1 folder to $FRCN/yochin_tools/PoseEst
Download Models.
Move Models folder to $FRCN
-
Set paths and run the program (for a camera, image, and video input)
In $FRCN/yochin_tools/yo_network_info.py, change the variable PATH_BASE to become the real path to $FRCN.
In $FRCN/yochin_tools/my_demo_camera.py (this is the main code), edit followings.
If you don't want to use realsense, then comment line 44.
# import pyrealsense as pyrs-
If you use the program as a standalone program using web camera,
In line 489, INPUT_TYPE = 0
In line 497, extMat = getCamIntParams('') <-- select the proper camera name.
-
If you set all parameters, then run the program.
python my_demo_camera.py
-
-
Set paths and run the program (as a server)
In $FRCN/yochin_tools/yo_network_info.py, change the variable PATH_BASE to become the real path to $FRCN.
And set the IP address and port number.
- If you set all parameters, then run the program.
python my_demo_tf_wPoseEst_Server.py
- If you set all parameters, then run the program.
-
Verify the version of the opencv library is ver.3.2.x.
python
import cv2
cv2.__version__
If the opencv is not imported or the version is not 3.2.x, then remove all opencv and reinstall.
conda uninstall opencv
conda uninstall opencv3
conda install -c menpo opencv3
If you meet an message, "OSError(13, 'Permission denied')", then log in as a superuser.
sudo bash
source activate ModMan
If you meet an message, "ImportError:
/.so: undefined symbol: PyFPE_jbuf", then delete the .so file and make again in step 4.
The updated code will be uploaded on git server.
###References