NagaScan is a distributed passive vulnerability scanner for Web application.
NagaScan currently support some common Web application vulnerabilities, e.g. XSS, SQL Injection, File Inclusion etc
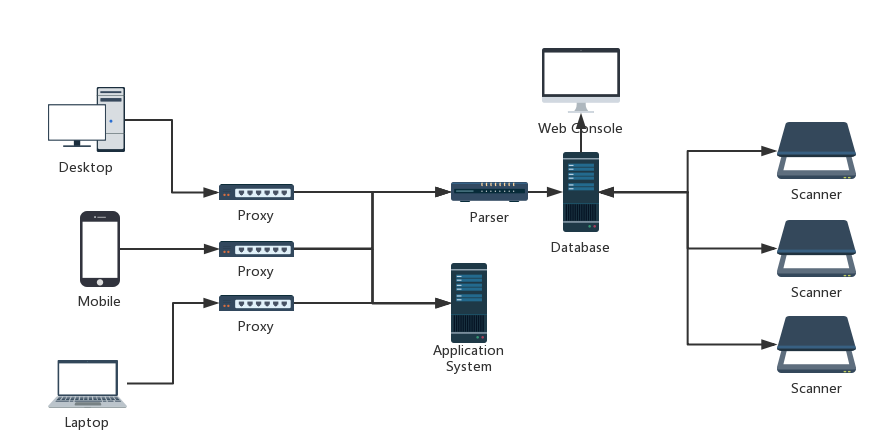
Config a proxy, e.g. Web Browser proxy or mobile Wi-Fi proxy, the traffic (including requests headers, cookies, post data, URLs, etc) will be mirrored and parsed into our central database, then NagaScan will be automatically assigned to distributed scanners to scan the common web application vulnerabilities.
- sudo pip install mysql-connector
- sudo pip install jinja2
- sudo pip install bleach
- sudo apt-get install python-pip python-dev libmysqlclient-dev
- sudo pip install requests
- sudo pip install MySQL-python
- sudo pip install -U selenium
- sudo apt-get install libfontconfig
- sudo apt-get install python-pip python-dev libmysqlclient-dev
- sudo pip install MySQL-python
- Install MySQL and create a db user and password, e.g.
root/toor - Create database for NagaScan by using command
source schema.sql
- Modify
www/config_override.pywith your own DB configuration for Web console
configs = {
    'db': {
        'host': '127.0.0.1',
        'user': 'root',
        'password': 'toor'
    }
}
- Run
sudo python www/wsgiapp.pyto start Web console
- Modify
scanner/lib/db_operation.pywith your own DB configuration for Scanner
def db_conn():
    try:
        user = "root"
        pwd = "toor"
        hostname = "127.0.0.1"
- Install PhantomJs
- Linux 64-bit:
- wget https://bitbucket.org/ariya/phantomjs/downloads/phantomjs-2.1.1-linux-x86_64.tar.bz2
- tar -jxvf phantomjs-2.1.1-linux-x86_64.tar.bz2
- Linux 32-bit:
- wget https://bitbucket.org/ariya/phantomjs/downloads/phantomjs-2.1.1-linux-i686.tar.bz2
- tar -jxvf phantomjs-2.1.1-linux-i686.tar.bz2
- Linux 64-bit:
- Modify
scanner/lib/hack_requests.pyin line 28 as below
self.executable_path='[Your Own Phantomjs Binary Path]' # e.g. /home/ubuntu/phantomjs-2.1.1-linux-x86_64/bin/phantomjs
- Run below commands to start Scanner
python scanner/scan_fi.pyto scan File Inclusionpython scanner/scan_xss.pyto scan XSSpython scanner/scan_sqli.pyto scan SQL injection
- Install MitmProxy
- Ubuntu 16.04 (Preferred):
- sudo apt-get install python3-dev python3-pip libffi-dev libssl-dev
- sudo pip3 install mitmproxy
- Ubuntu 14.04:
- sudo apt-get install python-pip python-dev libffi-dev libssl-dev libxml2-dev libxslt1-dev libjpeg8-dev zlib1g-dev
- sudo pip install "mitmproxy==0.18.2"
- MacOS:
- brew install python3
- brew install mitmproxy
- Ubuntu 16.04 (Preferred):
- Run
mitmdump -p 443 -s "proxy/proxy_mitmproxy.py /tmp/logs.txt"to start Proxy - Modify
parser/lib/db_operation.pywith your own DB configuration for Parser
def db_conn():
    try:
        user = "root"
        pwd = "toor"
        hostname = "127.0.0.1"
- Run
python parser/parser_mitmproxy.py /tmp/logs.txtto start Parser
- Access to Web Console with the default username and password (nagascan@example.com/Naga5c@n) to config exclusions and add SQLMAP server


- Install MitmProxy certificates for Browser or Mobile per Instruction
- Add a proxy you created in your Web Browser or Mobile Wi-Fi
- Just browse websites from Browser or use APPs from Mobile whatever you like


