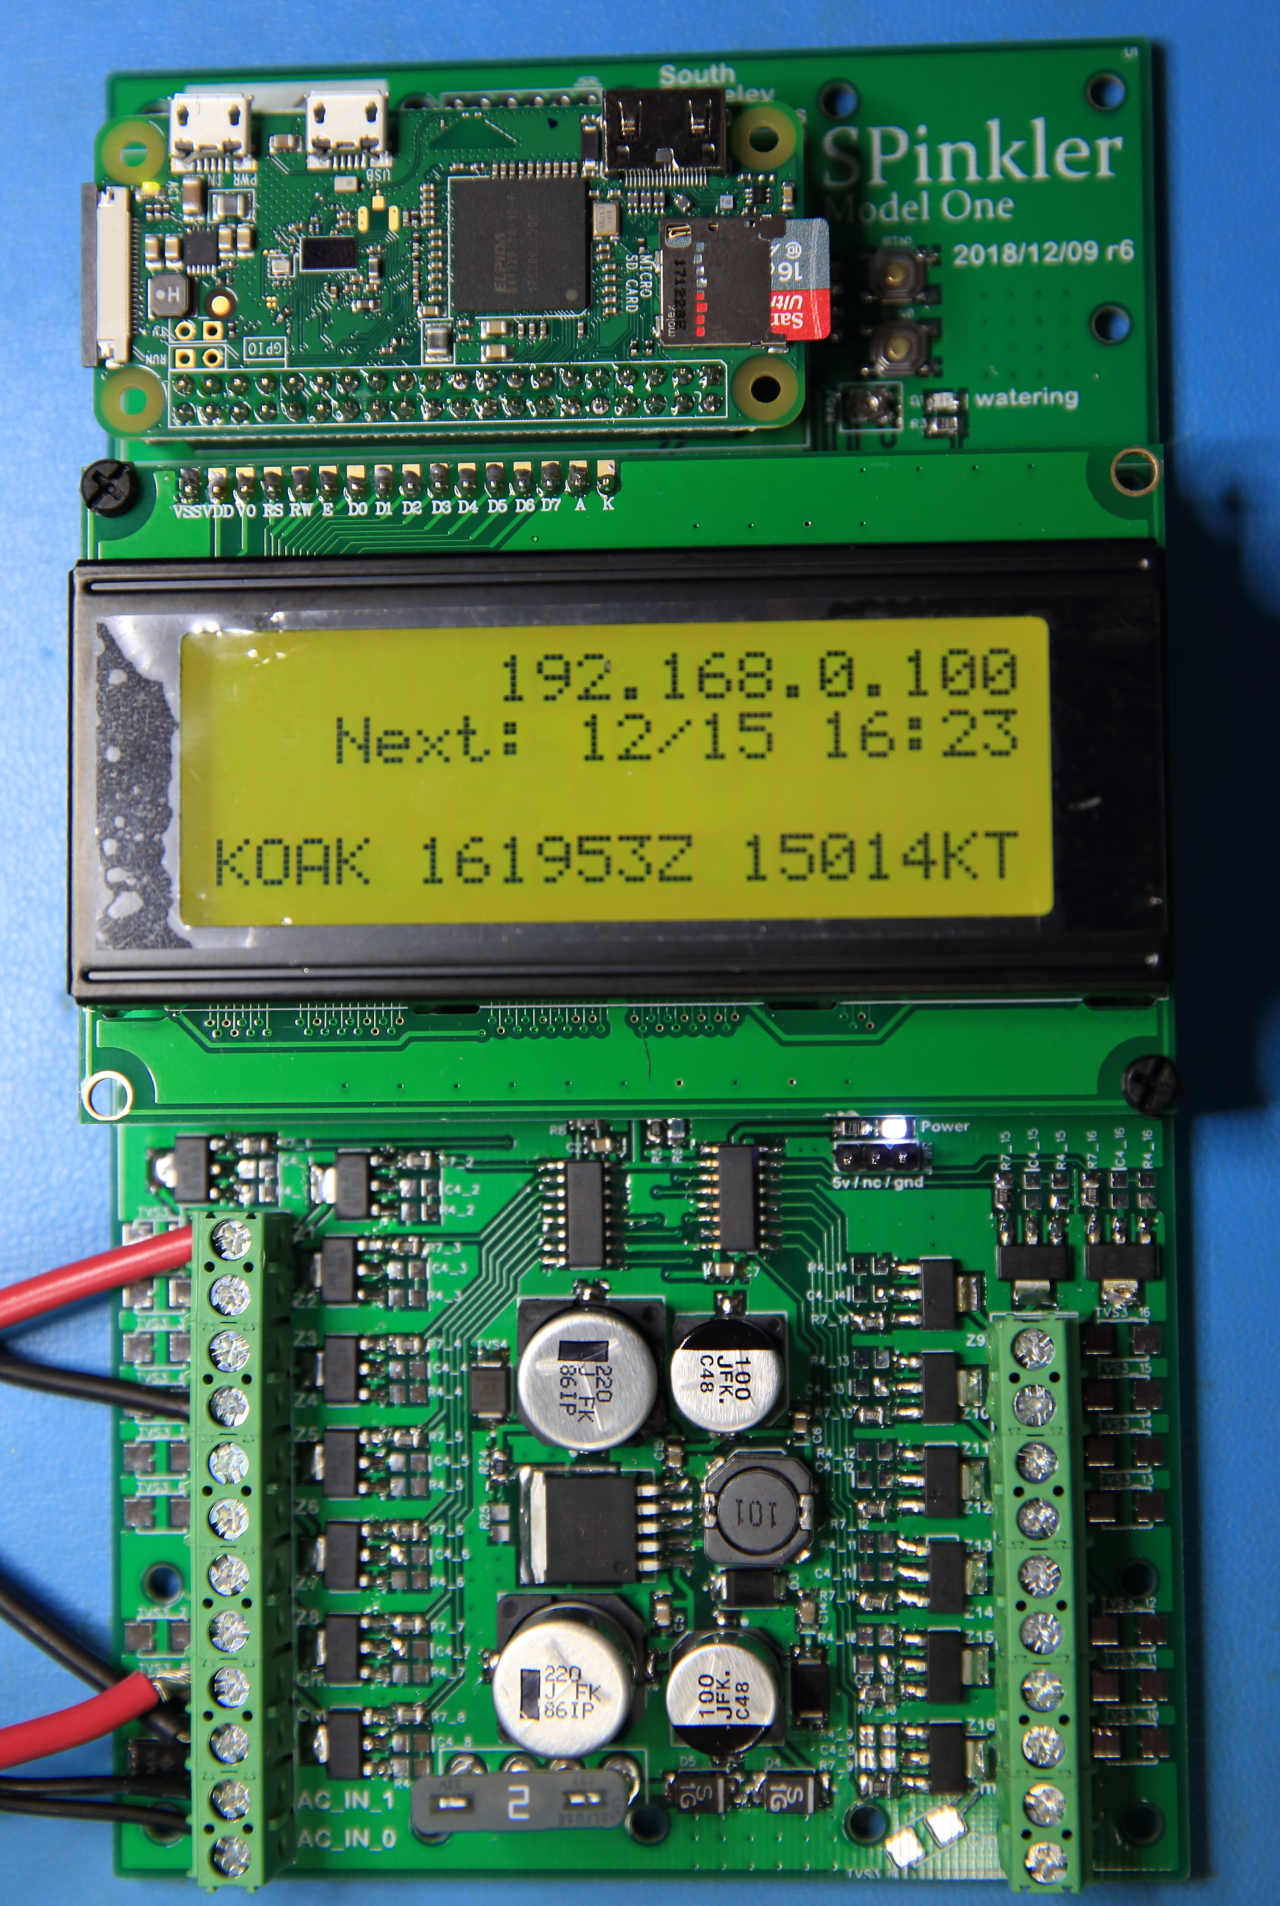
The "SPinkler" is a Raspberry Pi based sprinkler controller. Other projects, such as "Open Sprinkler" are very similar. However, I didn't like the Open Sprinkler Project's Pi-based controller. I wanted a different form factor, 16 zones in one unit, and a display.
And I wanted to do it myself.
As a result this project is similar, but not identicaly to Open Sprinkler.
There are so many IOT irrigation controllers on the market, you definitely do not need to go to an open source project.
However, if:
- you like to hack
- you're just curious
- you are protective of your privacy
- just like simple things that you can manage yourself
... then you might be interested in this project.
The demo app I provide is the one I use to water my garden. It simply accesses a Google Calendar to know when to water. I don't run a web server or a phone app or anything like that, since Google already provides the tools I need to manage a calendar.
If this is appealing to you, then the SPinkler may be of interest.
Lots of sprinkler projects do clever stuff like run evapotranspiration models to adjust to the weather and provide a nice phone app that might provide real-time control of your sprinklers.
I wanted to instead build something simple, with a minimum of additional software. I already use Google Calendar, so it was an easy choice to use that for watering.
And that's what I've written. I think this is clean and simple and allows me to edit my watering calendar using any of the interfaces to Google Calendar (phone, web, etc) without having to write (or use) a special app at all.
Google, of course, will know your sprinkler schedule, but nobody else will. This is IoT how I like it -- no (or at least, only familiar) middle men collecting my data.
I have put in some very basic weather adapatation just to play around. The system will download weather from NOAA and if it is raining or cold, the sprinklers won't run.
The demo app needs to be configured directly by modifying a config file that specifies the specific calendar you want to use, and the local weather station. Alternatively, you can use a main app that hosts a little web server to allow the same configuration details via web browser.
The web server is more trouble to set up, though. If you want to, read WEB_SERVER.md.
I really tried hard to keep this very simple, so that there is nothing too clever in the Python code, and the bare minimum external libraries are used.
I provide simple libraries to:
- write to the display
- turn on triacs
- read from Google Calendar
The demo app just uses those to run a schedule.
You can use as little or as much of this as you like, and I'll be happy to take pull requests.
I encourage you to experiment with just the libraries and a simpe Python wrapper to get familiar with controller your sprinklers. You may be inspired to write your own app entirely and not use the demo code!
Follow the steps in the HARDWARE.md file, but in short:
-
obtain a 20x4 LCD and solder a 16x1 0.1" header to the back of it so that the pins point backwards.
-
obtain the 20x2 0.1" header for a Raspberry Pi Zero W and solder those pins on, also on the back
-
Plug in the LCD and Pi Zero the main board. You can use mounting hardware to secure them. The holes should line up
-
insert an auto fuse into the fuse holder.
-
Get a 24 VAC plug pack (perhaps from your old controller) and attach the wires to the 24VAC AC1 and AC0 terminals of the board
-
Sprinkler valves themselves will have two wires each. One should be attached to the screw terminals market Z1, Z2, Z3 ... Z16. The other should be grouped together and attached to the "common" screw terminals. For convenience, there are two common terminals on each side of the unit.
However, I'd wait until you have the basic sofware set up and working before you go crazy with the valves.
This assumes basic familiarity with the Raspberry Pi.
-
Install an OS on your Raspberry Pi Zero.
I like Raspbian Lite because it brings in no gui or other cruft which is not helpful for this project and just increases the size of the install and of updates.
While setting it up, you will probably find it convenient to power it up on its own (not on the SPinkler board) with a monitor and keyboard attached. I usually do this long enough to enable ssh and set the WiFi password, and then from there on out I connect to it from another computer via ssh.
-
Some prelimiary setup:
-
change your password
-
use
raspi-configto enable ssh so you can log in remotely -
set your WiFi credentials (
/etc/wpa_supplicant/wpa_suplicant.conf)
-
-
Install Python3 if it is not already on there:
sudo apt install python3
Also, install a few packages. You can get these from pip3 but I prefer to get the OS packages when they exist. That way they get picked up with OS updates.
sudo apt install \ python3-rpi.gpio \ python3-dateutil \ python3-googleapiclient \ python3-oauth2client \ -
Create a working directory for this project and clone the code to it:
cd ~
git clone https://github.com/djacobow/spinkler
cd spinkler
-
Create a Google Project
Google manages all developer application through an interface called the Google Cloud Console. You will be using the Cloud Console to create a project, where you will specify which API's you intend to use (Calendar and GMail) and then create a credentials which your app will then use to identify itself so that Google will let it use the APIs.
The project will belong to you and not me because the credentials generated are secret and can be used by others to pretend to be your app to access your Calendar and GMail, or even trick others into accessing theirs. So there's really no why I can provide canned credentials for your use. Sorry.
I can't really give a complete tutorial on the Cloud Console here. The basic steps you need to take are:
-
Go to console.cloud.google.com and creata project by clicking on the down triangle at the top and then clicking "new project"
-
name the project and fill in whatever you want or not, it doesn't really matter
-
Click on API's and services, search for Calendar API and click to enable it. Search for GMail API and enable that, too. (The demo app uses that API to send you an email with watering results.)
-
generate credentials. Google's credentials system is pretty confusing, I'm afraid. There is a simple wizard to step you through it. Tell Google that you are making a "console application".
-
download the credential you just made and save it in the folder your just created with your git pull as
noweb_client_secret.json.
This credential does not give access to your Google Account. It identifies the app and lets the app request credentials to see your Google Account account.
-
-
If you have not yet created a Google Calendar for your SPinkler, do so now. Open Google Calendar in a browser, and click the plus sign next to "Add a friend's calendar", then click "New Calendar" and give it a name, etc.
-
Create your sprinkling schdule
It's easy to add a watering to your schedule. Just create an event in the calendar the Spinkler can see (the one you just edited into Spinkler.py) and set the title to "water". The description tells what zones you want watered and how long, in this format:
run 3 duration 2
run 4 duration 0.2
run 5 duration 0:02
In this case, zones 3, 4, and 5 will be run sequenually for 2 hours, 0.2 hours (that's 12 minutes) and 2 minutes, respectively. As you see, each line starts with "run" then the zone number to run, then the duration to run in either hours (fractions allowed) or hours:minutes
You can create as many events as you like, they can repeat, run only on weekdays, etc, whatever you want. You can put more than one zone in a Calendar event, or you can make a separate Calendar event for each zone you'd like to run.
-
Find your calendarID and make sure the app can log in to your account
From the
spinkler/rpidirectory, run the programlist_cals.py.It will prompt you with a web url to open in a browser. Do so, log in to your Google account, grant the necessary permissions.
The web page will then show you a token: a string of goggledygook. Copy that over and paste back into the ssh window.
The tool should then show you a list of your calendars. Try to idendify the one you just created for watering and copy that calendarId. You will use it in the next step.
Note: this program has stord a token in your home directory that give it and
noweb_spinkler.pyaccess to your Google Account. -
Adjust your config file
In the
spinkler/rpifolder use a text editor to open a file calleduser_config.jsonand put the following contents into it:[]
Save that file and then run:
python3 ConfigMarshaller.py
That command fills out that file with the relevant parameters with defaults. It will look something like:
[
  {
    "path": "sprinkler_calendar",
    "value": "some_calendar@calendar.google.com"
  },
  {
    "path": "cal_check_interval",
    "value": 60
  },
  {
    "path": "mail/send",
    "value": false
  },
  {
    "path": "mail/to",
    "value": [
      "nobody@nowhere.net"
    ]
  },
  {
    "path": "psr/enabled",
    "value": true
  },
  {
    "path": "psr/zone",
    "value": 1
  },
  {
    "path": "weather/args/stationString",
    "value": "KOAK"
  },
  {
    "path": "weather_check_interval",
    "value": 600
  },
  {
    "path": "pause_time",
    "value": 2
  }
]
At a minimum, you will now want to use a text editor to modify the value for the
sprinkler_calendar. What you put here is the Google "Calendar ID" for the calendar that you found in the previous ste.If you want to end emails after each watering, change the
mail/sendvalue totrueand themail/tovalue to your email address. I like this to know that the system is working and to have a record.If you use a pump start relay, adjust those fields, too. You can set up any zone connection as your PSR connection. But, of course, be careful not to use that zone for anything else.
You can change
/weather/args/stationStringto ICAO four-letter identifier of a local airport with weather reporting. -
Once you a basic config file, start the server to test it out:
./console_spinkler.py
You should see the display on your SPinkler light up and show the date and time, and, if you have watering events on your calendar in the next 24 hours, the next watering event. The weather may also scroll across the bottom line.
You may want to experiment with using your Calendar to set a watering event a few minutes in the future (at least three, or else the tool might not catch it before it passes) and see that it actually runs.
If so, you are good!
-
Make the spinkler program a daemon so it starts automatically and restarts if it crashes.
If the spinkler program appear to be running/working, convert it into a background process that will auto-restart if something fails. First, use ctrl-c to exit the instance you have running.
Then, issue these commands to "daemonize" your program:
cp systemd/noweb_spinkler.service /etc/systemd/system
sudo systemctl daemon-reload
sudo systemctl enable noweb_spinkler
sudo systemclt restart noweb_spinkler
You can see how spinkler is doing with:
sudo journalctl -f -u noweb_spinkler
That's about all there is to it. Good luck!
Dave J (djacobow)
Updated December 2018 Started October 2018