A process known as Laser Direct Imaging.
Note, the image below is severily dated

The code is based upon LDGraphy.
The BOM is in the order of $200 including the Beaglebone Green.
- 500mW 405nm laser ($30)
- Commonly available polygon mirror scanner (from laser printers) ($20)
- Beaglebone Black/Green to control it all (using the PRU to generate precise timings for motors and laser) ($40)
- quartz optical window, 2 mm thick, 30x30 mm ($55)
- Photo-diode to determine start-of-line (as the polygon mirrors have slightly different long faces and also phase-drift over time) (BPW34-B) ($5)
- Hexastorm hat ($30)
The Hexastorm hat is not for sale and has to be produced manually. The prism has to be glued on top of the polygon motor.
The project is work on progress. Currently, it is possible to reach a phase-locked loop with the Hexastorm and sent lines to the scanner via Python 2.
The following image was used http://debian.beagleboard.org/images/bone-debian-9.4-iot-armhf-2018-06-17-4gb.img.xz
Check wether the uio_pruss driver is loaded.
lsmod | grep uio
There should be something called uio_pruss. If it is not loaded load the module and check again.
sudo modprobe uio_pruss
To enable the uio_pruss module on each boot add it to /etc/modules where by adding the line uio_pruss. An alternative is to load the PRU via the Python module. check
ls /dev/uio*
and see if you have /dev/uio1 /dev/uio2 etc. If not modify /boot/uEnv.txt, comment the proc line
uboot_overlay_pru=/lib/firmware/AM335X-PRU-RPROC-4-4-TI-00A0.dtbo
uncomment pruss line
uboot_overlay_pru=/lib/firmware/AM335X-PRU-UIO-00A0.dtbo .
Reboot and check again. You can get an overview your config via
sudo /opt/scripts/tools/version.sh .
If it doesnt' work, your old bootloader in the eMMC is blocking u-boot overlays, you can fix it via:
sudo dd if=/dev/zero of=/dev/mmcblk1 bs=1M count=10
To properly prepare the GPIOs and the PRU to be used, you have to install the device tree overlay on your Beaglebone. Compile the DTS to a DTBO and move it to /lib/firmware folder. Load the DTS via uboot with the custom cape variable, dtboverlay. In the laser test we have
dtb_overlay=/lib/firmware/blinklaser.dtbo
You can check whether it is working via;
export PINS=/sys/kernel/debug/pinctrl/44e10800.pinmux/pins
cat $PINS | grep 'pin 101'
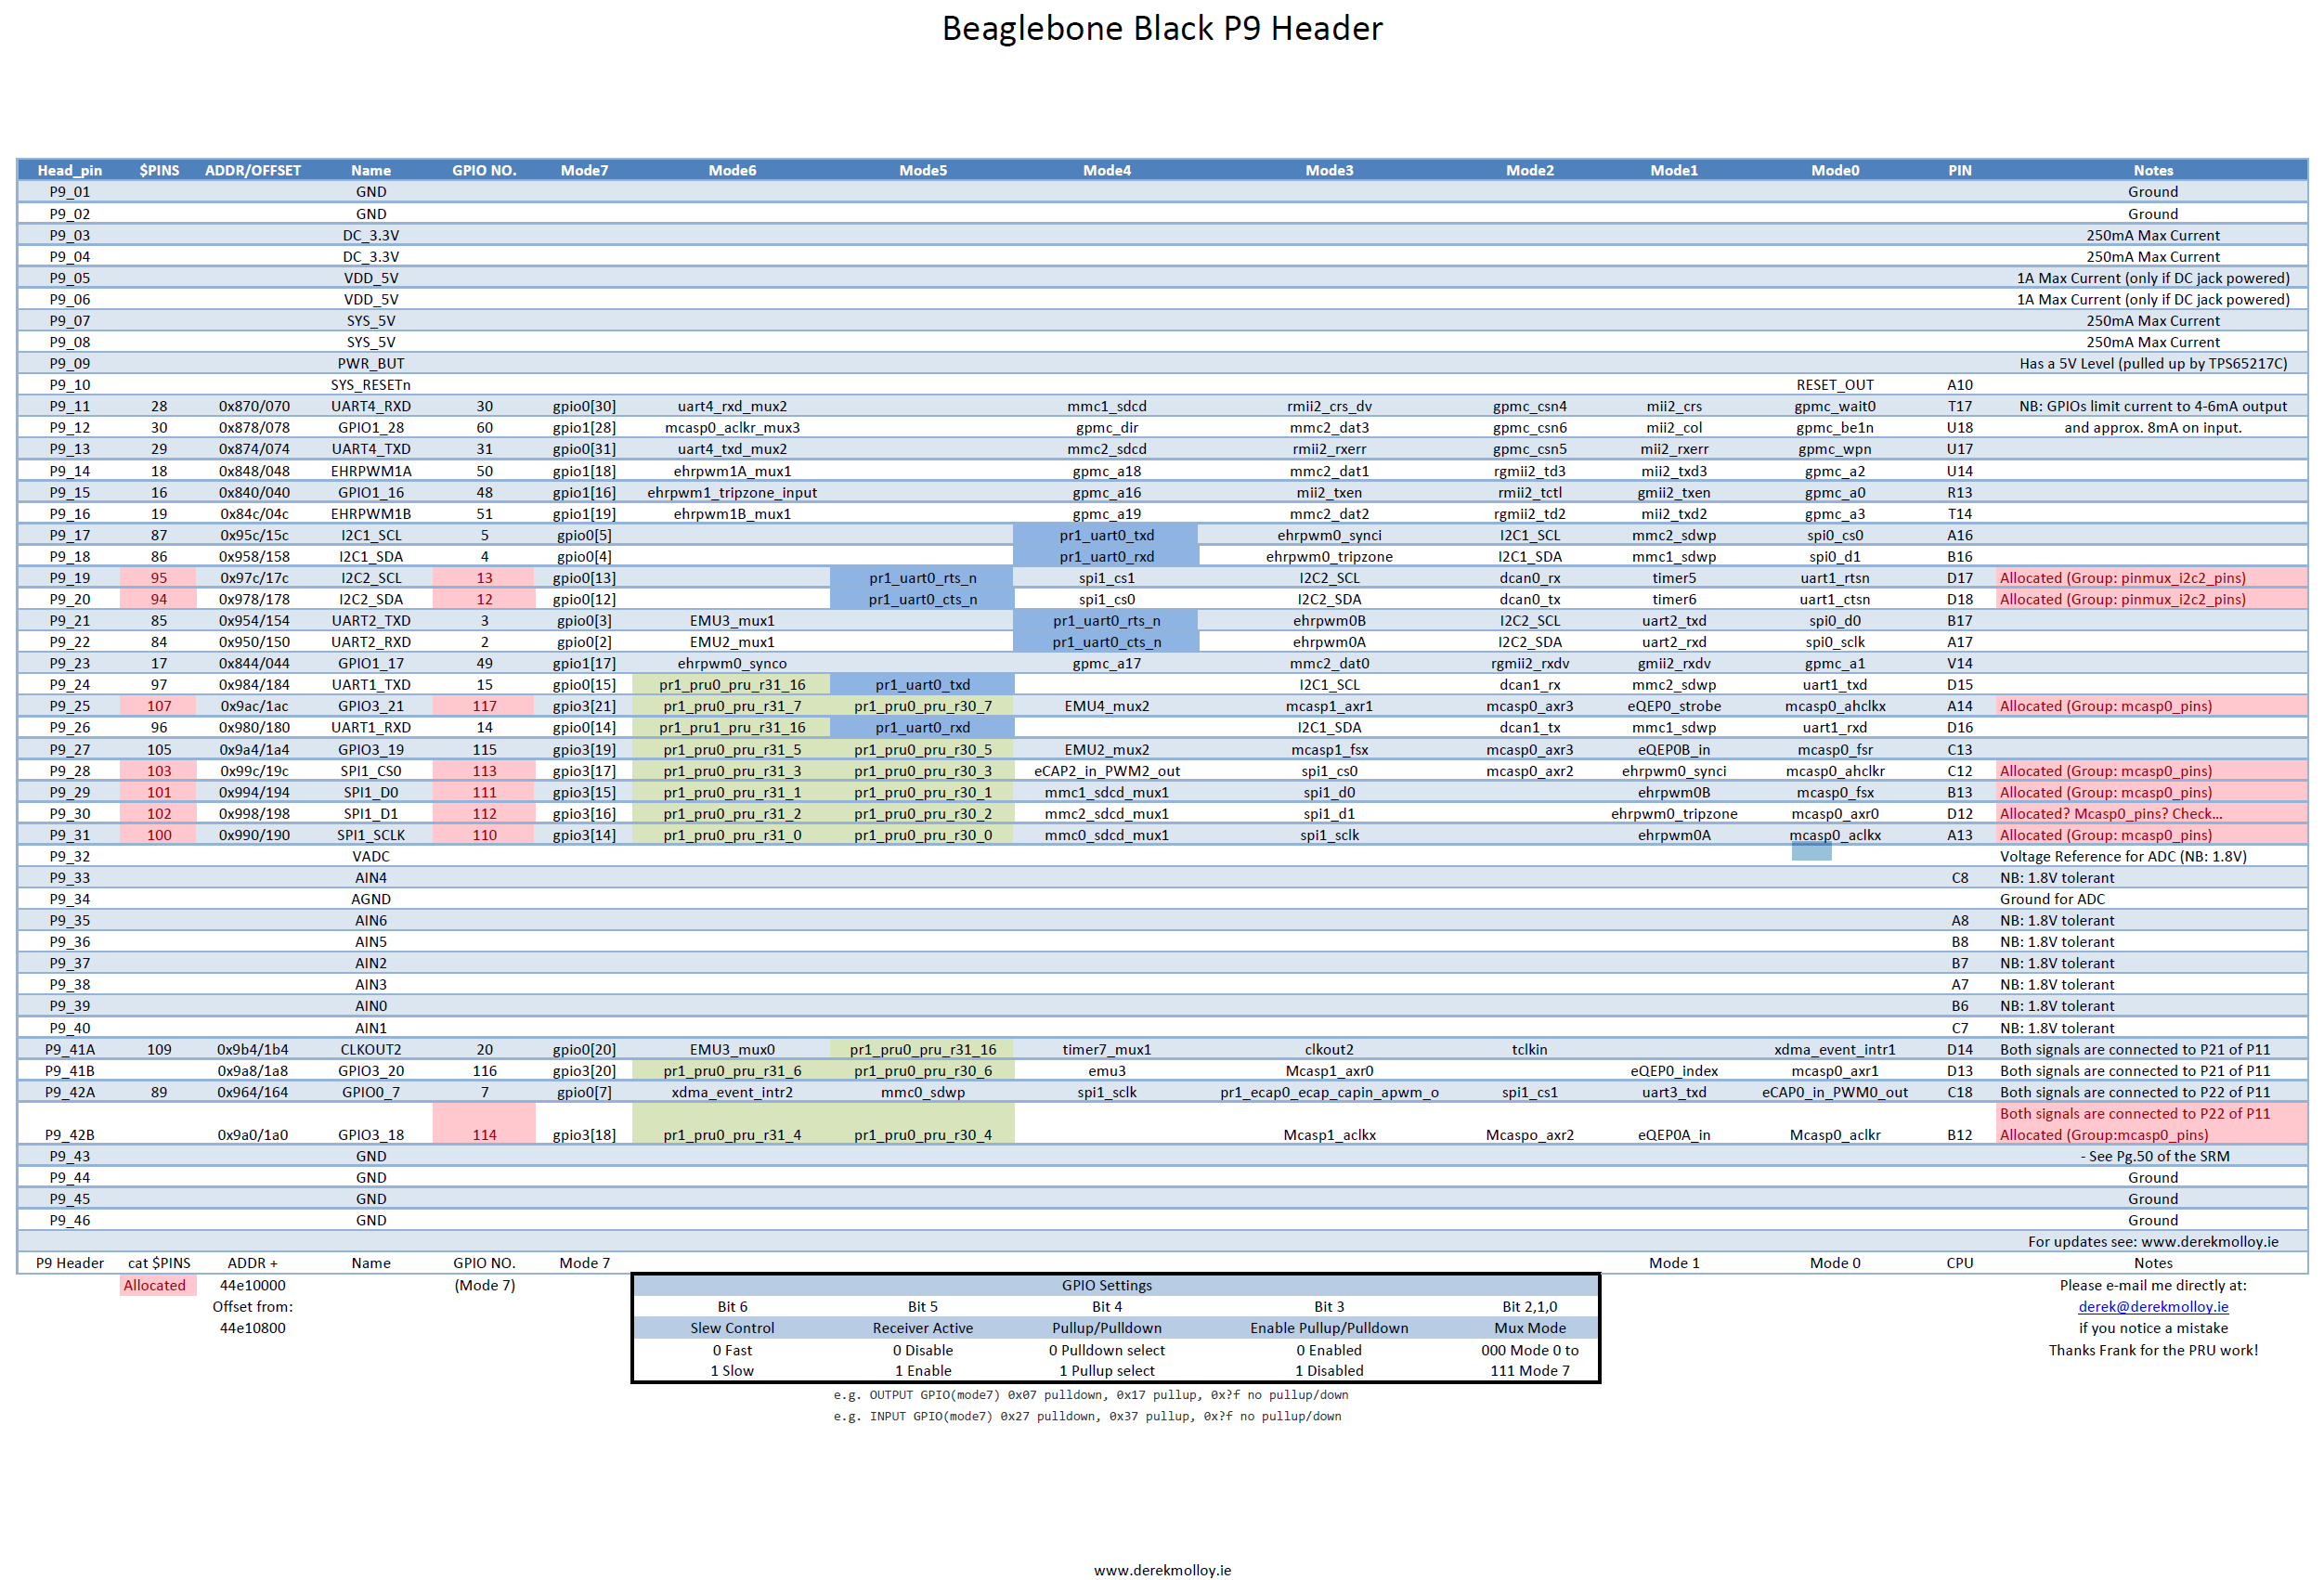
A good pinout view of the beagle bone is available here https://vadl.github.io/images/bbb/P9Header.png
Laser
Plug in the 5V and 12V source for the cape, so the laser driver has power.
Hook the fan to the board, it should spin. Run the following lines of code;
echo 110 > /sys/class/gpio/export
echo high > /sys/class/gpio/gpio110/direction
echo low > /sys/class/gpio/gpio110/direction
cat /sys/class/gpio/gpio110/direction
cat /sys/class/gpio/gpio110/value
ls -al /sys/class/gpio
If the laserdiode does not turn on it could be broken or the laserdiode driver could be broken.
Hook the fan to the laserdiode output and see if it spins. If it does the laserdiode is broken.
There is also a test script,
ldgraphy/scripts/firestarter_tests/laserdriver.py
Polygon driver
Run the test script ldgraphy/scripts/firestarter_tests/polydriver.py
The polygon should spin. Two types of polygon were considered.
The MASQ6DF15RS which are sold with a maximum speed of 24000 RPM although a label indicates they spin at 20787 RPM. A Chinese sticker has been placed to cover this number. The chip used is Panasonic AN44000A. The MASQ0DF9RV rotate at 21000 RPM. The chip used is NBC3111.
It was found at that both the input and output of these chips are different and the Panasonic chip rotates the polygon faster than what would be expected of a given pulse rate. We therefore chose to proceed with the NBC3111. The pulse pin of the Panasonic is AN44000A.
Photodiode
The python library is broken, so a python test script could not be made.
Turn on the laser via the command line.
echo 110 > /sys/class/gpio/export
echo high > /sys/class/gpio/gpio110/direction
Rotate the prism and measure the photodiode input. Pin 20 or pin 116 can be used.
echo 20 > /sys/class/gpio/export
echo in > /sys/class/gpio/gpio20/direction
cat /sys/class/gpio/gpio20/value
i2c is already in use; so you can't modify it you have to disable i2c http://www.embedded-things.com/bbb/enable-canbus-on-the-beaglebone-black/
P8 header
http://exploringbeaglebone.com/wp-content/uploads/resources/BBBP8Header.pdf
P9 header
http://exploringbeaglebone.com/wp-content/uploads/resources/BBBP9Header.pdf
Test