See FAQ for common problems not necessarily related to uPyLoader.
The tool is in Alpha version! It may hang or crash on certain user actions. Please, restart the application in such case.
- File upload and download over WiFi & UART
- Terminal over WiFI & UART
- Multiline input field with history
- Remote script execution
- Graphical interface for flashing firmware (via esptool)
- Editing via built-in or external editor
| Terminal | Code Editor | Settings |
|---|---|---|
 |
 |
 |
Download latest release executable and run it.
Please see this wiki page on running uPyLoader from source.
Please refer to this wiki page for instructions on how to edit and build source files.
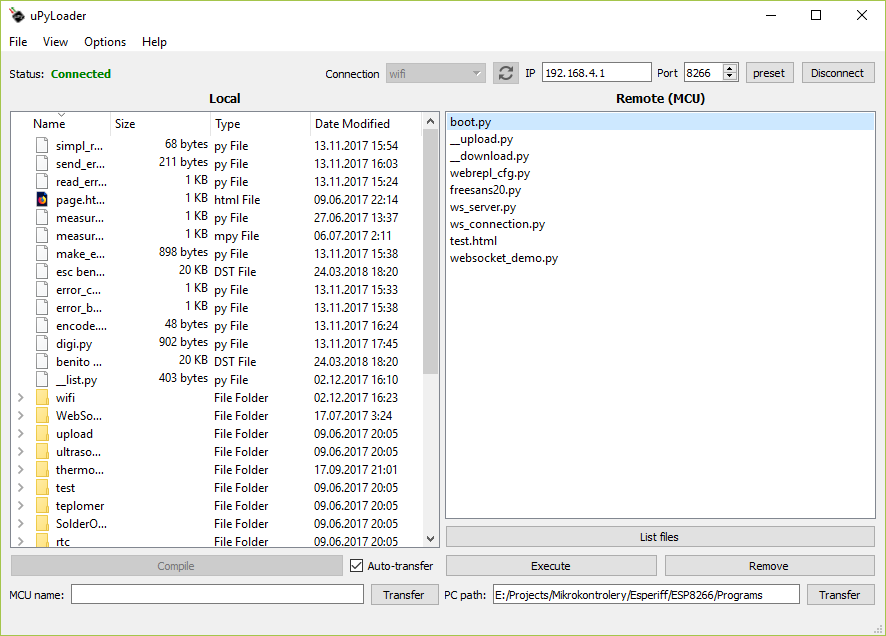
The main application window offers 2 colums:
- Left column shows local folder, double clicking a file opens it in Code Editor.
- Right column shows remote (MicroPython) folder. It should be populated when connection is established, but in case not,
List Filesbutton can be used to do so. Again, double clicking file opens it in Code Editor. To change root directory for local folder, useFile->Navigate.
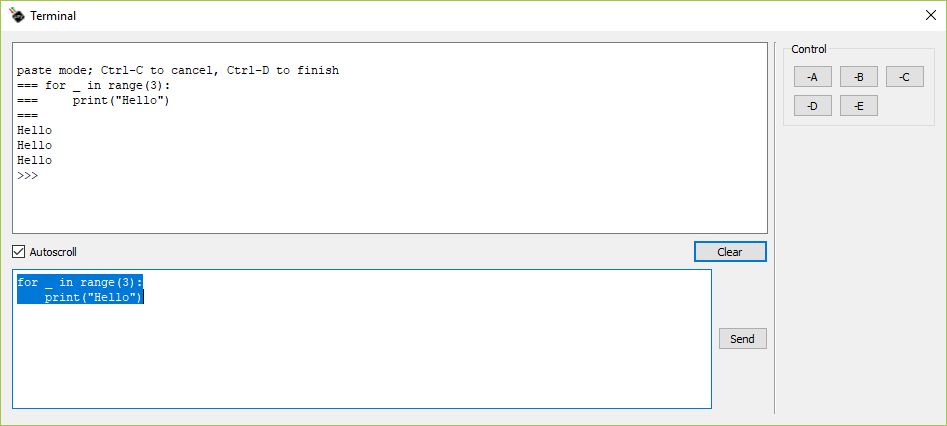
When connected, the application will allow opening the Terminal (View->Terminal).
The upper box in terminal shows output of the MicroPython on board. Although cursor is not visible in this box, it also accepts input that is immediately sent to remote device. This emulates usual terminal behaviour and allows for things such as input completion after pressing tab or sending special Ctrl-_ sequences (e.g Ctrl-C).
Lower box is used to prepare command for the board. Enter key is used to send the command. Shift-Enter creates new line. This can be changed in Options->Settings. The input also supports classic copy/paste via Ctrl+C, Ctrl+V. To browse through previous commands (input history), use Ctrl+UpArrow and Ctrl+DownArrow.
The control group can be used for sending special Ctrl-_ sequences. For example, sending Ctrl-C causes KeyboardInterupt and breaks any running code unless handled.
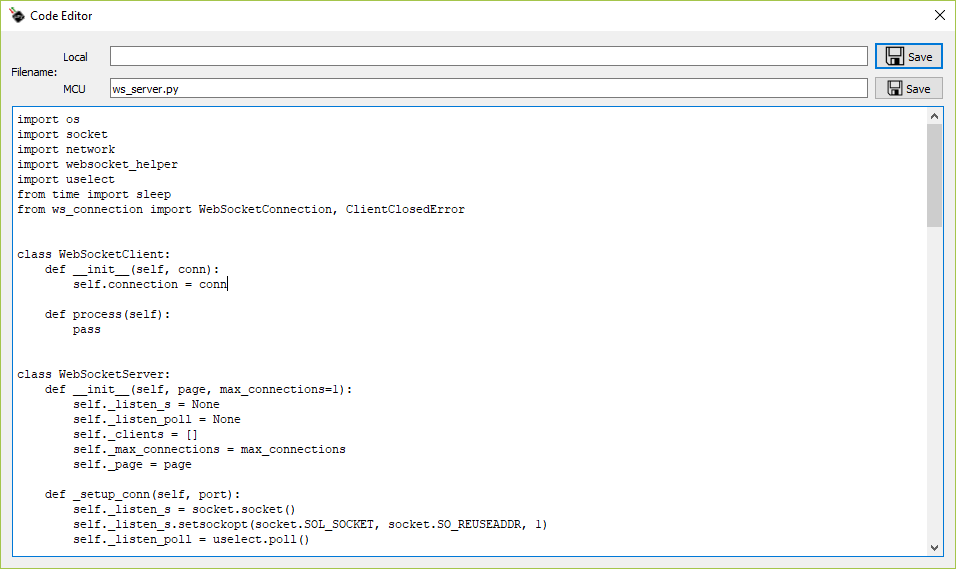
Code editor has single main element that shows script code. The editor is populated by double-clicking .py scripts in either of the main window's columns. The code can be either saved to local file or uploaded to remote device by using the Save buttons above the code editor element.
Note: Files in built-in editor are not currently refreshed upon external change. Double-click the file in local folder to refresh it.
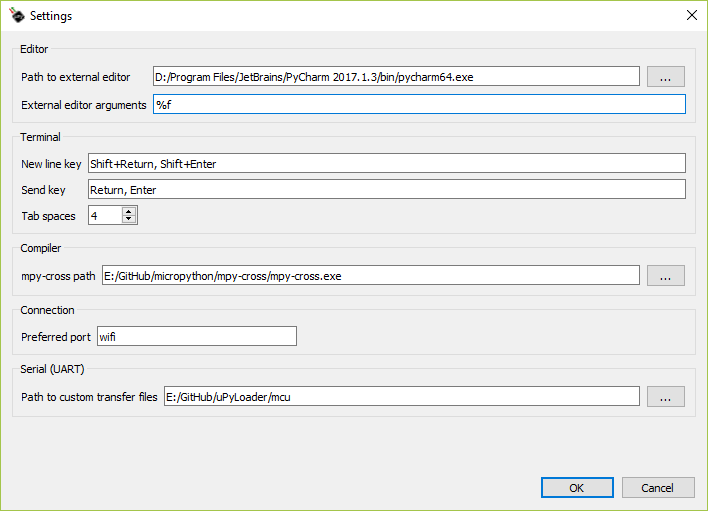
External code editor: In case the built-in editor is not sufficient, local files can be also opened in your favorite editor. This can be set up in Options->Settings. Enter absolute path to the editor into Path to external edito field and use External editor arguments to pass any required arguments. The arguments are delimited by ; character and special sequence %f will be replaced by absolute path to opened local file. For example, PyCharm editor can be used by entering Z:/Program Files (x86)/JetBrains/PyCharm 2016.3.2/bin/pycharm.exe to first field and only %f to second field.
On startup, the application scans for working UART connection and lists them in Port drop-down box. WiFi option is also listed there.
Select the desired connection port and click Connect. The status will change to green Connected on success.
When connecting through WiFi, make sure that you are connected to the AP of the board or the board is connected to the same local network and the IP is correct.
Note: If you are Linux user and your serial port doesn't show up in Port box even after refresh, try setting permissions for the port (e.g. sudo chmod 666 /dev/ttyUSB0, where ttyUSB0 is the serial port device).
Note: If connecting to the board over wifi for first time, older micropython version will ask for new password in WebREPL. To prevent stall, the password will be set automatically to passw. You can change it later in file webrepl_cfg.py (board reboot is required afterwards). New micropython version will ask for password when setting up the WebREPL.
File transfer for WiFi works out-of-the-box.
UART file transfer requires communication scripts on the side of board, unless this option is disabled as mentioned in Configuration section.
To upload communication scripts, use File->Init Transfer Files. These files greatly improve transfer speed and prevent communication errors. If the scripts are not present and were not disabled, the tranfer will stall and uPyLoader needs to be restarted.
To download file from MicroPython board, select it in the right, remote folder column and press Transfer underneath. The script will be transfered to a folder specified in PC path with the same name it had on the remote device.
To upload file, select it in left, local folder column, optionally edit it's name underneath in the MCU name box and press Transfer next to it. Files can be also uploaded in batches, in which case the name of the file will be kept same when transfering. To select multiple files for transfer, either drag over them or use ordinary ctrl/shift-click commands.
To remove script, select it by single clicking it in remote folder column and press Remove button.
Select the file in remote folder you wish to execute (by single-clicking it) and press Execute button.
Many boards have limited resources and compiling large scripts / modules results in errors such as memory allocation failure. For example, modules larger than only few hundred lines will fail to load on ESP8266, which requires splitting the code between more files and results in bad code organization. A better solution is to precompile source code into bytecode with mpy-cross tool. Generated bytecode files can be used in the same way as original source code files but require much less resources to load at run-time.
uPyLoader supports generating these bytecode files. First, path to mpy-cross has to be set in Options->Settings. After doing so, select script .py files in left, local column and click Compile, which should be now enabled. The bytecode files will be generated in the same folder as the original script files.
Building mpy-cross tool on Linux is straightforward. Windows users can use MinGW to build native executable which can be run by uPyLoader.
Open dialog by selecting File->Flash firmware. Because of mismatch between python version (uPyLoader == Python3, esptool == Python2), it is required that you select Python2 executable of environment which contains esptool (esptool can be added to environment with pip install esptool). In case that this executable can be called directly (e.g. on linux), it is sufficient to type python into Python2 path field. Otherwise, full path to executable must be specified. You can use Pick button next to the input field for browsing through directories. An example of full path on Windows is C:/Python27/python.exe.
Once correct Python2 executable is selected, choose firmware file that you would like to flash to ESP8266. Either enter full path to Firmware file field or use Pick button to browse. You can also choose if you would like to erase flash prior to writing new firmware by checking Erase flash (this operation takes aprox. 10 seconds). Select communication port from Port drop-down and check if you have ESP8266 wired up correctly (the correct wiring can be seen by clicking on Wiring instructions). If everything is in order, press Flash button. The Flasher output text-box should show progress of the operation and end with message Rebooting from flash mode... if successful.
The available options can be found under Options->Settings.
Configuration is saved in config.json file and can be modified manually if needed. However, backing up the config is recommended when doing so.
Currently, the UART transfer scripts can be only disabled by changing "use_transfer_scripts" to false manually.
- Refecting many of the past changes in this readme.
- The main GUI is now two-pane layout supporting file transfer between local host (PC) and remote device (MCU)
- Code editor became separate window which can be used to edit scripts in-place. Previous file-save functionality is preserved for fast workflow.
- UART communication protocol was changed to support transfer of binary files. The transfer scripts in the MCU needs to be updated. Use
File->Init Transfer Filesto do so.
mcu, ESP8266, micropython, IDE, uPyLoader, file transfer