


- Introduction
- Core concepts
- A few examples
- HTTP API
- Websocket API
- Web hooks
- Entities
- Core Installation
- Plugins installation
- Configuration
- The Web interface
- Mobile app
- Browser extension
- Tests
Platypush is a general-purpose and extensible platform for automation across multiple services and devices with hundreds of supported integrations.
It enables users to create their own self-hosted pieces of automation based on events (if this happens then do that) and it provides a comprehensive and customizable user interface that collects everything you need to visualize and control under one roof.
It borrows concepts from IFTTT, Tasker and Home Assistant to provide an environment where the user can easily connect things together. It focuses on an automation-as-code and API-first approach, offering power users great flexibility in customizing their routines.
It's built with compatibility and flexibility in mind, and it can easily run on any device that can run a Python interpreter - from a Raspberry Pi, to an old smartphone, to a beefy server.
You can use Platypush to do things like:
- Control your smart lights
- Control your music across multiple devices
- Create custom and privacy-secure voice assistants that run custom hooks on your phrases
- Build integrations between sensors, cameras, microphones and machine learning models to create smart pieces of automation for e.g. people detection or sound detection
- Display events from your calendars and build automation on them
- Build automation routines and visualizations from your sensors data
- Control and automate a self-built robot
- Deliver automated newsletters from custom RSS digests
- Synchronize the clipboards on your devices
- Implement custom text-to-speech logic
- Build any kind of automation routines with your Android device using Tasker
- Play local videos, YouTube videos and torrent media from any device and service, to any device, with support for Kodi, Chromecast, VLC, Jellyfin, Plex and more
- Get weather forecast events for your location and build automation routines on them
- Create a custom single hub for Zigbee and Z-Wave smart devices
- Build your own web dashboard with calendar, weather, news and music controls (basically, anything that has a Platypush web widget)
- ...and much more (basically, anything that comes with a Platypush plugin).
The full list of available integrations is available at docs.platypush.tech, which also contains a more in-depth wiki on the features supported by the platform.
The wiki is also mirrored on git.platypush.tech.
The blog regularly publishes content with step-by-step tutorials and recipes.
The foundations of Platypush rest on a few simple building blocks that offer great versatility to build arbitrarily complex automation routines:
-
🧩 Plugins. Plugins are the bread-and-butter of the platform. Each plugin exposes an API to interact with an integration - there are plugins for media players and devices, calendars, sensors, voice assistants, smart devices, cloud services, and so on.
-
⏻ Actions. These are the methods of a plugin transparently exposed to the user over a simple JSON RPC API, and they are always expressed in the format
<plugin_name>.<action_name>. For instance,light.hue.oncan be used to turn on Philips Hue-compatible lights,media.vlc.playto play some media on a VLC player, etc. -
⚙️ Backends. These are special integrations whose main purpose is to deliver messages to the main application. The principal one is the
httpbackend, which exposes the HTTP and WebSocket APIs, serves the main UI and is used by several integrations to provide additional services. Anoderedbackend is also available to expose a Platypush action component to a Node-RED instance, as well as an internalredisbackend and an (insecure)tcpbackend to receive raw messages.
-
-
📧 Events. Plugins emit events whenever some particular conditions happen for example, a new media track is played, a voice assistant conversation has started, and so on.
- 🪝 Hooks. Users can define custom callbacks on events in the form of hooks. Hooks can contain lists of actions to execute when a certain event matches the hook condition, or any kind of custom logic - for example, send a notification on my phone when the presence sensor in my garage goes on, or use a TTS plugin to process the digest of the latest RSS feeds if I tell the voice assistant "play the news". Event hooks can be expressed either in YAML format or as Python runtime scripts.
-
📜 Procedures. Procedures are custom snippets of logic that can be invoked using the Platypush API. For example, you can define an
at_homeprocedure that will be executed when you arrive home, which turns on the lights, plays the music, sets the thermostat temperature etc., and then call it using the Platypush API from any device. Like event hooks, procedures can be defined both in YAML format (good if you just want to execute lists of actions without much added logic), or as Python scripts.- 🕗 Cronjobs. Cronjobs are special procedures that can be executed either at regular intervals (the UNIX cron syntax is supported), or at a specific time (one-shot). Just like procedures, they can be defined either in YAML or as Python scripts.
-
💡 Entities. Some plugins expose generic entities - such a lights, sensors, media players, switches, voice assistants etc. These entities can be controlled through the same generic APIs, emit the same types of events, can be controlled from the same Web view or dashboard, and their state is persisted across runs.
The bulk of the configuration of Platypush lives under the config.yaml file.
An extensive config.yaml
example
is provided in the repo. All the sections are optional - the only one enabled by
default is the HTTP server, backend.http, but that is optional too.
Let's take an example where we want to control the following entities:
-
A Philips Hue bridge and its connected smart lights.
-
An on-device voice assistant (we'll consider the Google Assistant in this example as it's the easiest to configure, although Google deprecated the Assistant libraries long ago).
-
A compatible music player - we'll consider MPD/Mopidy in this example as they are the ones best supported in Platypush, and Mopidy also offers plugins with basically any audio backend out there.
We'll need the following plugins enabled in the config.yaml:
light.hueassistant.googlemusic.mopidyormusic.mpd(they expose the same API)
The documentation pages of these plugins already provide some comprehensive configuration snippets that you can use.
The most basic configuration would be something like this:
# Enable it if you want the enable the HTTP API and the Web interface
backend.http:

light.hue:
  # IP/hostname of the Hue bridge
  bridge: 192.168.1.10
  # Default groups that should be targeted by actions if none is specified
  # (default: all lights/groups)
  groups:
    - Living Room

# Check the plugin documentation on how to get the credentials
assistant.google:

music.mopidy:  # Or music.mpd
  # IP/hostname of the MPD/Mopidy server
  host: 192.168.1.2
Now that we have our integrations configured, let's build some automation routines.
In this case we will have to create a hook that listens to a
SpeechRecognizedEvent
triggered by the assistant - for example, when we say "OK, Google" followed
by "turn on the lights".
We can declare the hook in YAML format directly in the config.yaml, or in one
of the files included in it through the include: directive:
event.hook.turn_lights_on_voice_command:
  if:
    type: platypush.message.event.assistant.SpeechRecognizedEvent
    # Note that a minimal regex-like syntax is supported here.
    # This condition matches both a phrase that contains
    # "turn on the lights" and one that contains "turn on lights"
    phrase: "turn on (the)? lights"
  then:
    - action: light.hue.on
      args:
      groups:
        - Living Room
Or we can declare the hook in a Python script - you just have to create a .py
file (e.g. lights.py) under a scripts directory located under the same
folder as your config.yaml:
from platypush import run, when
from platypush.events.assistant import SpeechRecognizedEvent

@when(SpeechRecognizedEvent, phrase="turn on (the)? lights")
def lights_on_voice_command():  # Also accepts an optional `event` argument
  run('light.hue.on', groups=['Living Room'])
Or, using the get_plugin API:
from platypush import get_plugin, when
from platypush.events.assistant import SpeechRecognizedEvent

@when(SpeechRecognizedEvent, phrase="turn on (the)? lights")
def lights_on_voice_command():
get_plugin('light.hue').on(groups=['Living Room'])The approach is similar for a "play the music" voice command. YAML:
event.hook.play_music_voice_command:
  if:
    type: platypush.message.event.assistant.SpeechRecognizedEvent
    phrase: "play (the)? music"
  then:
    - action: music.mopidy.play
Python:
from platypush import run, when
from platypush.events.assistant import SpeechRecognizedEvent

@when(SpeechRecognizedEvent, phrase="play (the)? music")
def lights_on_voice_command():
run('music.mopidy.play')This example requires the sun
plugin configured:
sun:
  latitude: LAT
  longitude: LONG
You can then simply subscribe to
SunsetEvent.
YAML:
event.hook.sunset_lights_on:
  if:
    type: platypush.message.event.sun.SunsetEvent
  then:
    - action: light.hue.on
Python:
from platypush import run, when
from platypush.events.sun import SunsetEvent

@when(SunsetEvent)
def sunset_lights_on():
run('light.hue.on')You can also operate token extraction from event arguments if the values are strings.
For example, you can use advanced pattern matching and token extraction to create voice assistant hooks that will match a template with parametrized field which will be passed as arguments to your event hook:
from platypush import run, when
from platypush.events.assistant import SpeechRecognizedEvent

@when(SpeechRecognizedEvent, phrase='play ${title} by ${artist}')
def on_music_play_command(event, title, artist):
  results = run(
    'music.mpd.search',
    filter={
      'artist': artist,
      'title': title,
    }
  )

  if results:
run('music.mpd.play', results[0]['file'])Your event hooks can include more complex filters too. Structured filters against partial event arguments are also possible, and relational operators are supported as well. For example:
from platypush import when
from platypush.events.sensor import SensorDataChangeEvent

@when(SensorDataChangeEvent, data=1):
def hook_1(event):
    """
    Triggered when event.data == 1
    """

@when(SensorDataChangeEvent, data={'state': 1}):
def hook_2(event):
    """
    Triggered when event.data['state'] == 1
    """

@when(SensorDataChangeEvent, data={
  'temperature': {'$gt': 25},
  'humidity': {'$le': 15}
}):
def hook_3(event):
    """
    Triggered when event.data['temperature'] > 25 and
    event.data['humidity'] <= 15.
    """
The supported relational fields are the same supported by ElasticSearch - $gt
for greater than, $lt for lesser than, $ge for greater or equal, $ne for
not equal, etc.
We can use a cron for this case. YAML:
cron.lights_off_night:
  # Run this every day at 1 AM
  cron_expression: '0 1 * * *'
  actions:
      - action: light.hue.off
Python:
from platypush import cron, run

@cron('0 1 * * *')
def lights_off_night():
run('light.hue.off')Let's create an at_home procedure for this purpose. We can also use a
text-to-speech plugin like the tts
plugin (it requires no
configuration as it relies on the Google Translate frontend API, but other,
more sophisticated plugins are also available) to have a warm voice to welcome
us home. YAML:
# Make sure that the sound plugin is also enabled, for audio processing
sound:

procedure.at_home:
  - action: tts.say
    args:
      text: "Welcome home!"

  # Get luminosity data from a sensor - e.g. LTR559
  - action: gpio.sensor.ltr559.get_data

  # If it's lower than a certain threshold, turn on the lights.
  # Note that we can directly access attributes returned by the
  # previous request(s) as local context variables within the
  # procedure/hook/cron. In this case, `light` is an attribute returned
  # on the response of the previous command.

  # Otherwise, you can also use the special `output` variable to get only
  # the response of the latest action, e.g. `output['light']`

  # Also note the use of the special `if ${}` construct. It accepts
  # a snippet of Python code and it can access variables within the
  # current context.
  - if ${light is not None and light < 110}:
      - action: light.hue.on

  - action: music.mopidy.play
    args:
      resource: "uri:to:my:favourite:playlist"
Python:
from platypush import procedure, run

@procedure("at_home")
def at_home_proc():
  run('tts.say', text='Welcome home!')

  luminosity = run('gpio.sensor.ltr559.get_data').get('light', 0)
  if luminosity < 110:
    run('light.hue.on')

  run('music.mopidy.play', resource='uri:to:my:favourite:playlist')
You can then call the procedure from a hook or another script:
from platypush import run

run('procedure.at_home')
Or, from YAML:
procedure.some_other_procedure:
  - action: procedure.at_home
Or using the API (see next section).
Actions and procedures can also be called using the JSON-RPC API exposed by Platypush.
Your configuration requires the backend.http
section enabled if
you want to use the HTTP API - default listen port: 8008.
After ensuring that the HTTP backend is enabled, head to
http://localhost:8008 and register a new user.
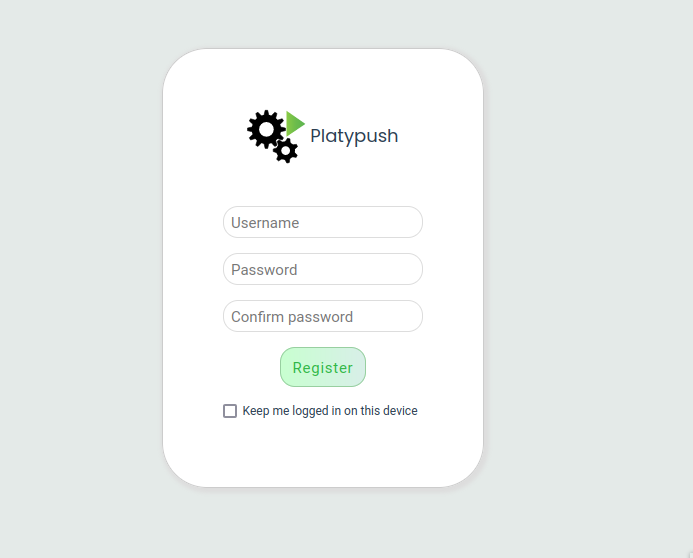
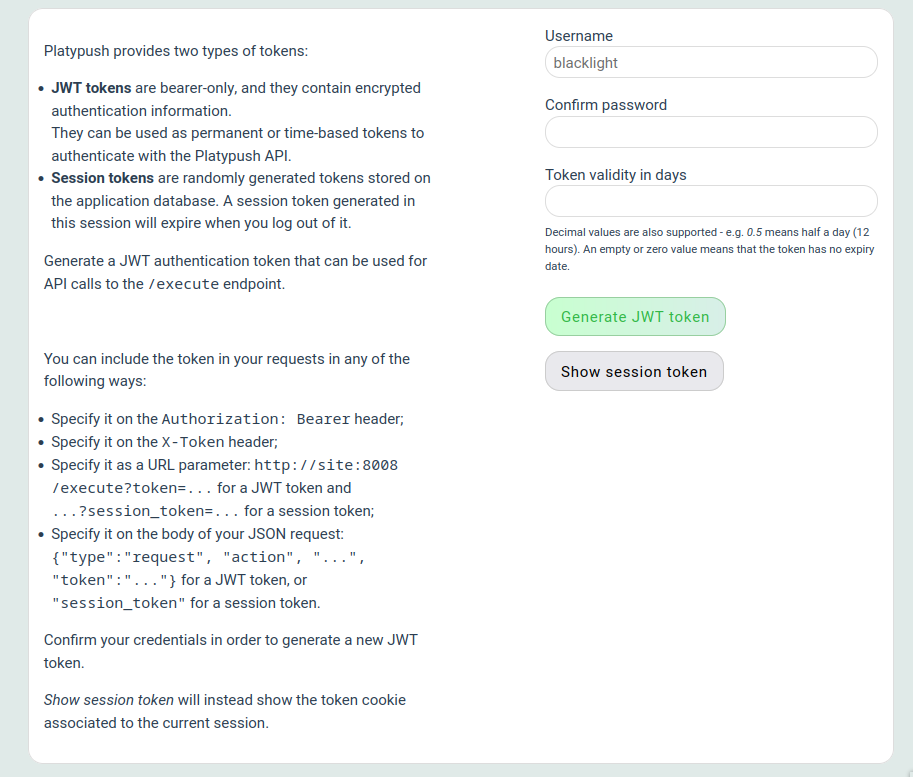
From the Web UI, head to Settings → Tokens, insert your password again and click Generate JWT token.
Alternatively, you can retrieve a token via HTTP request:
❯ curl -XPOST -H 'Content-Type: application/json' -d '
{
  "username": "$YOUR_USER",
  "password": "$YOUR_PASSWORD"
}' http://localhost:8008/auth
You can then send requests to Platypush using a simple RPC API:
❯ curl -XPOST \
    -d '{"type":"request", "action":"procedure.at_home"}' \
    -H "Authorization: Bearer $YOUR_TOKEN" \
    -H "Content-Type: application/json" \
    http://localhost:8008/execute
❮
{
  "id": "724754df98968247a284557ce32f74bb",
  "type": "response",
  "target": "http",
  "origin": "myhost",
  "_timestamp": 1716575901.046127,
  "response": {
    "output": {
      "success": true
    },
    "errors": []
  }
}
If your procedure returned something, then that will be returned on the API response too, so downstream consumers can use it.
The POST /execute endpoint accepts a payload in the format:
{
  "type": "request",  // Constant
  "action": "<plugin-name>.<action-name>",  // Or procedure.<name>
  "args": {
    "arg1": "arg2",
    // ...
  }
}
In our procedure.at_home example, you can for instance create an automation
snippet paired with your phone that runs the routine whenever you arrive home
(or your phone does):
-
Install an app like Tasker to create automation tasks on your Android device.
-
Install a plugin like AutoLocation to create automation tasks based on your phone's location.
-
Create a profile that triggers whenever you enter your home location (and/or exit it).
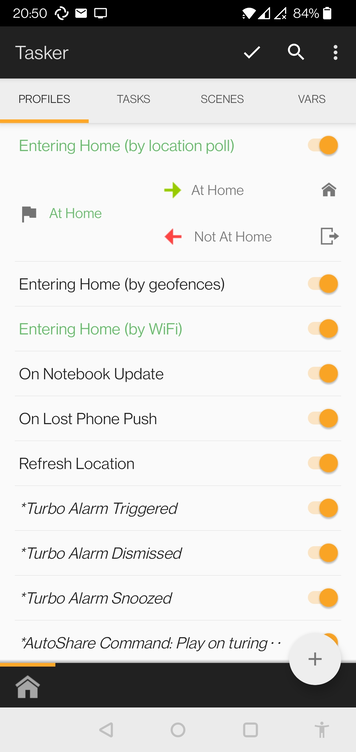
- Leverage the HTTP Request Tasker action to send a request to your Platypush API to trigger the routine.
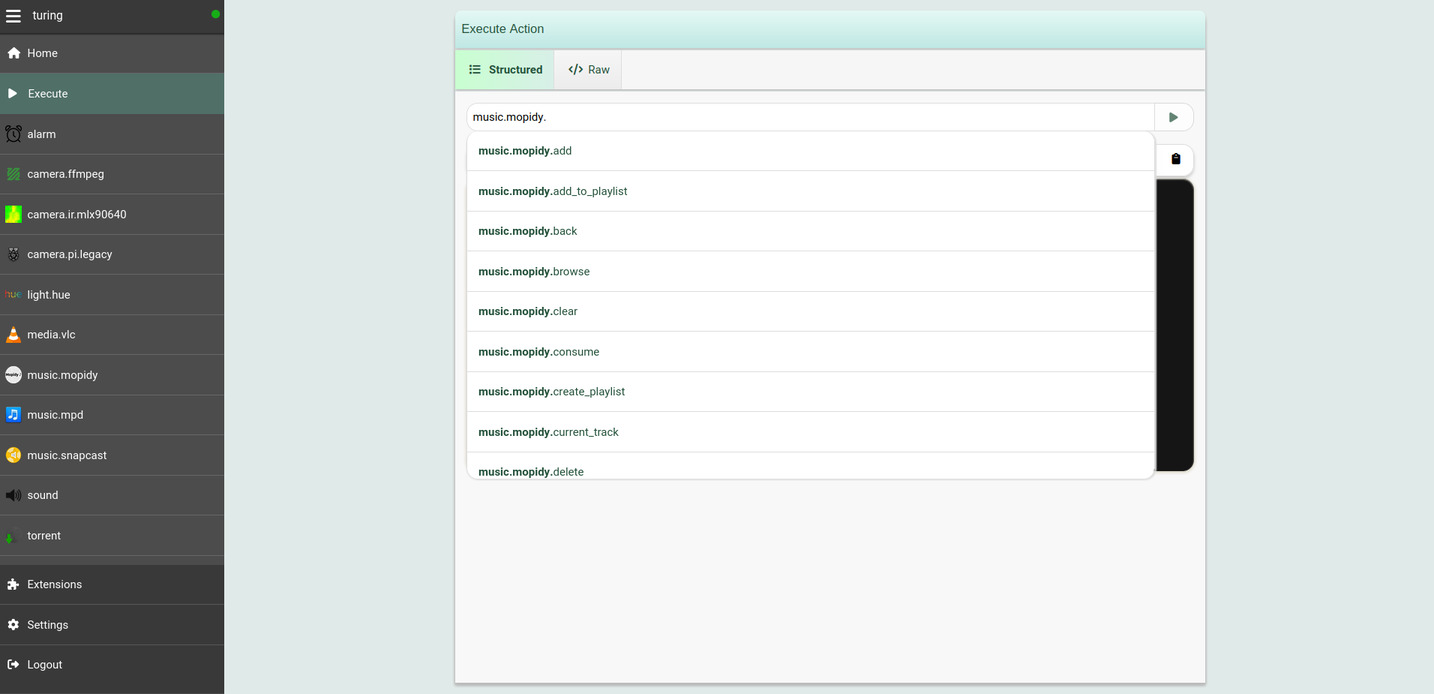
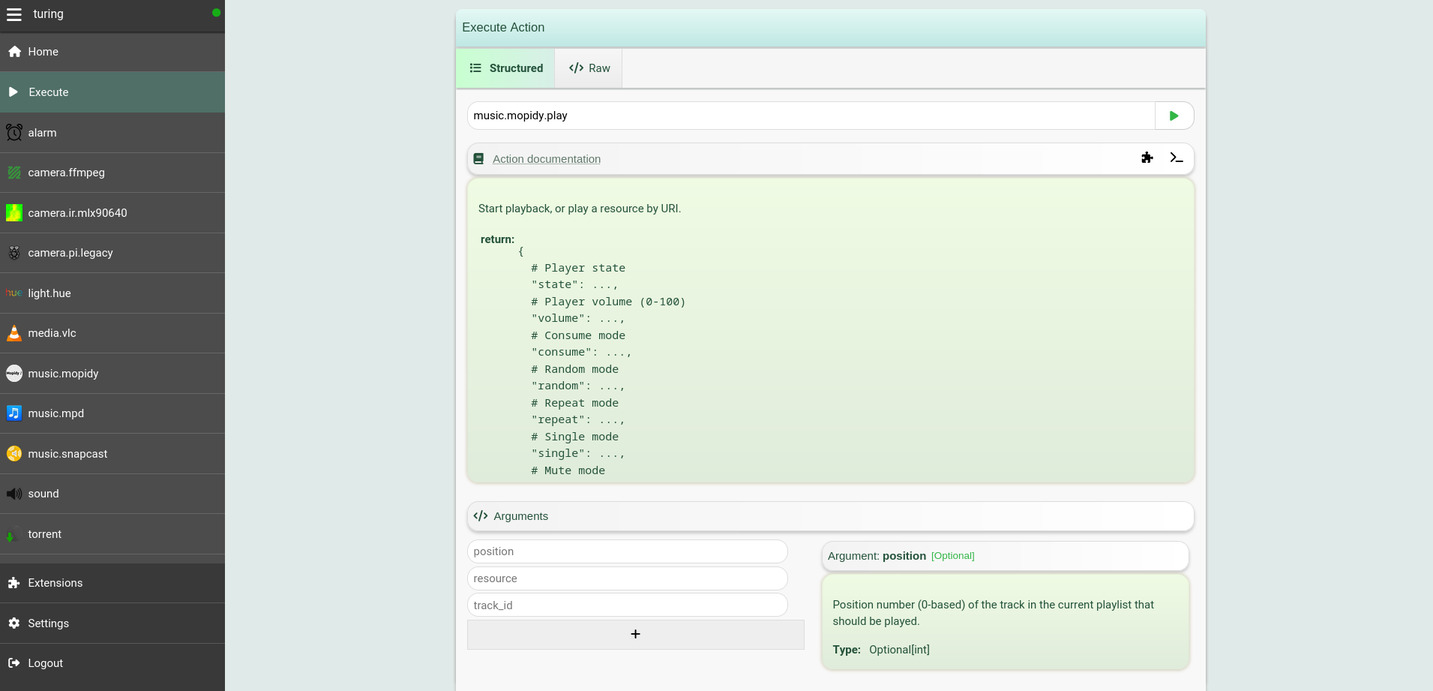
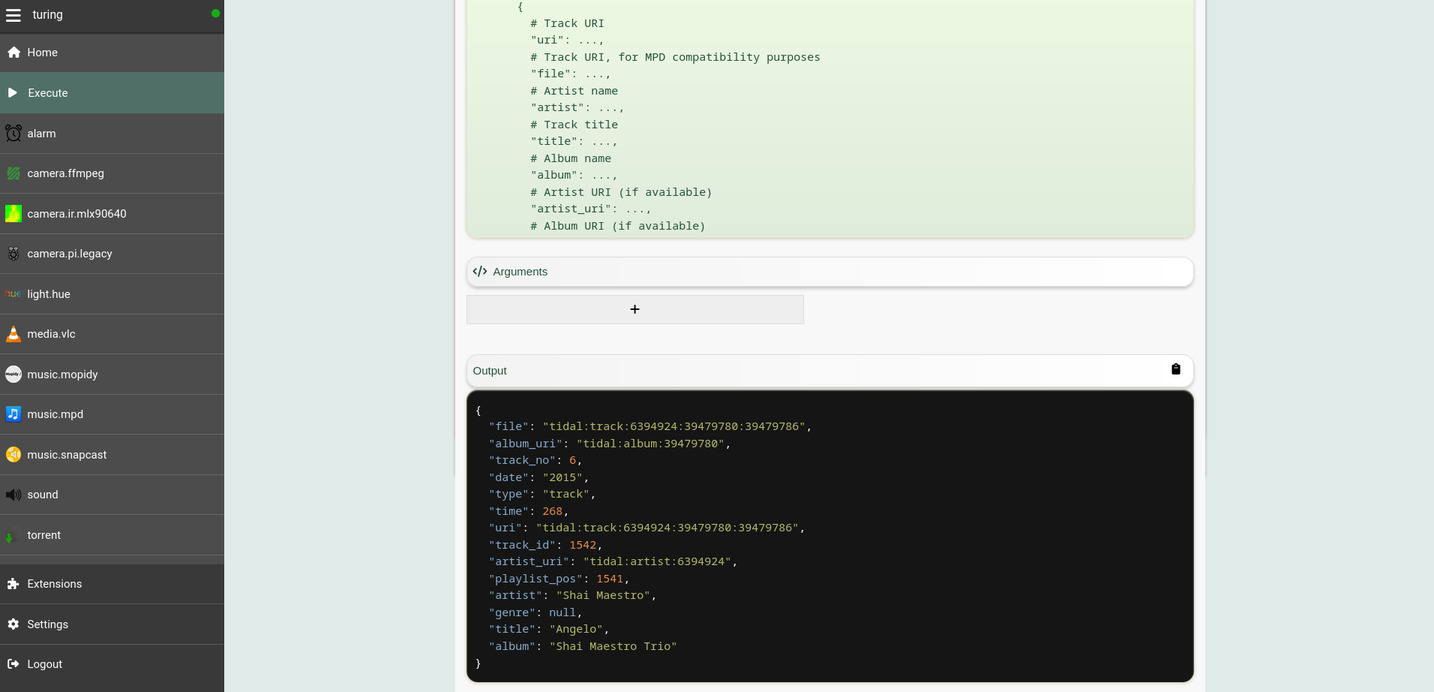
The Web interface also provides an Execute tab under the menu sidebar. You can use this tab to dynamically discover the actions exposed by various plugins (and also your own procedures):
You can subscribe to events generated by the application over the /ws/events
Websocket endpoint, and send events to this endpoint too.
This is useful if you want to synchronize Platypush events with another client, or send custom events outside of those native to the application and build custom automation hooks on them.
Sending events:
❯ wscat -H "Authorization: Bearer $YOUR_TOKEN" \
    -c "ws://localhost:8008/ws/events" \
    -w 1 \
    -x '
{
  "type": "event",
  "args": {
    "type": "platypush.message.event.custom.CustomEvent",
    "subtype": "foo",
    "args": {
      "bar": "baz"
    }
  }
}'
Receiving events:
❯ wscat -H "Authorization: Bearer $YOUR_TOKEN" -c "ws://localhost:8008/ws/events"You can also send requests to the /ws/requests Websocket endpoint, and get
responses asynchronously on the same channel:
❯ wscat -H "Authorization: Bearer $YOUR_TOKEN" \
    -c "ws://localhost:8008/ws/requests" \
    -w 1 \
-x '{"type": "requests", "action": "procedure.foo.bar"}'You can use Platypush to expose your custom routines as dynamic Web hooks that can be called by any client.
All you need is to register a listener for a
WebhookEvent
from platypush import run, when
from platypush.events.http.hook import WebhookEvent

hook_token = "abcdefabcdef"

# Expose the hook under the /hook/at_home endpoint
@when(WebhookEvent, hook="at_home")
def at_home_webhook(event: WebhookEvent):
    # Unlike the calls to /execute, custom web hooks are unauthenticated.
    # If you want authentication, you'll need to implement your custom logic by
    # parsing the event headers
    if event.headers.get("X-Token") != hook_token:
        # Tuple with <response, http-code, [response-headers]>
        event.send_response(("Unauthorized", 401))
        return

    run('procedure.at_home')

    # Return anything back to the client
    return {'status': 'ok'}
Then you can invoke your custom logic over HTTP:
❯ curl -H 'X-Token: abcdefabcdef' 'http://localhost:8008/hook/at_home'Entities are another building block of Platypush. Many integrations will store their state or connected devices in the form of entities - e.g. the sensors detected by the Z-Wave/Zigbee/Bluetooth integration, or the lights connected to a Hue bridge, or your cloud nodes, or your custom Arduino/ESP machinery, and so on.
Entities provide a consistent interface to interact with your integrations regardless of their type and the plugin that handles them. For instance, all temperature sensors will expose the same interface, regardless if they are Bluetooth or Zigbee sensors, and all the media plugins will expose the same interface, regardless if they manage Chromecasts, Kodi, Plex, Jellyfin or a local VLC player.
Once you enable the HTTP backend and a few integrations that export entities and register a user, you can query the detected entities via:
curl -XPOST -H 'Content-Type: application/json' \
    -H "Authorization: Bearer $YOUR_TOKEN" \
    -d '{"type":"request", "action":"entities.get"}' \
    http://localhost:8008/execute
All the entities expose the same interface and can be manipulated through the
same API. Also, when an entity is updated it always emits an
EntityUpdateEvent,
so you can easily create hooks that react to these events and act on multiple
types of entities.
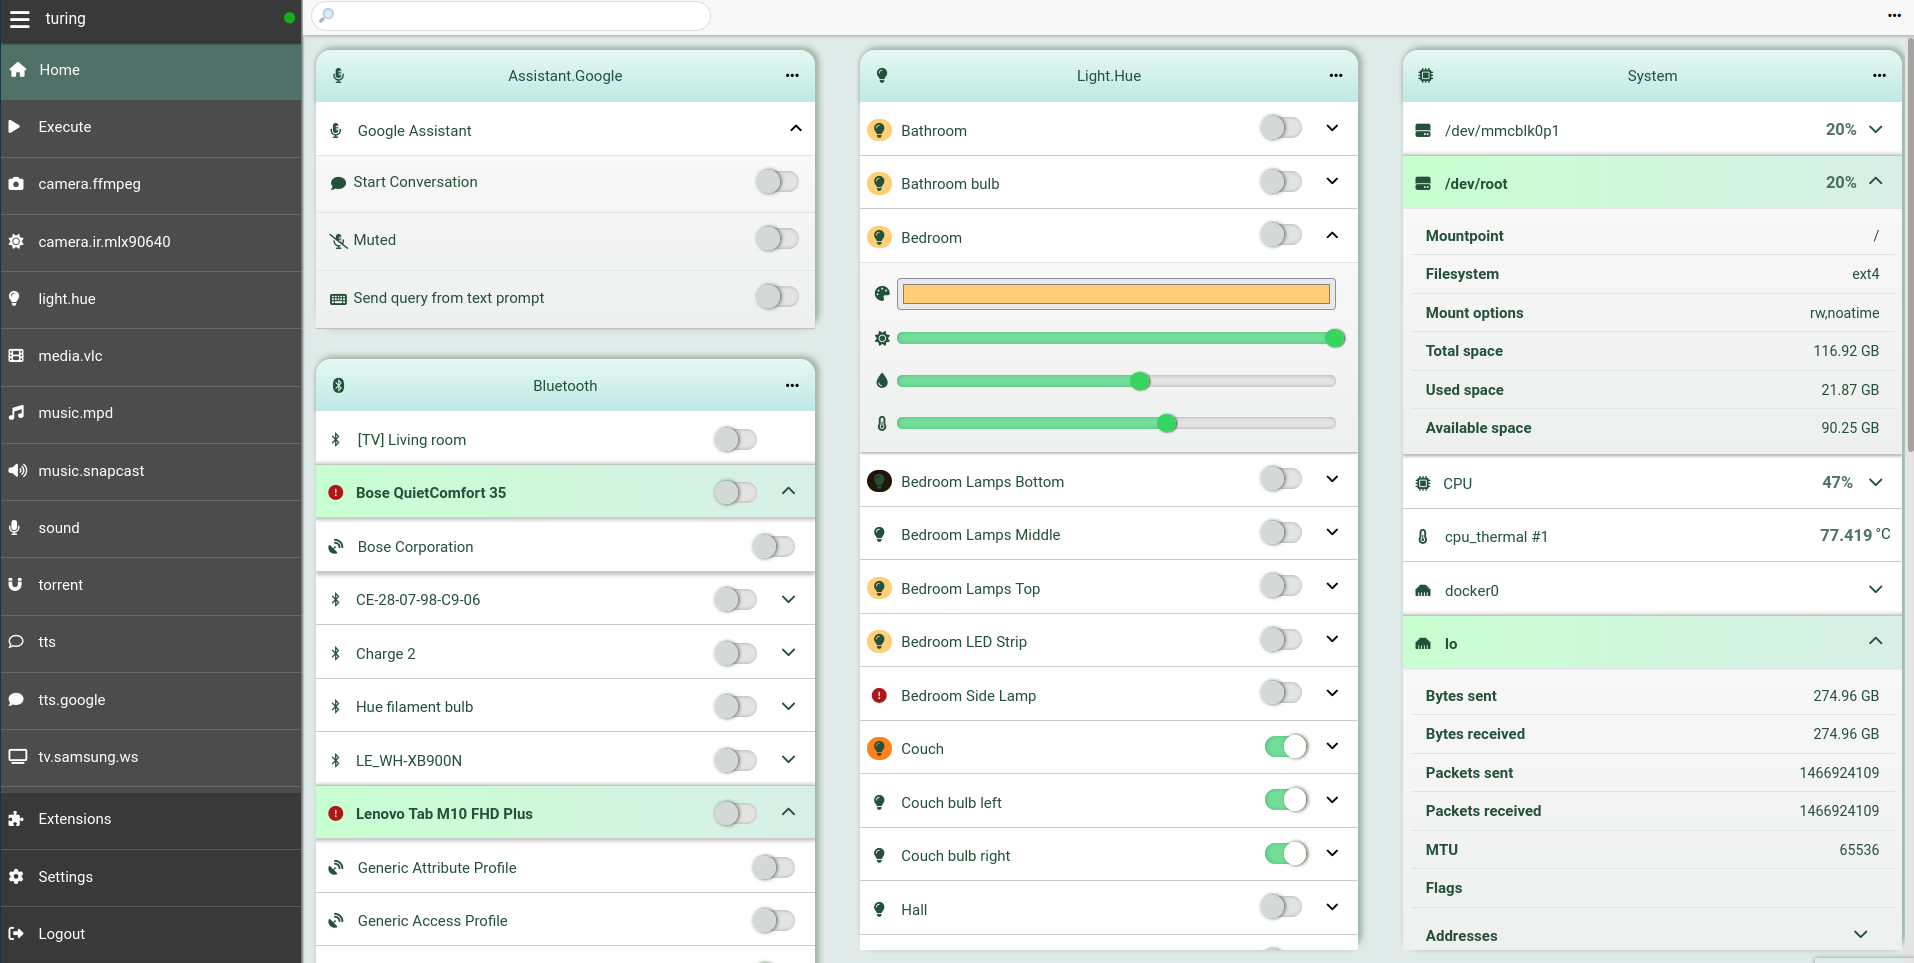
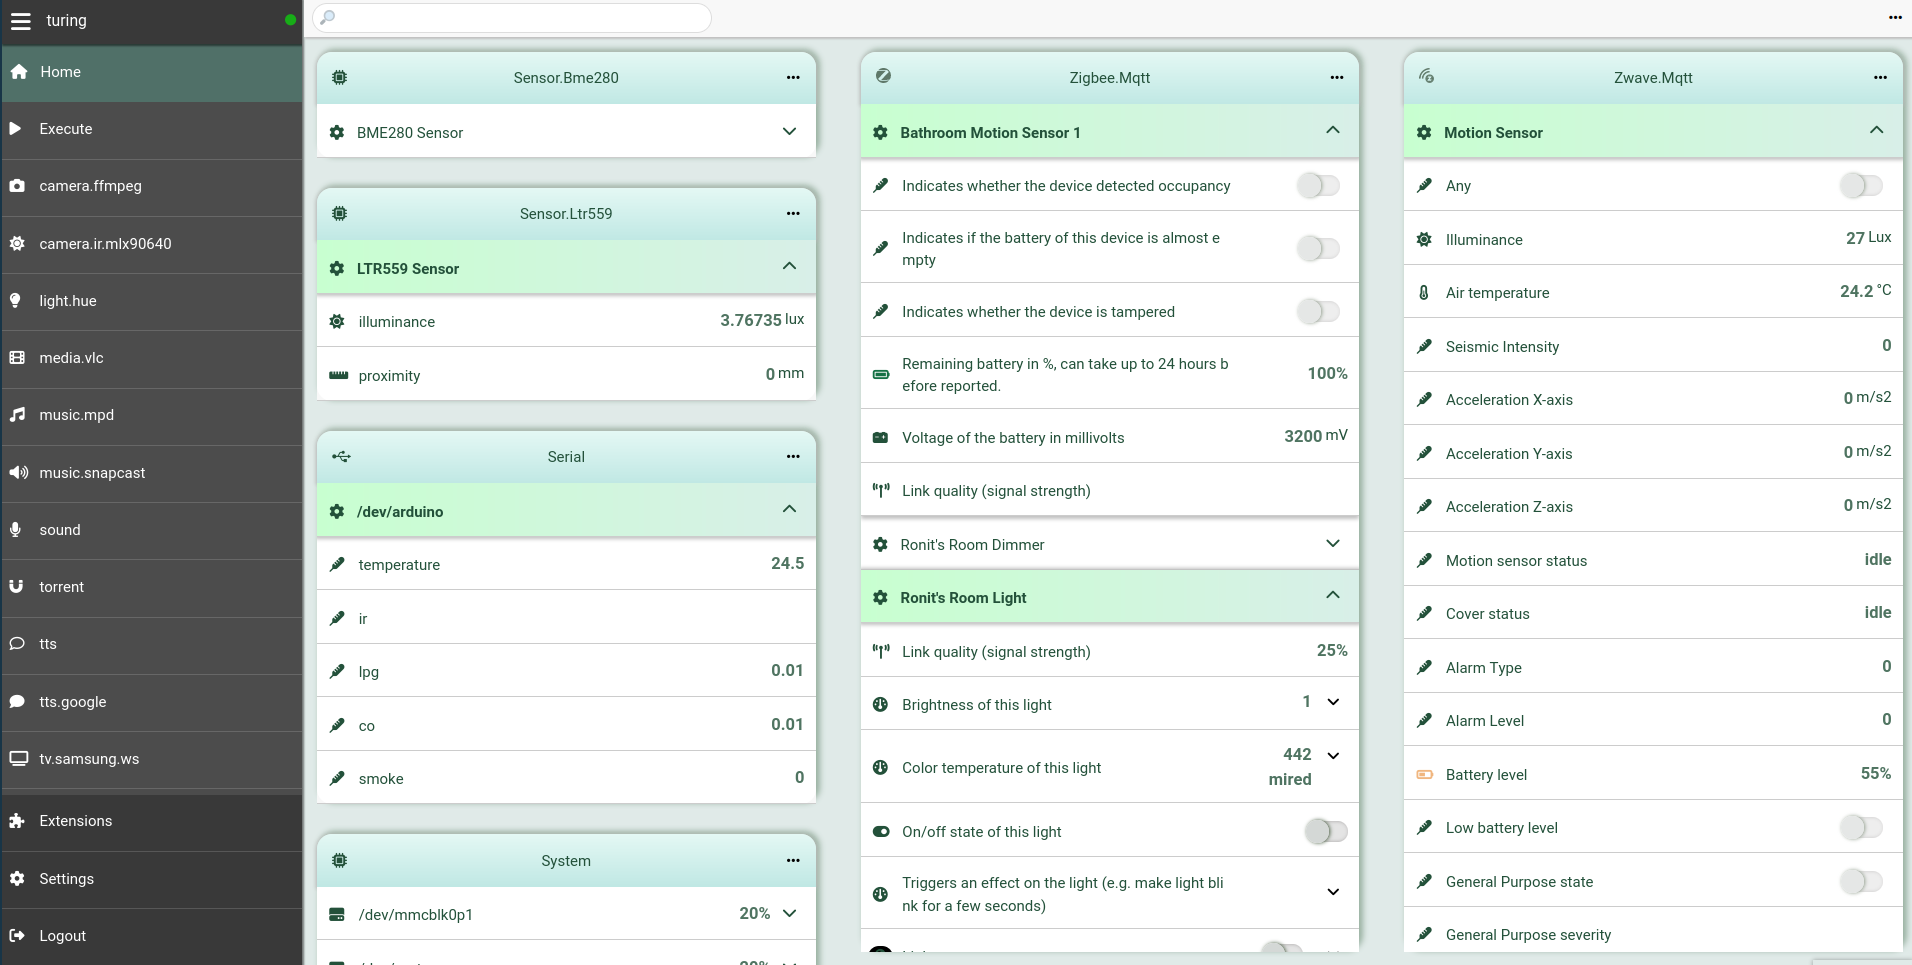
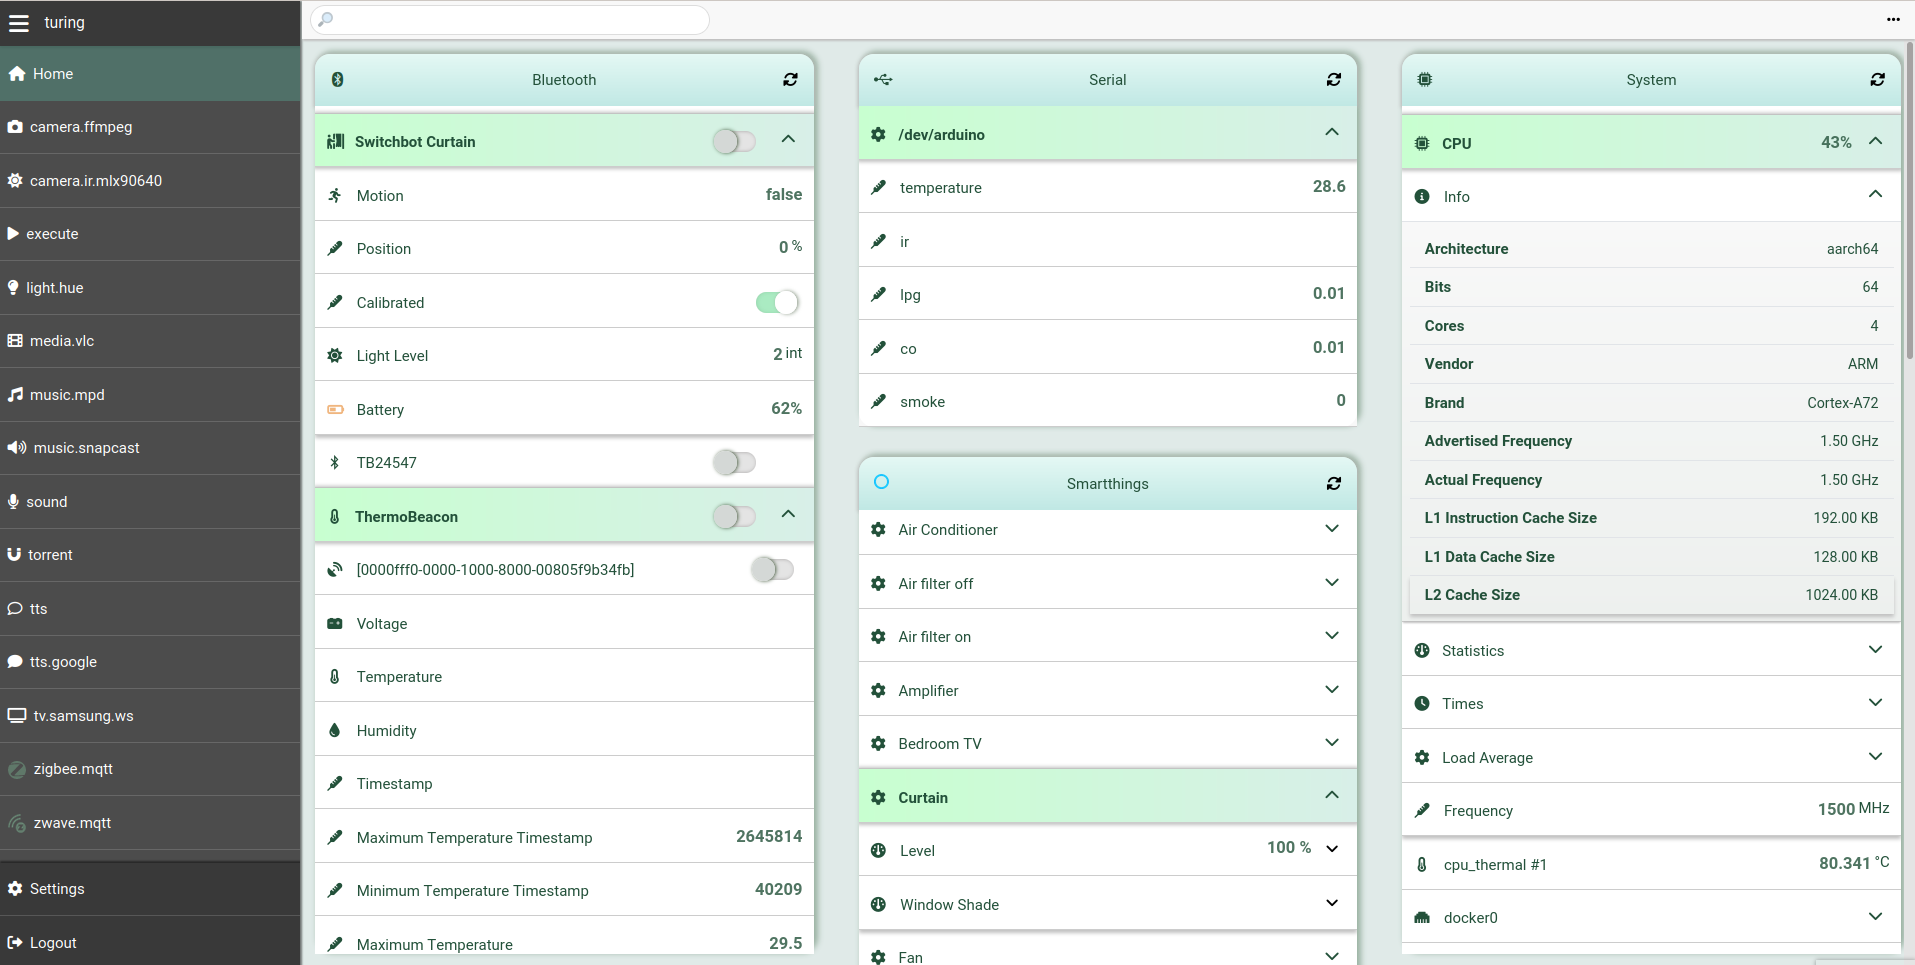
If you enabled the HTTP backend, then you can also access all the entities from the home panel of the Web UI.
You can either install the
platypush package (for the
latest stable version) or the
platypush-git package
(for the latest git version) through your favourite AUR package manager. For
example, using yay:
$ yay platypush
# Or
$ yay platypush-git
The Arch Linux packages on AUR are automatically updated upon new git commits or tags.
Currently the following releases are supported:
- The current Debian
stable - Debian
oldstable
Ubuntu supported to be added soon.
- Add the Platypush APT key to your trusted keyring:
# wget -q -O \
    /etc/apt/trusted.gpg.d/platypush.asc \
    https://apt.platypush.tech/pubkey.txt
- Add the Platypush repository to your APT sources:
#  wget -q -O \
    /etc/apt/sources.list.d/platypush.list \
    https://apt.platypush.tech/lists/platypush-<deb_version>-<branch>.list
Where:
deb_versioncan be either stable (for the current Debian stable version) or oldstable (for the previous Debian stable version)branchcan be either main (for the latest releases) or dev (for a package that is always in sync with the git version)
For example, to install the latest stable tags on Debian stable:
# wget -q -O \
    /etc/apt/sources.list.d/platypush.list \
    https://apt.platypush.tech/lists/platypush-stable-main.list
- Update your repos and install Platypush:
# apt update
# apt install platypush
RPM builds targeting the latest Fedora release are automatically built on every push pipeline.
To install Platypush via RPM on Fedora:
- Add the Platypush RPM repository configuration to the package manager:
# yum config-manager --add-repo https://rpm.platypush.tech/platypush.repo
- Install Platypush, either the latest stable release or the rolling release updated on every commit to the main branch:
# yum install platypush
# Or
# yum install platypush-git
$ pip install platypushOr, for the latest git version:
# Official repo
$ pip install git+https://git.platypush.tech/platypush/platypush
# Github mirror
$ pip install git+https://github.com/blacklight/platypush$ git clone https://git.platypush.tech/platypush/platypush.git
$ cd platypush
# Copy .env.example to .env and edit docker-compose.yml if required.
# In particular, you may want /etc/platypush and /var/lib/platypush
# to point to directories on your hosts
$ docker compose upNote that the default Dockerfile uses Alpine, but in docker-compose.yml you
can also specify an alternative Dockerfile - Debian, Ubuntu and Fedora are
supported.
$ git clone https://git.platypush.tech/platypush/platypush.git
$ cd platypush
$ pip install .All the plugins included in the main repo will be available once you have installed the core platform.
However, some plugins may require extra (optional) dependencies. You have several ways of installing those dependencies:
You can install extra dependencies via pip extras:
pip install 'platypush[plugin1,plugin2,...]'For example:
pip install 'platypush[light.hue,music.mpd,rss]'Will install Platypush with the dependencies for the light.hue, music.mpd
and rss plugins.
Plugins can be installed from the Web interface too. Navigate to the Extensions entry in the sidebar, select the extension that you want to install, select the Install tab and click Install.
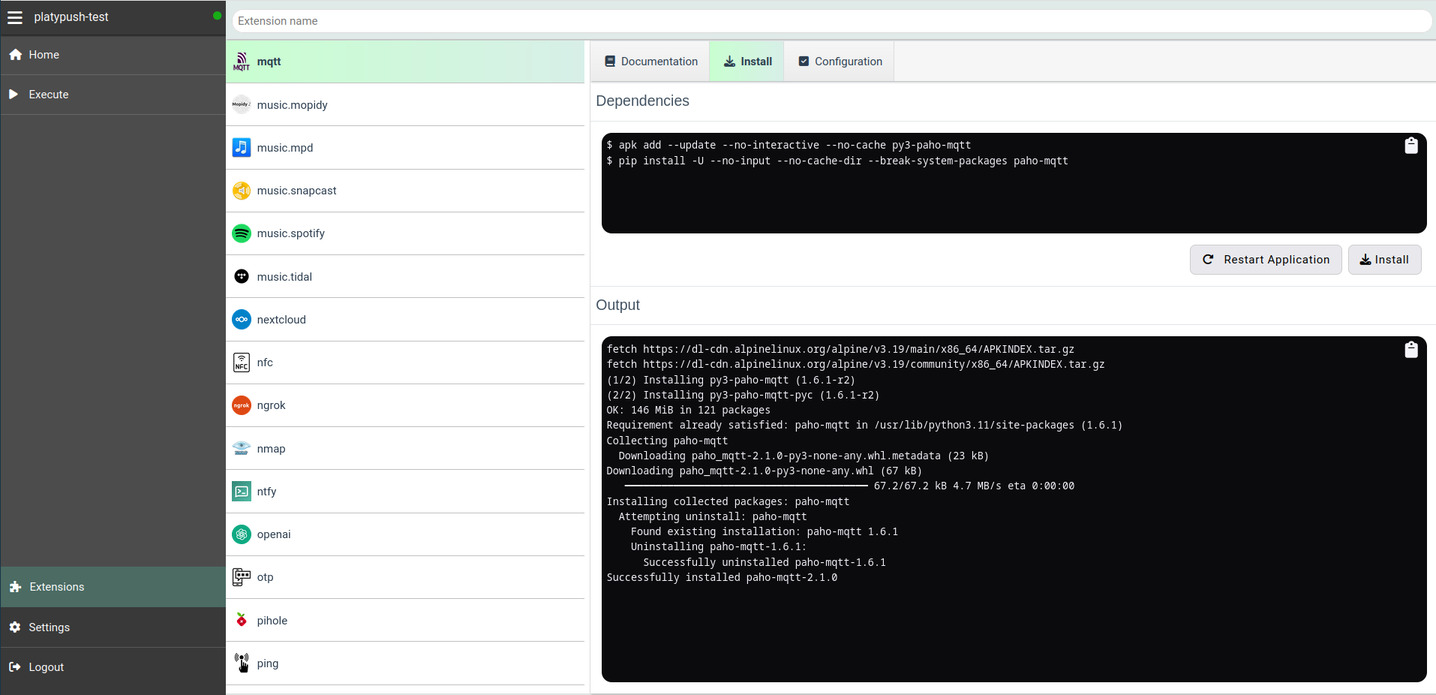
This section also includes the Configuration tab, with a ready-to-paste configuration snippet template for that plugin, as well as a documentation page that includes all the actions supported by a given plugin and the events it triggers.
If you already have the base installation of Platypush on your machine, and you
have a configuration file with a custom set of integrations, then you may opt
to generate a custom Docker image from your configuration file, with all the
extra dependencies configured, using the platydock command.
The following command:
❯ platydock -c /path/to/your/config.yaml -d platypush-testWill create a Platypush Docker image for a device with ID platypush-test,
with all the requirements for the additional integrations listed in
config.yaml.
You can pass the --print option if you just want to print the content of the
output Dockerfile instead of generating the image.
By default the image will use Alpine Linux as a base. You can use the
-i/--image to specify another supported base image - ubuntu, debian or
fedora.
If you already have the base installation of Platypush on your machine, and you
have a configuration file with a custom set of integrations, then you may opt
to generate a custom virtual environment from your configuration file, with all
the extra dependencies configured, using the platyvenv command.
The following command:
❯ platyvenv -c /path/to/your/config.yaml -o /path/to/your/venvWill create a new virtual environment under /path/to/your/venv using the
specified config.yaml to determine which optional dependencies should be installed.
You can then run Platypush after activating your new environment:
❯ source /path/to/your/venv/bin/activate
❯ platypush -c /path/to/your/config.yamlThe plugin/backend documentation reports all the dependencies required by each plugin, as well as the commands to install them on multiple platforms.
If you want to customize your installation, or if you need to install dependencies for a plugin that requires some manual steps, you can check out any plugin-specific installation steps from its documentation.
You can use the default
config.yaml
as a template/reference.
The location of the config.yaml to be used by the application is determined
in the following way:
- It can be passed through the command-line
-c/--configargument. - If not specified via
-c, it will be read from thePLATYPUSH_CONFIGenvironment variable. - If not specified, use
./config.yamlif available. - If not available, and you are running Platypush within a Docker container,
or as a privileged user (and usually you shouldn't), or as a systemd service
created by a supported package manager, then
/etc/platypush/config.yamlwill be used if available. - Otherwise, if you are running Platypush as a non-privileged user or in a
virtual environment,
$XDG_CONFIG_HOME/platypush/config.yamlwill be used (defaults to~/.config/platypush/config.yaml).
By default, any custom Python scripts will be searched under
<CONFDIR>/scripts, where <CONFDIR> is the path to your config.yaml.
You can override it in your config.yaml:
scripts_dir: /path/to/custom/scriptsSince everything under the scripts directory will be imported as a submodule, you can create your own libraries of scripts that can import other scripts:
# Content of scripts/music.py

from platypush import run

def music_play(plugin='music.mopidy', resource=None):
  run(f'{plugin}.play', resource)

# Content of scripts/lights.py

from platypush import run

def lights_toggle(plugin='light.hue', groups=('Living Room',)):
  run(f'{plugin}.toggle', groups=groups)

# Content of scripts/home.py

from platypush import procedure

from scripts.music import music_play
from scripts.lights import lights_toggle

@procedure
def at_home():
  music_play()
lights_toggle()The config.yaml file can become very complex, especially if you embed many
hooks and procedures in it in YAML format.
To make the configuration more maintainable, and also to isolate modules that
you can reuse across multiple instances, you can leverage the include
directive:
# All paths are relative to config.yaml, or to the location of the current file
include:
  - assistant.yaml
  - db.yaml
  - media.yaml
  - mqtt.yaml
  - sensors.yaml
# ...This is where the application will store its data and integration plugins will store their data. The order of precedence is:
-w/--workdircommand line argument.- The
PLATYPUSH_WORKDIRenvironment variable. - The
workdirfield in the configuration file. $XDG_DATA_HOME/platypush(default:~/.local/share/platypush) if launched with a non-privileged user,/var/lib/platypushif launched as root or with a system user.
The application stores entities, variables, users, integrations state and more on a database. The engine configuration supports the SQLAlchemy engine syntax.
Note: The application uses a local SQLite database by default, which is
natively supported by SQLAlchemy. The application has also been tested against
MySQL/MariaDB and Postgres, and should work fine with any modern relational
database supported by SQLAlchemy. However, any backend other than SQLite may
require an additional Python dependency for the SQLAlchemy driver (for example
pg8000 for PostgreSQL).
Order of precedence for the engine:
--main-db/--dbcommand line argument.- The
PLATYPUSH_DBenvironment variable. - The
main.dbfield in the configuration file. sqlite:///<WORKDIR>/main.db
The device ID is a unique identifier for a Platypush instance on a network and is used to reliably dispatch messages when multiple instances use a shared backend.
The order of precedence is:
--device-idcommand line argument.- The
PLATYPUSH_DEVICE_IDenvironment variable. - The
device_idfield in the configuration file. - The hostname of the machine.
If you installed Platypush from a system package manager then you'll also have
a systemd service installed for it.
You can start/enable Platypush like any other systemd service:
# systemctl start platypush
# systemctl enable platypush
Or, if you want to run the Platypush service as a generic user:
❯ systemctl --user start platypush
❯ systemctl --user enable platypush
Otherwise, you can create your own systemd service copying the provided
.service
file
to e.g. ~/.config/systemd/user or /etc/systemd/system.
Platypush uses Redis as a in-memory queue to deliver messages and as a pub/sub bus for inter-process communication.
If you installed Platypush through a package manager, then the Redis service will automatically be installed and started if you launch the Platypush service as a privileged user.
If you run Platypush in a container then by default it'll start its own Redis
instance through the --start-redis command-line option.
You can customize the Redis configuration through the:
--redis-host,--redis-portand--redis-queuecommand-line options.PLATYPUSH_REDIS_HOST,PLATYPUSH_REDIS_PORTandPLATYPUSH_REDIS_QUEUEenvironment variables.- Through your
config.yaml:
# See https://redis-py.readthedocs.io/en/latest/connections.html#redis.Redis
# for the full list of supported parameters
redis:
  host: redis-host
  port: 6379
  username: redis-user
password: redis-passIf you want to access your Platypush web panel outside your home network, it may be a good idea to use an nginx/Apache reverse proxy with a valid SSL certificate (e.g. managed by certbot). A sample an nginx configuration is provided in the repository.
Besides the built-in panels that we've already seen in the other sections, Several integrations add their own feature-rich panels to the Web view, turning Platypush into a gateway to all of your services - from Zigbee sensors, to media players and services, to your music cloud, and more.
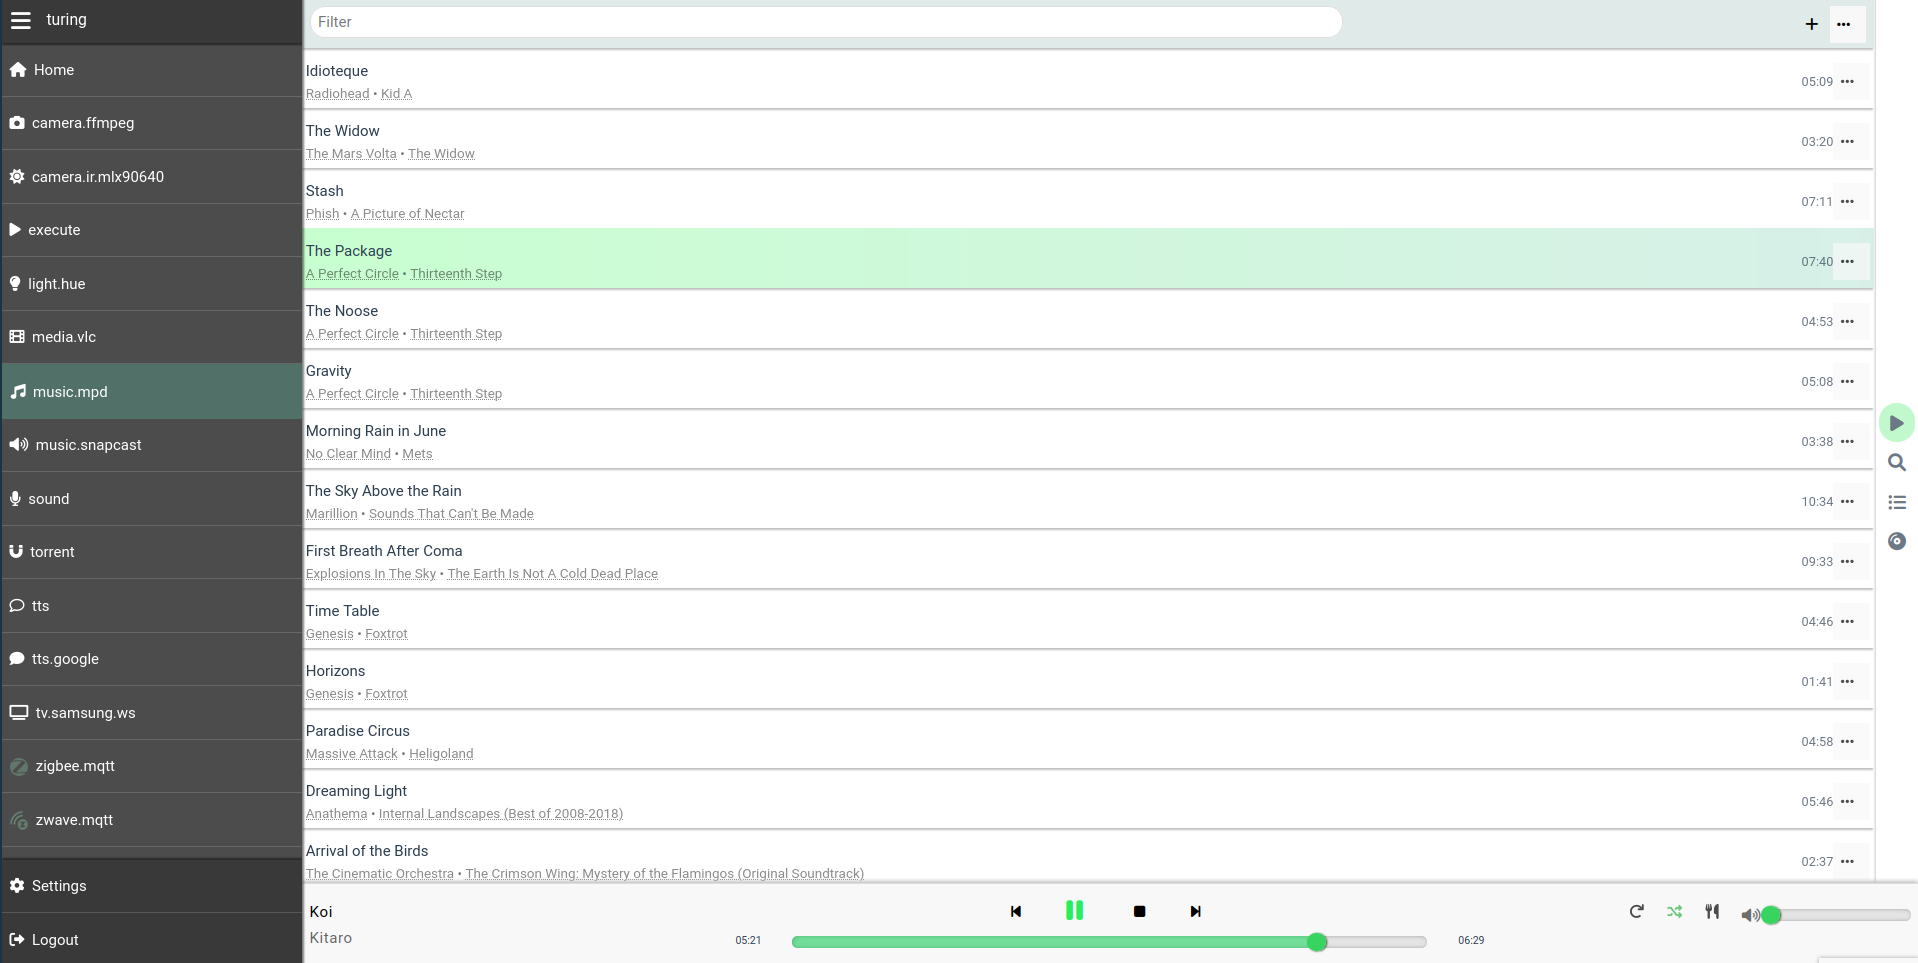
For example, the music view is available to most of the music plugins.
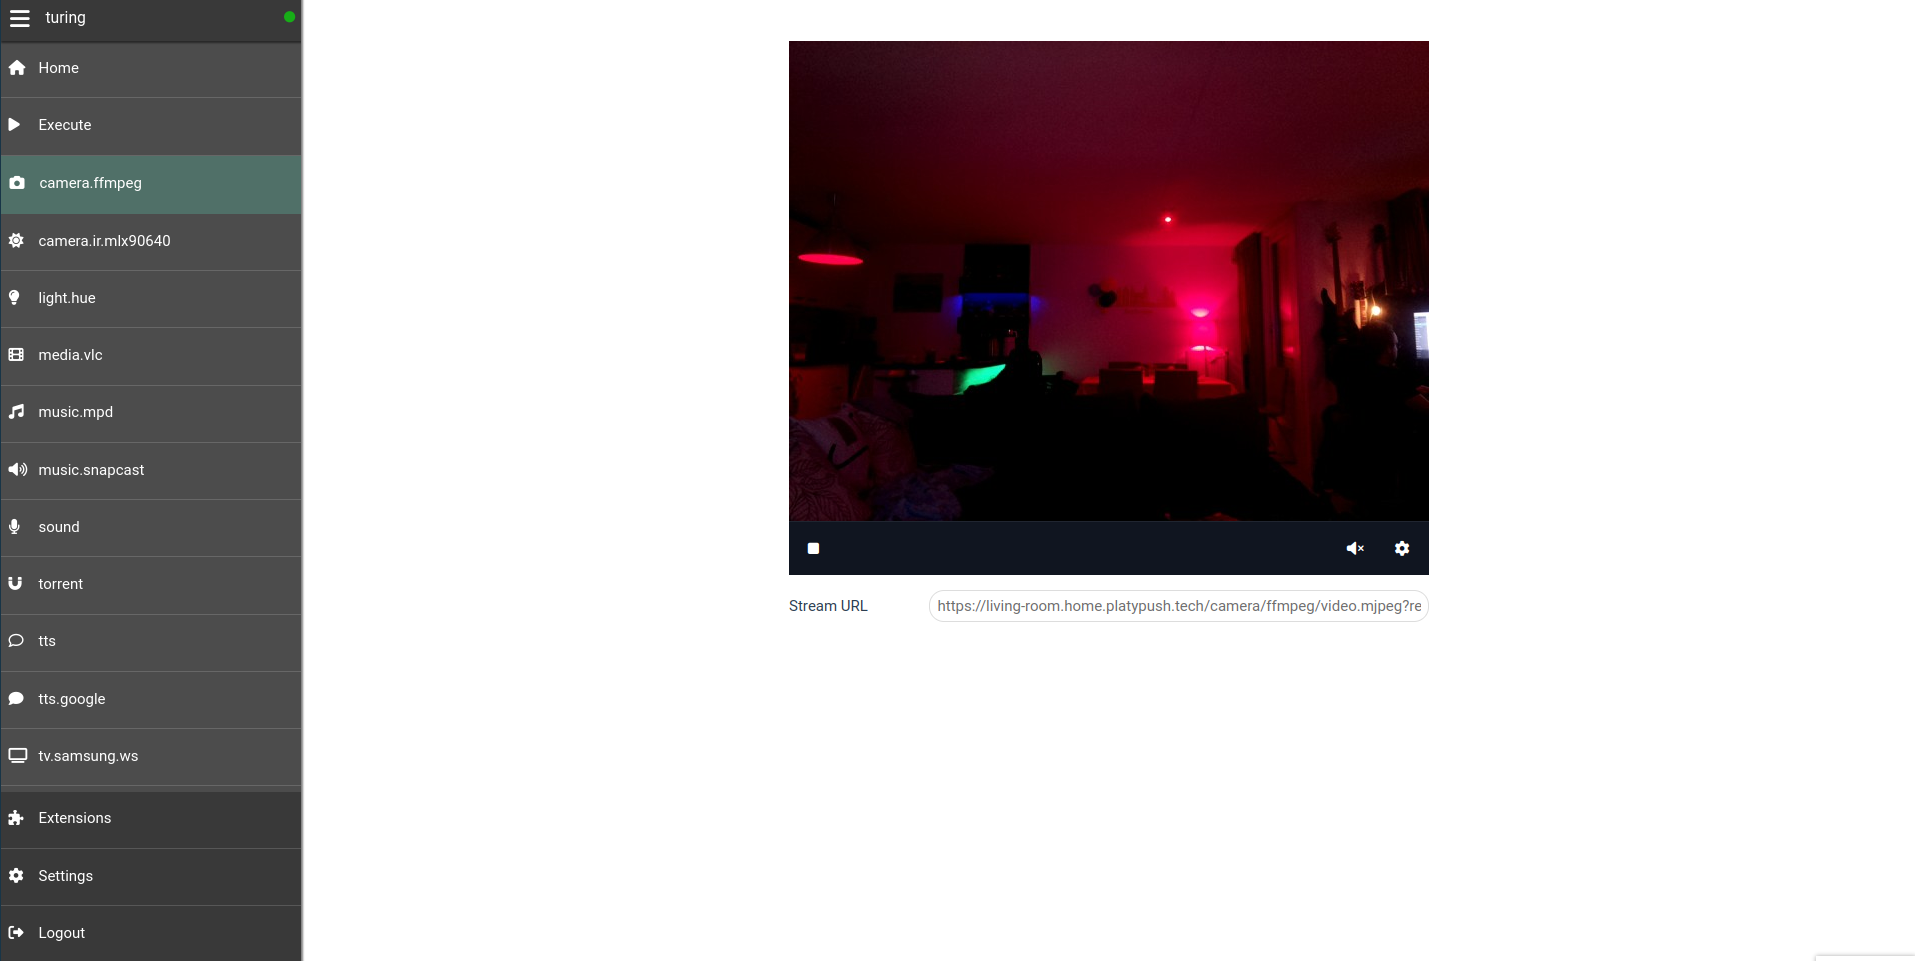
Another example is the camera panel, to monitor your cameras, get stand-alone
feed URLs, and take photos. This becomes available in the UI if you enable at
least a camera plugin.
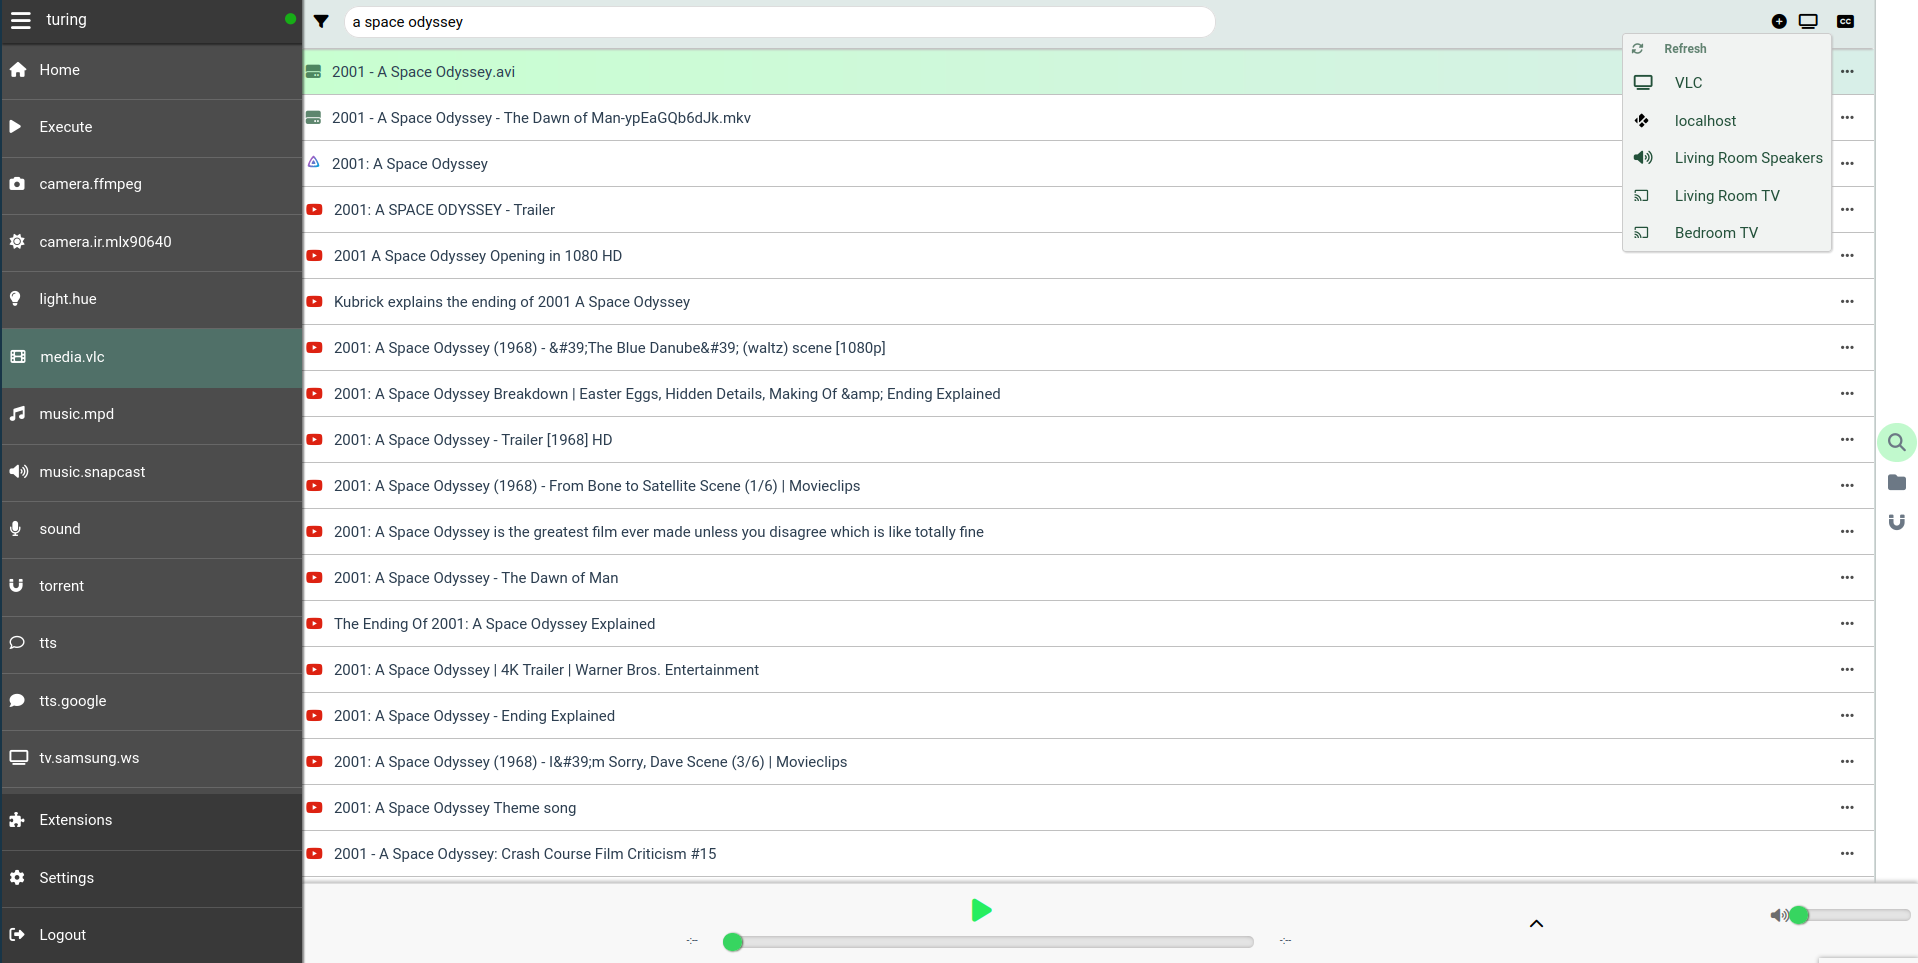
If you enabled at least one local media plugin (like media.vlc,
media.mplayer etc.) then you'll also unlock the media UI, which allows you to
index, search, view and cast media files under the configured media_dirs, and
it also integrates with other configured/supported backends such as YouTube,
Plex and Jellyfin.
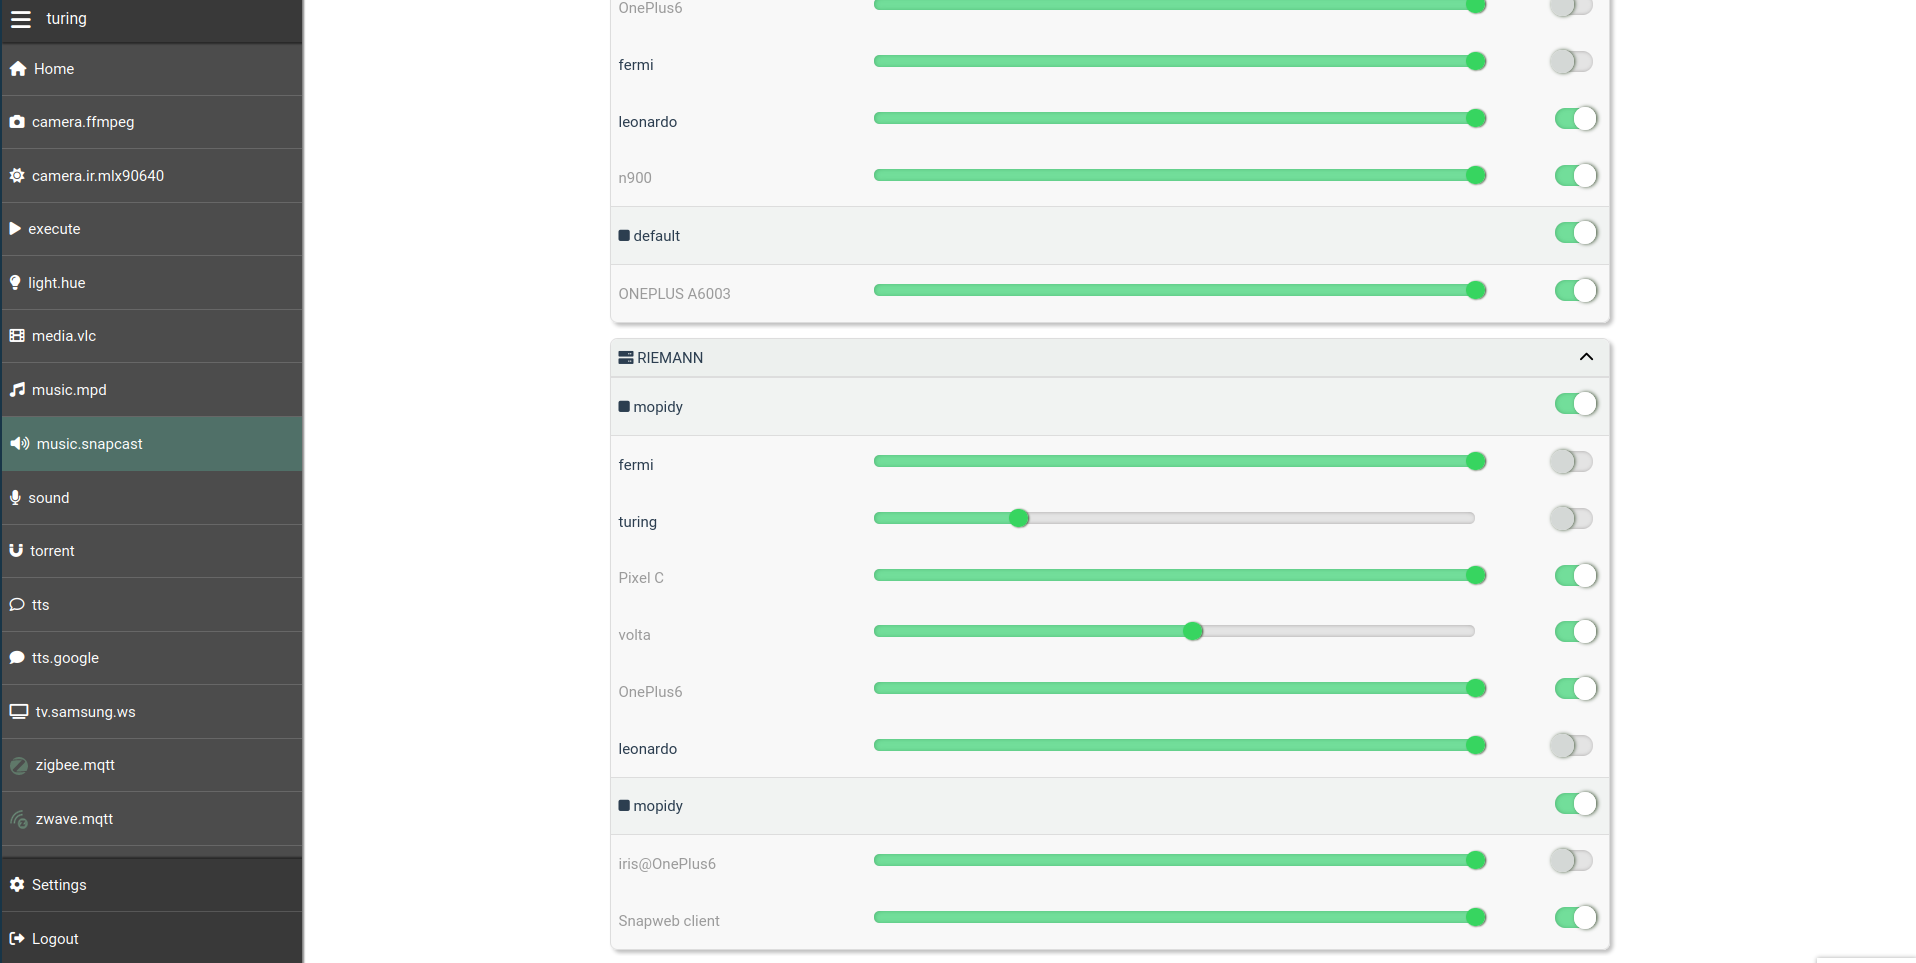
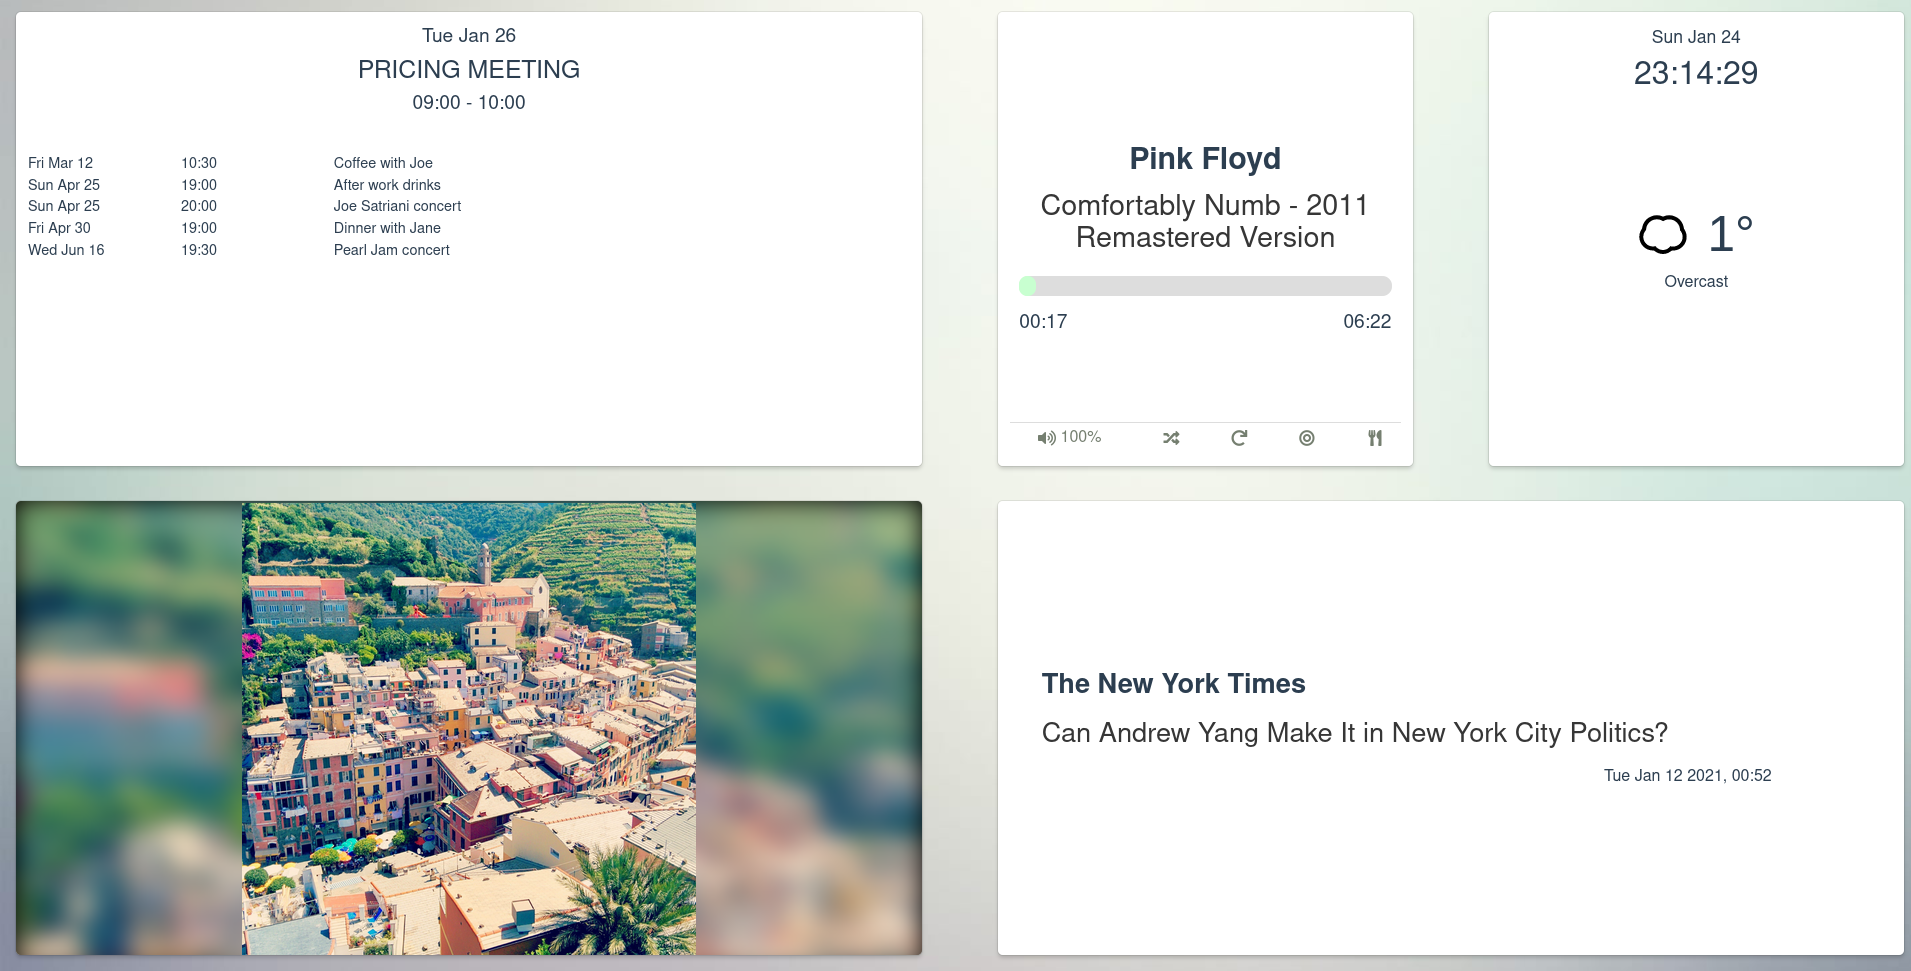
The web service also provides means for the user to create custom dashboards that can be used to show information from multiple sources on a large screen.
Note that having the web application served over SSL is a requirement for the PWA (progressive web app) to work. The Platypush PWA allows you to install a Platypush native-like client on your mobile devices if you don't want to use the full Android app.
An official Android app is provided on the F-Droid store. It allows to easily discover and manage multiple Platypush services on a network through the web interface, and it easily brings the power of Platypush to your fingertips.
A browser extension is available for Chrome and Firefox.
The browser extension allows you to run Platypush actions and procedures directly from your browser, associate keybindings with them, so you can run your favourite routines with a few keystrokes anywhere in your browser, and provides an advanced API to interact with the Web pages you visit - for example, you can build an action that gets the content of a page you're visiting and uses Platypush to distill it in readable format, or send the URL to another service.
To run the tests simply run pytest either from the project root folder or the
tests/ folder.