Classifies objects based on their geometry using a 3D camera and neural networks from Tensorflow + Keras and image processing from OpenCV.
See a demonstration and explanation on how this all works on YouTube.
No worries. You can use a virtual depth cam using Blender. Load VirtualDepthCam.blend into Blender, and run the embedded Python script. (Blender 2.8). Instead of placing real objects in front of a real depth cam, you can place 3D models in front of a virtual depth cam in Blender, and still have it classify objects in real time. (You do need a powerful CPU to render on a decent frame rate though).
- Clone this repository
- Find yourself a 3D camera. I've used a Occipital Structure Core. Or use a virtual depth camera from Blender.
- When using the Structure Core depth camera you should download their SDK.
- You can use SimpleStreamer.cpp to get camera data from the camera to python.
- Adjust the pipe for your operation system, as Windows pipes are used here.
- Or alternatively, on Windows, you can use SimpleStreamer.exe.
- After having setup the named pipe to transfer the camera data it is time to start the python code to capture the camera data. Run CaptureData.py. This will run the
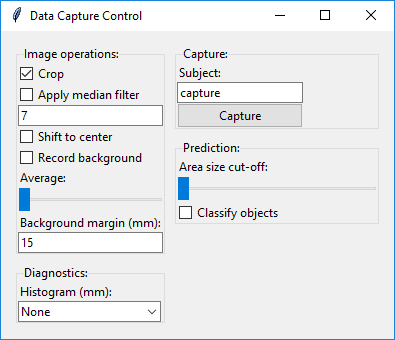
SimpleStreamer.exeby default to setup the pipe for streaming the camera data. Which will show you this GUI:
- By now the named pipe should be connected and images should be streaming to the GUI.
- First you will want to
Record backgroundfor a few seconds. Then turn it off. - Then put the object into the scene.
Apply median filterto reduce noise.- You can play with the number of frames to
Averageor theBackground marginto reduce noise further. - Next tick
Shift to centerwhich will shift and normalize the data. This shows you what data will go to the neural network. - Using the Data Capture Control you can capture images using the
Capturebutton. - It will store data in the data folder.
- When you are pleased with the captures data you need to move the data manually into a sub folder of the
datafolder. Give this the label you want to use when training the network. Likegeometric-perception\data\cube\for instance.
- You should have atleast captured 2 different objects and put the data in the
geometric-perception\data\as mentioned above. I recommend to take 32 images per object when rotated on a single axis. So 360 / 32 = ~11º rotation per image. - OPTIONAL: Next you will likely want to use a RAM drive for the images that will be generated by the ImageDataGenerator to not overly use your HD or SSD and it will probably speed things up a little as well.
- Set the location for the storage of the images being generated in
img_gen_dirin TrainNeuralNetwork.py. - Now run TrainNeuralNetwork.py. It should find the images from the
datadirectory, associated the sub folder name to the images as their label and start training. - Play around with the
lr(learning rate) and number ofepochsandbatch_sizeif you want. - If you want to tweak the image generation, then have a look at the parameters given to
ImageDataGeneratorin Training.py
So after having created images, and having trained the network you can have it classify objects. This will use the Data Capture Control GUI, that was used for capturing images.
- Run CaptureData.py and you should get the UI shown below.

- Record the background, without any objects in the scene by turning on and off the
Record backgroundcheckbox. You can play with the recording time. For me ~4 secs work just fine (without frame averaging). - Next check
Apply median filter - Check
Shift to center - Check
Classify objects - Put an object in the scene now that you have used for training.
- Play with these settings to improve accuracy and reduce noise:
Backgroudnd margin (mm)Which adds a margin to the recorded background- The number below
Apply median filterwhich is the size for the kernel used for the filter. Use an odd number like 1, 3, 5, 7, 9, etc... Area size cut-offThis controls the removal of noise by ignoring objects which are small. So when finding contours, small contours are skipped, based on this setting. If the slider is all the way to the left, then no contour is every skipped.
The code is not intended for production use. I spend some time to put structure to the project, but it is certainly not perfect. The intent of this software is to have a decent control to play around and get a feel for how a neural network behaves and performs. So the intent was not to create fully dummy proof code. For instance, when turning off Crop while classifying objects, things will break. As matrices used in the code, like frame averaging suddenly change in shape.