


Gmsh is a powerful mesh generation tool with a scripting language that is notoriously hard to write.
The goal of PyGmsh is to combine the power of Gmsh with the versatility of Python and to provide useful abstractions from the Gmsh scripting language so you can create complex geometries more easily.
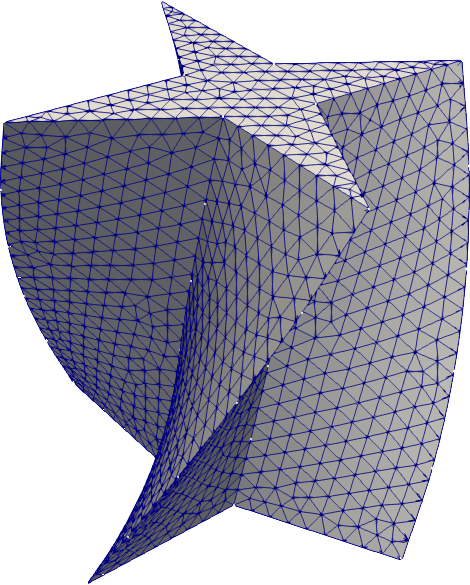
To create the above mesh, simply do
import pygmsh as pg
import numpy as np

geom = pg.Geometry()

# Draw a cross.
poly = geom.add_polygon([
    [0.0,   0.5, 0.0],
    [-0.1,  0.1, 0.0],
    [-0.5,  0.0, 0.0],
    [-0.1, -0.1, 0.0],
    [0.0,  -0.5, 0.0],
    [0.1,  -0.1, 0.0],
    [0.5,   0.0, 0.0],
    [0.1,   0.1, 0.0]
    ],
    lcar=0.05
    )

axis = [0, 0, 1]

geom.extrude(
    'Surface{%s}' % poly,
    translation_axis=axis,
    rotation_axis=axis,
    point_on_axis=[0, 0, 0],
    angle=2.0 / 6.0 * np.pi
    )

points, cells = pg.generate_mesh(geom)
to retrieve all points and cells of the mesh for the specified geometry. To store the mesh, you can use meshio; for example
import meshio
meshio.write('test.vtu', points, cells)
The output file can be visualized with various tools, e.g., ParaView.
You will find the above mesh in the directory test/examples/ along with other
small examples.
PyGmsh is available from the Python Package Index, so simply type
pip install pygmsh
to install or
pip install pygmsh -U
to upgrade.
Download PyGmsh from PyPi or GitHub and install it with
python setup.py install
PyGmsh depends on
and, obviously, Gmsh.
Just
import pygmsh as pg
and make use of all the goodies the module provides. The
documentation and the examples under
test/examples/ might inspire you.
To run the PyGmsh unit tests, check out this repository and type
nosetests
or
nose2 -s test
To create a new release
-
bump the
__version__number, -
create a Git tag,
git tag v0.3.1
git push --tags
and
-
upload to PyPi:
make upload
PyGmsh is published under the MIT license.