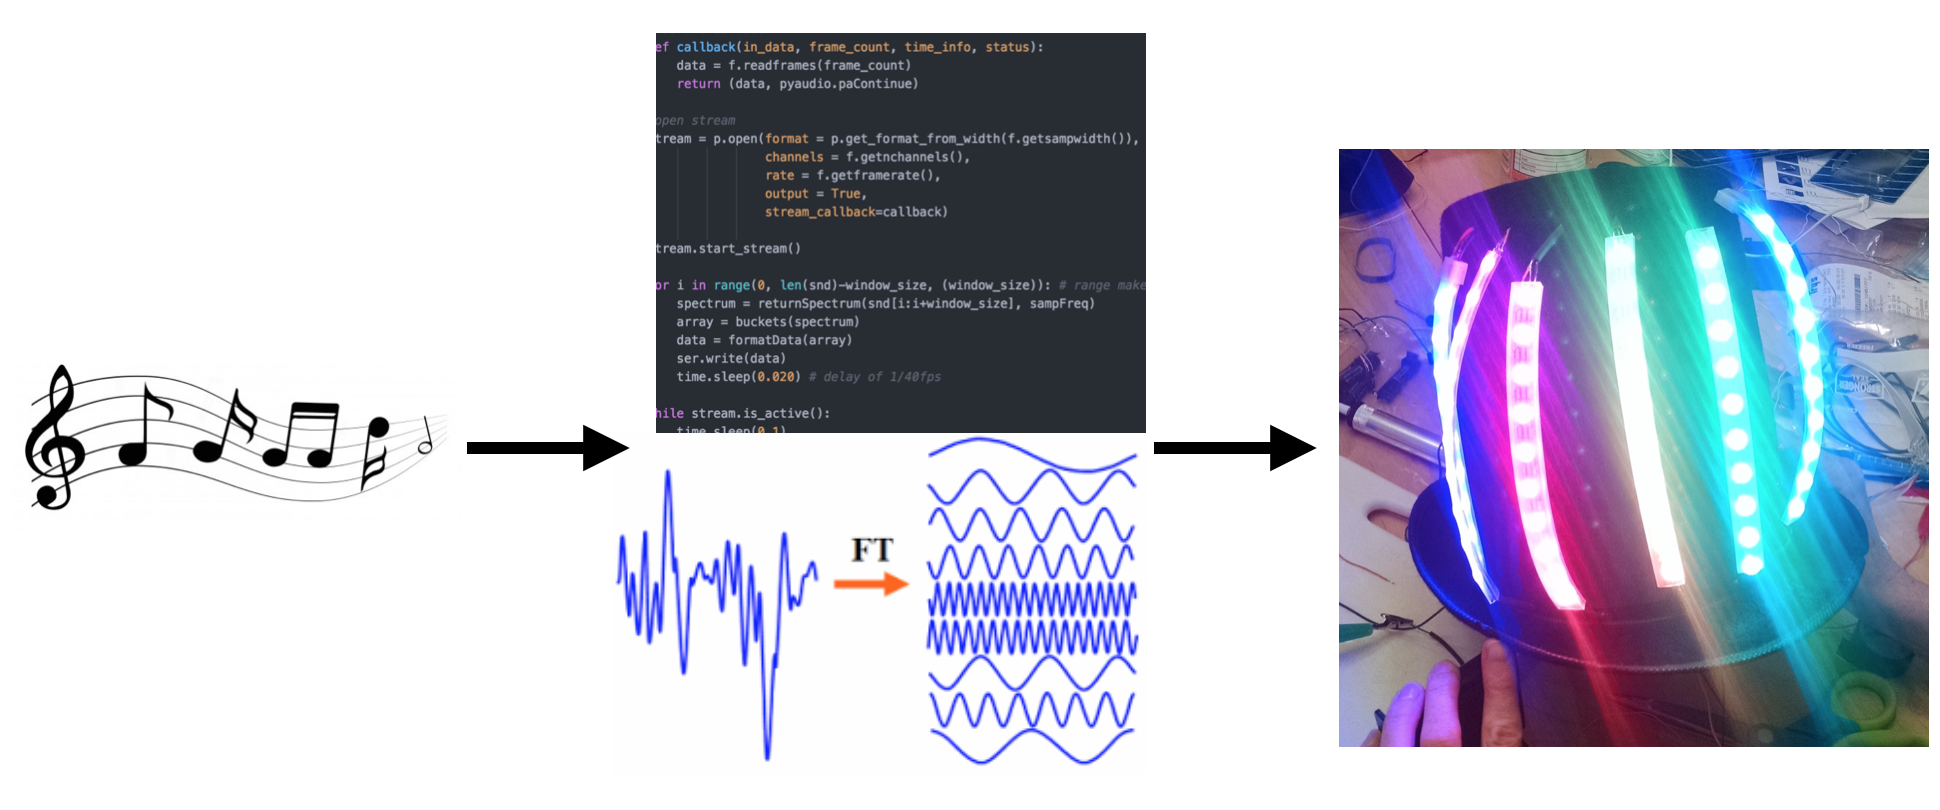
This is a guide for how to set up and implement a wearable top hat that responds to music input by displaying a visual equalizer.
"Oh My Beats" as I've called it is a wearable technology that will compliment any person who wants to share their music with people in a novel way. Oh My Beats aims to be a gender neutral accessory so as to be as inclusive as possible.
This project is a top hat + LEDs that will display a live-view of music playing on a computer.

Demonstration of the Hat in Action
- Overview
- Materials & Tools
- Software
- Safety
- Prototype Schematic
- Python Code
- Arduino Code
- Hat Construction
(All prices in USD)
- Black Top Hat = $12.00
- 1 M x Adafruit NeoPixel Digital RGB LED Strip - Black 60 LED (BLACK), ID:1461 Adafruit Link = $24.95
- RedBearLab Blend Micro Adafruit Link = $26.90
- 1 x 74AHCT125 - Quad Level-Shifter (3V to 5V) (74AHCT125) [ID:1787] = $1.50
- 1 x 4 x AA Battery Holder with On/Off Switch[ID:830] = $2.95
- 1 x Premium Male/Male Jumper Wires - 20 x 6" (150mm)[ID:1957] = $1.95
- 1 x Female DC Power adapter - 2.1mm jack to screw terminal block[ID:368] = $2.00
- 1 x Male DC Power adapter - 2.1mm plug to screw terminal block[ID:369] = $2.00
- Premium Vinyl Twist Connector
- 330 Ohm resister
- capacitor
- cords
- solder
- solder gun
- soldering station with helping hands
- 4 AA rechargeable batteries
- 5V battery holder
- volt meter
- tiny flathead screqdriver for power adaptor screws
- drill & bit (bit big enough to fit three cords through)
- CATT5 cable to cannibalize cords
- wire stripper
- electrical tape/heat shrink for covering exposed wires
- cardboard
- rubber bands
- hot glue
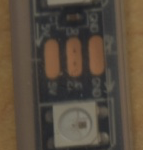
NeoPixels are Adafruit's house brand of Red Green Blue (RGB) LEDs (Light Emitting Diodes) that are also addressable. This means the pixels know their location, which makes programming what you want to display a little easier.
The Blend Micro is an Arduino microcontroller that also houses an on-board bluetooth chip. The micro utilizes bluetooth 4.0 Low Energy, (BLE) which makes this board not as power hungry as some other arduino shields or raspberry pi dongles. The micro-controller unit (MCU) is Atmel ATmega32U4 and the BLE chip is Nordic nRF8001.
- Computer: Macbook Pro running Yosemite v 10.10.5
- Processing software: Python 2.7.10 :: Anaconda 2.3.0 (x86_64)
- Install from python's website
- You also need to install a python library for serial communication between your computer and the arduino. To do this, in your terminal type
pip install pyserial
- use
pip listto get a list of the python libraries you have installed on your system - On-board software: Arduino programming language (based on C/C++), version 1.6.5
- Install from Arduino's website
- Follow getting started manual on how to get the libraries for the Blend Micro. I followed the Quickstart with Codebender link.
- Follow this link for how to install the Neopixel Arduino Library here.

-
Polarized capacitors can heat up/burst if installed in the wrong direction. Place the negative side with the ground wire.
-
Disconnect all power sources before modifying a circuit.
-
You will be putting electricity close to your body and skin, which can cause burns. Please be careful and cover any exposed wires before trying anything on.
From Adafruit's Neopixel Uberguide
- Before connecting NeoPixels to any power source, add a large capacitor (1000 µF, 6.3V or higher) across the + and – terminals as shown above.
- Place a 300 to 500 Ohm resistor between the Arduino data output pin and the input to the first NeoPixel. This resistor must be at the NeoPixel end of the wire to be effective! Some products already incorporate this resistor…if you’re not sure, add one…there’s no harm in doubling up!
- Try to minimize the distance between the Arduino and first pixel.
- Avoid connecting NeoPixels to a live circuit. If you simply must, always connect ground first, then +5V, then data. Disconnect in the reverse order.
- If powering the pixels with a separate supply, apply power to the pixels before applying power to the microcontroller.
- Observe the same precautions as you would for any static-sensitive part; ground yourself before handling, etc.
- NeoPixels powered by 5v require a 5V data signal. If using a 3.3V microcontroller you must use a logic level shifter such as a 74AHCT125 or 74HCT245. (If you are powering your NeoPixels with 3.7v like from a LiPoly, a 3.3v data signal is OK)
- Make sure that your connections are secure. Alligator clips do not make reliable connections to the tiny solder pads on NeoPixel rings. Better to solder a small pigtail wire to the ring and attach the alligator clips to that.
-
I attached my components using a breadboard (no soldering necessary) as a first step.
-
Run the 'strandtest' that comes with the Neopixel library to make sure the Aruino is communicating with your neopixels. Open the Arduino program, and navigate to:
file -> examples -> Adafruit Neopixels -> strandtest. This will run through 5 different programs.

My python code is in my GitHub repo here.
The code below is doing all the heavy lifting of playing the music, and manipulating it into frequencies. It takes a wave file, performs a fast fourier transform, averages the results, and then normalizes the data to fit the number of LEDs the hat has.
The final steps are to send a string of 12 numbers to the Arduino, and at the end of the sound file a signal to turn off the LEDs.
"""
This file is meant to feed an Arduino Blend Micro with data.
A fast fourier transform is performed on an imcoming music file,
and then subsequentely averaged and normalized to the number of LEDs attached to the Arduino.
I have 60 (-1, I broke one pixel) neopixels attached and have 6 buckets, so 10 LEDs/bucket.
I normalize my data from 0-10.
Created by Brittinator October 2015
"""
# Dependencies/libraries to import
from scipy import fft, arange
from scipy.io import wavfile # for chunking sounds into time slices
import pyaudio # to play audio
import wave # for opening wavefiles
import serial # for serial communication
import time # for timing things/time delays on python side
# -------------------------------------------------
def returnSpectrum(y,Fs):
    """
    Plots a Single-Sided Amplitude Spectrum of y(t)
    y = wavefile in array form
    Fs = sample frequency, sometimes called sampling rate; likely 44100
    """

    n = len(y) # length of the signal
    k = arange(n) # array from [0, 1, 2, ... n-1]
    T = n/float(Fs) # need to make Fs a float so T can be 0.xx decimal

    if y.ndim > 1: # stereo music has more than one dimension for stereo sound
        y = y[:,0] # taking 1st dimension, slice of matrix

    frq = k/T # two sides frequency range
    # take array, divide by num secs
    frq = frq[range(n/2)] # one side frequency range

    Y = fft(y)/n # fft computing and normalization
    Y = Y[range(n/2)]

    zipped =  zip(frq, abs(Y)) # takes 2 arrays of same size & combines

    frequencies = dict(zipped)
    return frequencies

# -------------------------------------------------
def averaging(min, max, spectrum):
    """normalizing a bucket, returns a number from 0-1"""
    length = 0
    sum = 0

    for key in spectrum:
        if key > min and key <= max:
            length += 1
            sum += spectrum[key]

    average = sum/length
    return average

# -------------------------------------------------
def formatData(array):
    """takes an array and adds a leading zero
    then joins all into a string of length 12
    so we'll consistentely send a chunk of data of length 12 to the Arduino"""

    stringArray = []
    for n in array:
        # convert number into a string
        numAsString = str(n)
        if len(numAsString) < 2:
            # add leading zeros to numbers
            numAsString = '0' + numAsString
        stringArray.append(numAsString)

    # join array items into a string of length 12
    return ''.join(stringArray)

# -------------------------------------------------
def buckets(spectrumHash):
    """Mundges data from a huge list of frequency data into 6 distinct buckets"""
    equalizer = []
    normalized = []

    LEDS = 10 # scaling factor, number of leds in each 'frequency bucket'
    SUBBASS =       [50, 100]            # Sub Bass: 50 to 100 Hz
    BASS1 =         [100, 250]           # Bass1: 100 to 250 Hz
    BASS2 =         [250, 300]          # Bass2: 250 to 300 Hz
    LOWMIDRANGE =   [300, 400]          # Low Midrange: 300 to 400 Hz
    MIDRANGE =      [400, 500]           # Midrange: 400 to 500 Hz
    TREBLE =        [500, 1500]        # Treble: 500 Hz to 1.5 kHz

    subBass =       averaging(SUBBASS[0], SUBBASS[1], spectrumHash)
    bass1 =         averaging(BASS1[0], BASS1[1], spectrumHash)
    bass2 =         averaging(BASS2[0], BASS2[1], spectrumHash)
    lowMidrange =   averaging(LOWMIDRANGE[0], LOWMIDRANGE[1], spectrumHash)
    midrange =      averaging(MIDRANGE[0], MIDRANGE[1], spectrumHash)
    treble =        averaging(TREBLE[0], TREBLE[1], spectrumHash)

    # normalizing buckets - 0 is no leds lit, 10 is all 10 leds in a strip lit
    beforeNormalization = [subBass, bass1, bass2, lowMidrange, midrange, treble]
    hi = max(beforeNormalization)
    lo = min(beforeNormalization)

    for n in beforeNormalization:
        norms = int((((n-lo)/(hi-lo)))*LEDS)
        normalized.append(norms)
    return normalized

# -------------------------------------------------
# test files to play
baseFolder = './AudioFiles/'
sweep = baseFolder +'sweep20-20k.wav'
hz60 = baseFolder +'60hz.wav'
hz200 = baseFolder +'200hz.wav'
drum = baseFolder +'drum.wav'
# -------------------------------------------------
""" Below is where we execute the code to run the fft
and send the arrays of LEDs to light to the Arduino"""

sampFreq, snd = wavfile.read(sweep)

second = sampFreq # sampling frequency is = second of data
fps = 40 # frames per second
window_size = second/fps # want 40 frames per second (fps), so want 40 windows/second

connection = '/dev/cu.usbmodem1411'
ser = serial.Serial(connection, 115200, timeout=1)

#open a wav format music
f = wave.open(sweep,"rb") #rb - read binary

#instantiate PyAudio
p = pyaudio.PyAudio()

# define callback
def callback(in_data, frame_count, time_info, status):
    data = f.readframes(frame_count)
    return (data, pyaudio.paContinue)

#open stream
stream = p.open(format = p.get_format_from_width(f.getsampwidth()),
                channels = f.getnchannels(),
                rate = f.getframerate(),
                output = True,
                stream_callback=callback)

stream.start_stream()

for i in range(0, len(snd)-window_size, (window_size)): # range makes an array auto
    spectrum = returnSpectrum(snd[i:i+window_size], sampFreq)
    array = buckets(spectrum)
    data = formatData(array)
    ser.write(data)
    time.sleep(0.020) # delay of 1/40fps

while stream.is_active():
    time.sleep(0.1)

ser.write("000000000000") #  turn LEDs off

#stop stream
stream.stop_stream()
stream.close()
f.close()

#close PyAudio
p.terminate()
My Arduino code is on Github here.
This code is written in Arduino's language which in based on C++. The whole Arduino interface is built upon loops, so you'll see a bunch of those in the following code. It's purpose is to control the LEDs on the hat. It will be receiving a string of 12 characters long from the computer.
// This code is meant to be paired with my fft code in python found at
// https://github.com/brittinator/OhMyBeats---Ada-Capstone/blob/master/musicFourierTransform.py.
// This code's purpose is to control LEDs on the hat. It will be receiving a string of 12 characters long from the computer.
// Brittinator October 2015

#include <Adafruit_NeoPixel.h>
#define PIN 8
Adafruit_NeoPixel strip = Adafruit_NeoPixel(59, PIN, NEO_GRB + NEO_KHZ800); // I broke 1 LED

// below is an array of each LED's location, in order starting from beginning to the end
int LED[6][10] = {
  {1000,8,7,6,5,4,3,2,1,0}, // 1000 is a placeholder for the LED I broke; does nothing
  {9,10,11,12,13,14,15,16,17,18},
  {28,27,26,25,24,23,22,21,20,19},
  {29,30,31,32,33,34,35,36,37,38},
  {48,47,46,45,44,43,42,41,40,39},
  {49,50,51,52,53,54,55,56,57,58}
};

int inputArray[6];  // variable that will house the array of numbers
/// arrays that house the last two iterations of LEDs, for color fading //////////
int minusOne[6]; // n-1 array
int minusTwo[6]; // n-2 array
char twoBytes[2]; // temporary slot for 2 characters at a time, i.e. "0" + "7"

////////////////////  colors   //////////////////////////////////////////////////
// {255,0,0}, // red
// {255,116,0}, //orange
// {255,253,0}, // yellow
// {0,255,0}, // green
// {0,0,255}, // blue
// {134, 2, 171} // purple

int PRIMARY[6][3] = {
 {255,0,0}, // red
 {205,116,0}, //orange
 {155,153,0}, // yellow
 {0,255,0}, // green
 {0,0,255}, // blue
 {134, 2, 171} // purple
};

int SECONDARY[6][3] = {
  {0,10,10}, // light blue
  {0,10,10},
  {0,10,10},
  {0,10,10},
  {0,10,10},
  {0,10,10}
};

int TERNARY[6][3] = {
  {13,0,17}, // purple
  {13,0,17},
  {13,0,17},
  {13,0,17},
  {13,0,17},
  {13,0,17}
};
////////////////////////////////////////////////////////////////////////

void setup() {
  strip.begin();
  strip.show(); // Initialize all pixels to 'off'
  Serial.begin(115200); // serial port set to 115200 baud
}

void loop() {
  bool wrote = false;

  // if we get a valid byte, read it
  while (Serial.available() > 0) {
    // get incoming byte
    for (int i = 0; i < 6; i++) {
      Serial.readBytes(twoBytes, 2); // buffer is twoBytes, of length 2
      // re-casting character array into a 1. string, then 2. integer
      inputArray[i] = String(twoBytes).toInt();
    }

    wrote = true;
  } // end of while

  if (wrote) {
    LedSwitch();
//    if(isOff()) {
//      turnAllOff();
//    }
    strip.show();
  }
} // end of void loop

void LedSwitch() {
  // turns LEDs on/off based on inputArray, minusOne array and minusTwo array
  for(int i=0; i < 6; i++) { // frequency buckets
    for(int n=0; n < 10; n++) { // quantity of LEDs in each bucket
      if(n < inputArray[i]) {
        // if the number of LED it's on is inside the input array, turn on the LED at this location
        strip.setPixelColor(LED[i][n], PRIMARY[i][0], PRIMARY[i][1], PRIMARY[i][2]);
      }
      else if(n < minusOne[i]) {
        strip.setPixelColor(LED[i][n], SECONDARY[i][0], SECONDARY[i][1], SECONDARY[i][2]);
      }
      else if(n < minusTwo[i]) {
        strip.setPixelColor(LED[i][n], TERNARY[i][0], TERNARY[i][1], TERNARY[i][2]);
      }
      else {
        strip.setPixelColor(LED[i][n], strip.Color(0,0,0));
      }
    }
  }

  //  set minusTwo array equal to minusOne's contents
  memcpy( minusTwo, minusOne, 12 );
  //  set minusOne array equal to inputArray's contents
  memcpy( minusOne, inputArray, 12 ); // 12 is number of bits to put into array, not array size!!
}

boolean isOff() {
  // checks to see if inputArray contains all zeros, a signature that song is finished
  boolean isOff = true;
  for(int i = 0; i < 6; i++) {
    if(!inputArray[i] == 0) {
      isOff = false;
    }
  }
  return isOff;
}

void turnAllOff() {
  for(int i = 0; i < 60; i++) {
    strip.setPixelColor(i, strip.Color(0,0,0));
  }
}
-
At this point I would load in a few test sound files with known frequencies. You should be able to see a certain bucket light up for that freqency. For example, if you run the 60-hz.wav file, you should ony see the first 10 LEDs light up for the duration of the sound file because this bucket encompasses frequencies from 20-60 Hertz.
-
If all went well, continue onto step 5. Otherwise, look back at the code, and check your breadboard connections.
-
Before this step, I would make sure both programs above are behaving properly. It is easier to debug the whole thing in prototype stage rather than trying to determine if the problem is wiring vs. code not functioning.
-
I cannabilized a CATT5 cable for my cords. I've used green wire for the data, red/orange wire for power, and black for the ground.
-
Turn off/unplug your power sources while soldering.
-
Test our your soldering techniques on some wire or components you won't need before jumping into soldering the crucial parts.
-
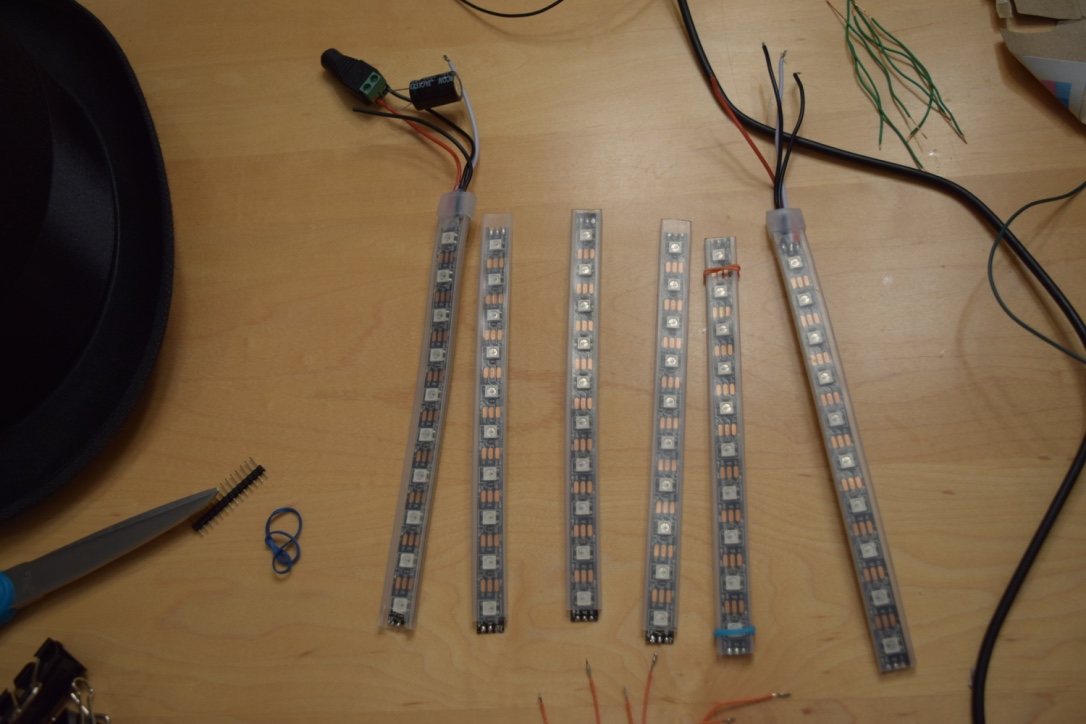
Cut the Neopixels in the middle of the three copper oblongs. These are what you'll be soldering to. I cut too much on one side on the first cut, so I had toss that LED and adjust my code for 59 pixels instead of 60.
You should end up with 6 equal strips of neopixels.
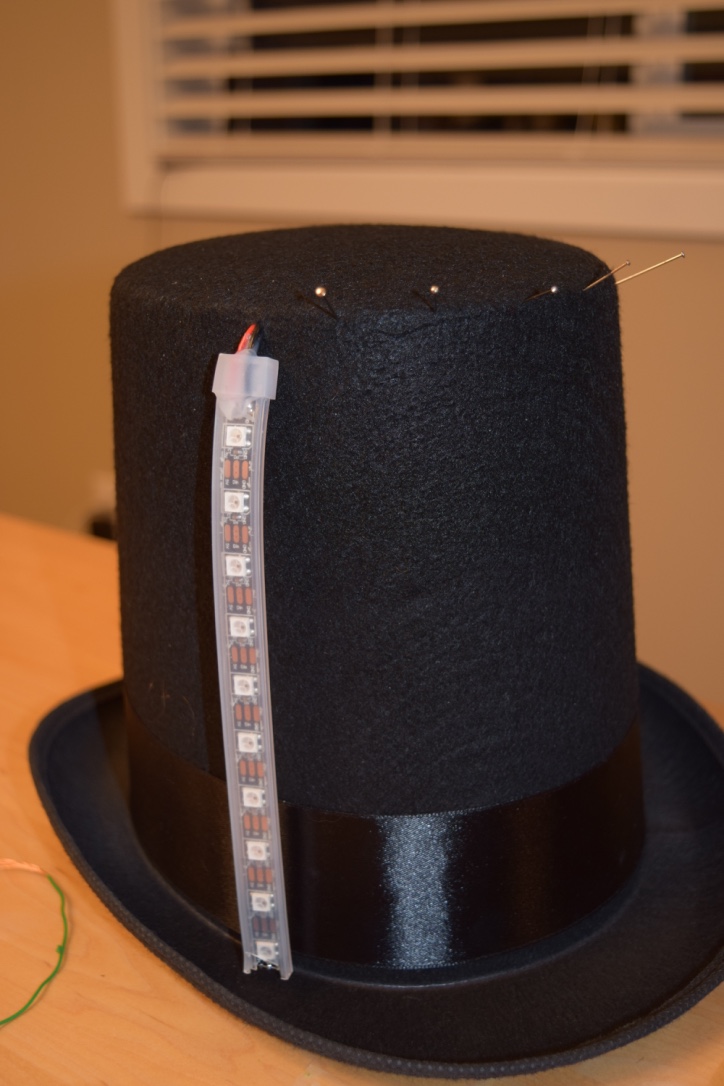
- I plotted out where I wanted my LED strips to go using pins. Mark where the top and bottom of the LEDs will be, as this is where your wires will go.
-
I drilled holes on the top and bottom of the front panel of the hat. This is where the wires will thread through, and also helps secure the LEDs in place.
-
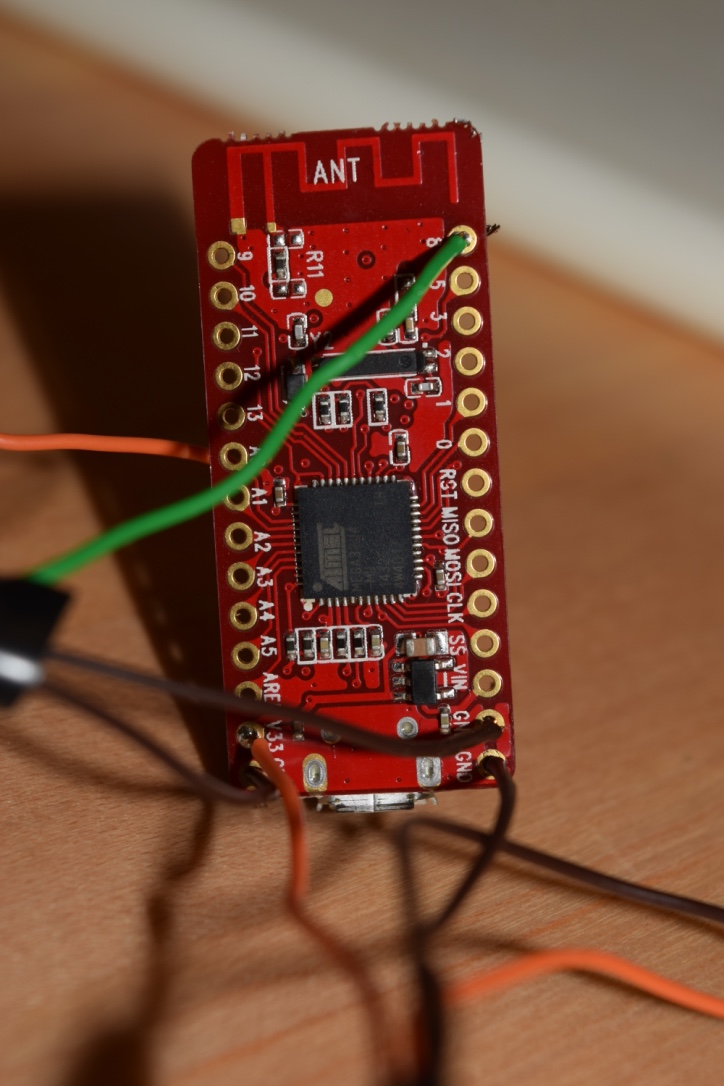
Solder the wires onto the Blend Micro. Black wires into the GND holes, red wire into the V33 hole, and green wire into pin 8.
- Use wire stripper to strip a portion of your wires. Tin the ends of the wires so it'll be easier to solder the wires to the LEDs. Also tin the copper strips on the ends of the LEDs, making sure to keep the strips separate.
![]()
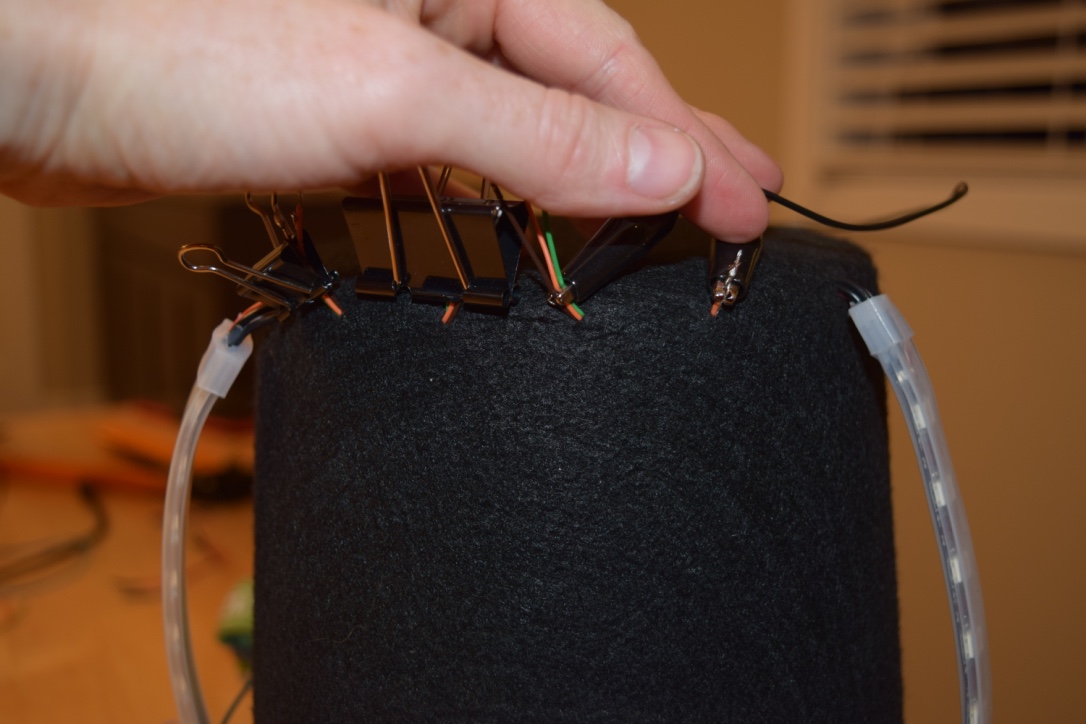
- Make sure the wires you cut are long enough to go through your holes by pushing them into the holes. Put the wires into the holes using a snake-like pattern. I used clips to secure the wires so they didn't fall out of the holes.
-
The next step is soldering your pieces together. I soldered bits at a time, and when I got the battery pack soldered to the arduino I checked to make sure it was getting power using the volt meter. When you are doing this, make sure any stray ground and power cords are not touching each other! Then when I soldered the first set of LEDs, I downloaded the
strandtestthat comes with the neopixel example library, and powered on the LEDs. You should see them light up, and if not check your connections before moving on. Troubleshooting: If you've checked your connections and still have no LEDs lit, load theblinktest and make sure the onboard LED on the arduino is blinking. You can find this infile -> examples -> 01. basics -> blink -
I repeat the process of soldering a new LED strand, and then turning power on to see if the LEDs are properly connected.
-
When you are finished and have tested all LEDs, use shrink wrap or electrical tape to protect yourself from any exposed wires. This will also help decrease oxidation of the wires, which will make your project last longer.
-
Optional: Make a housing at the top of the hat to protect your wires from detaching to components. I used cardboard and rubber bands. This would be a perfect time to use a circuit board, but I was running short on time.
-
Trace around your hat onto a piece of cardboard to make your secret hatch. Cut around this, only slightly larger than your tracing.
-
Hot glue a piece of fabric to the cardboard to make it look a little better.
-
Drill a hole on one side of the cardboard/fabric, and place a piece of yarn/twist tie/cut rubber band as a holder to open/close it.
-
My top hat was to large for me, so I added some padding around the bottom.
- Load up your programs, type in the filename of your sound file and enjoy!