This repository contains software and hardware design of an immersion module. The module is designed to provide a stereo, human-like vision for a e.g. robot's operator. The module is assumed to run with the Oculus Rift DK2 headgear and is composed of a set of commercially available parts such as Dynamixel servomotors, Raspberry PI single-board computer, Logitech USB webcams, custom 3D-printed parts and some custom software.

This document (manual) presents how to manufacture, program and use the module.
- commercial parts:
- 2x Logitech Webcam C920,
- 3x AX-12 servomotors,
- 1x USB2Dynamixel or any other Dynamixel compatible interface,
- 1x FP04-F2,
- 2x FP04-F3,
- 1x FP04-F9,
- Raspberry Pi 3 single-board computer,
- 5V power supply for Raspberry,
- 12V power supply for servomotors,
- some plastic housing.
- custom part:
- 2x 3D-printer camera holder.
For the module 2 USB webcams were used. The Logitech C920 Webcam has a good image resolution (1920x1080), provides encoded stream and has autofocus feature integrated. It also has a stereo mic that could be used in a future.
Each camera is attached to the module using dedicated 3D-printed part (check /stl directory for the holder STL files).

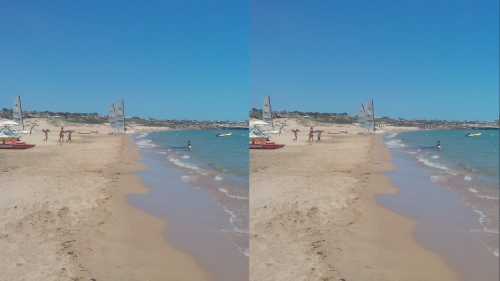
As the Oculus DK2 provides 960 x 1080 pixels per eye, we aligned the cameras vertically in order to utilize as much of the cameras capabilities as possible.
Horizontal vs vertical view is presented below.
Horizontal:
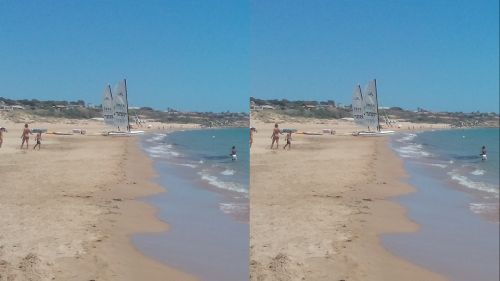
Vertical:
Camera holders are attached to the servos that are stacked each other. Each servomotor provides one degree of freedom (DOF) to mimic humans head natural movements. Thanks to that an user experience is smooth an comfortable.

The servos are connected in series mechanically and electrically. They are connected to the power supply and the USB to serial adapter. The camera USB cables are connected directly to the Raspberry. All the electronics is enclosed in the plastic commercial housing.
As mentioned before, servos are connected in series.
Note that the servos IDs matter, you will need to provide them to the configuration file for software to run proper servo for each DOF. Servos are connected using the commercially available parts: FP04-F2, FP04-F3 and FP04-F9 and M2 screws and nuts.

Cameras are attached using 3D printed parts. Note that cameras are rotated in 90deg clockwise so the USB cable prevents them from falling out from the handler. A small rubber band is used for tightening the grip.
- Windows 7,
- Oculus SDK 0.8.0.
Software package contains of three components:
- firmware,
- oculus_renderer,
- oculus_position.
Relation between software is presented on diagram below:

IMPORTANT NOTICE:
Before launching the module, it is crucial to set up your configuration properly:
-
firmware/servos/oculus_1.0:
- Servos IDs. Depending on the configuration you can have multiple files and use them for different modules. In our case we use firmware/oculus_1.0. You need to provide a proper servos IDs for a relevant joints (yaw, pitch and roll).
- Servos limits. You can also define the motion limits for each joint depending on your particular configuration to prevent any joints collision.
- Serial interface. The serial interface is usually recognized as /dev/ttyUSB0 but in general it is possible that it gets some another name in the system. In such case you can define its name here.
-
firmware/cameras/cam1.sh and cam2.sh:
- provide your cameras devices paths. In our case it is 'device=/dev/v4l/by-id/usb-046d_HD_Pro_Webcam_C920_3AFA6F4F-video-index0' and 'device=/dev/v4l/by-id/usb-046d_HD_Pro_Webcam_C920_EA71325F-video-index0' consequently. Please mind that the order matters as if you mismatch the paths your images will be interchanged. cam1.sh and cam2.sh corresponds with left and right camera consequently.
- in 'udpsink host=10.5.2.32 port=1234' your operator computer IP address has to be provided.
To run the module, copy the whole firmware catalogue to the Raspberry. Assuming the firmware is located in /home/pi/firmware then for launching the module you have to run the following commands in separate terminals:
/home/pi/firmware/cameras/cam1.sh
/home/pi/firmware/cameras/cam2.sh
/home/pi/firmware/servos/ptrs.py /home/pi/firmware/servos/oculus_1.0
Where two first commands make the the video strams to be send and the third one controls the servos.
To make the module to start automitically after powering the Raspberry you can add the commands to the /etc/rc.local file:
/home/pi/firmware/cameras/cam1.sh &
/home/pi/firmware/cameras/cam2.sh &
/home/pi/firmware/servos/ptrs.py /home/pi/firmware/servos/oculus_1.0 &
This software connects to Oculus Rift headset, retrieves headset's position and orientation and next sends these data to VR module computer controlling servos with video cameras attached to them (computer where oculus_servos application and firmware are running).
Major requirements for this software are Oculus Rift SDK version 0.8.0.0 beta and Windows 7. Other Oculus Rift SDK versions will not work - see remarks in oculus_renderer section.
You can use your favorite IDE to build this software, but there are some things you should know:
- add include path for Oculus SDK, e.g. "E:\Libraries\OculusSDK\LibOVR\Include",
- add library path for Oculus SDK, e.g. "E:\Libraries\OculusSDK\LibOVR\Lib\Windows\Win32\Release\VS2010",
- add following libraries to project: LibOVR.lib, Ws2_32.lib.
You should also build this application as architecture x86.
In main.cpp file there is function called sendMsg(). In this function you can find following line:
addr.sin_addr.s_addr = inet_addr("192.168.230.70"); // Destination IP address
Oculus Rift headset's position and orientation will be sent to this IP address to control servos, so you should set there IP address of your computer where servos are connected to (see diagram at the beginning of this manual).
This software is responsible for rendering video in stereo mode (from two video cameras) for Oculus Rift headset.
It utilizes Gstreamer library to open video stream like video file (MP4, AVI, etc.) or stream from two video cameras (e.g. web cameras) and then receives video frames from selected video source. Next, each frame is converted to OpenGL texture, which is finally rendered on screen.
Using OpenGL textures gives a lot of flexibility. Each frame can be distorted or modified in various ways. For example, to fix chromatic aberration in Oculus Rift headset this software separates (splits) color channels and adds some offset to each of them. Chromatic aberration fix parameters can be easily modified, so each user is able to tune this parameters to individual preferences.
- Windows 7. This software will not work on Windows 10 (see remarks regarding Oculus Rift SDK below). Windows 8 and Windows 8.1 were not tested.
- Oculus SDK version 0.8.0.0 beta. It is very important. Versions newer than 0.8.0.0 will not work. In version 0.8.0.0 Oculus Rift behaves as secondary screen in Windows, so you can easily drag this software's window and drop it in on Oculus Rift screen. Newer versions have removed this functionality. To use newer versions of Oculus Rift SDK some fixes in this software are needed. Important note: Oculus 0.8.0.0 beta does not work on Windows 10. You should use Windows 7 for this.
- Gstreamer library version >= 1.8.1. You can download Gstreamer library from this location: https://gstreamer.freedesktop.org/data/pkg/windows/. Version higher than 1.8.1 is needed, because lower versions do not support GL textures [see Instalation notes below].
- GLM library. GLM provides classes and functions designed and implemented with the same naming conventions and functionalities than GLSL so that anyone who knows GLSL, can use GLM as well in C++ [see Instalation notes below].
- GLEW library. The OpenGL Extension Wrangler Library (GLEW) is a cross-platform open-source C/C++ extension loading library. GLEW provides efficient run-time mechanisms for determining which OpenGL extensions are supported on the target platform [see Instalation notes below].
- SOIL library. SOIL is a tiny C library used primarily for uploading textures into OpenGL. You can download it from: http://www.lonesock.net/soil.html. Installation notes are included in downloaded library package.
- QtCreator. It is not mandatory, but in this repository you can find already configured QtCreator project file. You have to just change paths to libraries installed on your system in project .pro file. If you do not use QtCreator, you can build it also in VisualStudio or in other favorite software.
Installation notes [for Gstreamer]:
You should install two packages: gstreamer-1.0-devel-x86-1.X.Y.msi and gstreamer-1.0-x86-1.X.Y.msi, where X and Y mean version number. Notice that version x86 is needed, not x64.
After installation please verify if you have system variable GSTREAMER_1_0_ROOT_X86 set to directory in Gstreamer location, e.g. "C:\Libraries\gstreamer\1.0\x86".
You can also add "C:\ Libraries \gstreamer\1.0\x86\bin" to PATH system variable to use Gstreamer applications like “gst-launch” directly from command line.
Installation notes [for GLM]:
Installation notes and more information can be found on GLM website: http://glm.g-truc.net/. Installation of this library is very easy. There is no need to build this library, because it is based only on headers files.
Installation notes [for GLEW]:
Installation notes can be found directly on GLEW library website: http://glew.sourceforge.net/install.html. You should build this library from source using CMake.
Open .pro file in QtCreator and configure paths to libraries installed on your system. Remember to configure project as x86, not x64.
GST_LIB_PATH = C:/Libs/gstreamer/1.0/x86
GLM_LIB_PATH = C:/Libs/glm
GLEW_LIB_PATH = C:/Libs/glew-1.13.0
SOIL_LIB_PATH = C:/Libs/soil
To run this software you should probably also provide necessary DLLs files, e.g. glew32.dll. It all depends how you built libraries (static or dynamic). Static libraries do not need DLLs. During application startup you will receive information about missing DLLs files. Put them to application’s directory to fix these errors.
Launch dialog window looks like below:

Video source has two possible options:
- Cameras,
- Test MP4 Video.
Cameras option uses Gstreamer pipeline to open two separate video cameras streams. You can modify that pipeline to your preferences in gst_streamer.cpp file.
Gstreamer pipeline for Logitech web cameras used in this project looks like below:
std::string pipe1{"udpsrc port=1235 caps=\"application/x-rtp, media=(string)video, "
                  "clock-rate=(int)90000, encoding-name=(string)H264\" ! "
                  "rtph264depay ! h264parse ! decodebin ! videoconvert ! "
                  "videoflip method=clockwise ! glupload ! "
                  "gleffects_identity ! identity name=video1 ! glimagesink sync=0"};

std::string pipe2{"udpsrc port=1234 caps=\"application/x-rtp, media=(string)video, "
                  "clock-rate=(int)90000, encoding-name=(string)H264\" ! "
                  "rtph264depay ! h264parse ! decodebin ! videoconvert ! "
                  "videoflip method=clockwise ! glupload ! "
                  "gleffects_identity ! identity name=video2 ! glimagesink sync=0"};
Note that first stream should be named video1 and the second video2.
Test MP4 Video option uses Gstreamer pipeline to open sample MP4 file. By default it opens file in location "Video/SampleMP4/video.mp4" You can change this location in gst_streamer.cpp file.
pipeline_video_0_ = GST_PIPELINE(gst_parse_launch("filesrc location=Video/SampleMP4/video.mp4 ! "
                                                  "qtdemux ! avdec_h264 ! videoconvert ! "
                                                  "glupload ! gleffects effect=0 ! "
                                                  "fakesink sync=1 name=video1", nullptr));
Video size should be set to video’s frame size.
Experimentally, this software also supports rendering some overlay on the Oculus Rift screen. We are using this option to render our robot's state icons, but it can be configured to render some other information. Program recevies message on UDP port, parses it and displays some information on the screen. Please check udp_receiver.h and gl_renderer.cpp files to configure your own overlay.
For our case UDP robot status port allows to configure network port on which robot sends its status to this software, like battery level, etc.
When program starts two windows will appear. One of these is responsible for rendering video in stereo mode for Oculus Rift headset. The second window is configuration window. This window gives a lot of rendering configuration options. It looks like below:

Chromatic aberration panel allows to setup parameters for fixing chromatic aberration in Oculus Rift headset. Mask texture is very important part. Chromatic aberration is mostly visible in regions some distance away from lens' optical axis. Texture mask simulates lens in headset. White color on this mask mean that in these regions chromatic aberration has to be corrected at maximum level. Black color means that there is no need for chromatic aberration correction.
Chromatic aberration correction is done by splitting color channels and adding a small offset to each of them. It can be seen at picture below:

Below texture mask there are six values which can be configured to correct chromatic aberration. Feel free to experiment with them to obtain the best results for you.
GUI displays robot’s state. If robot is not connected GUI is automatically hid.
Under Video camera panel it is possibility to configure video width, height and position on screen. Two configurations can be set, and then you can select one of them.
Save settings button saves all settings to configuration file. This file is then loaded on application startup, and settings are restored.